Seagate STBN100 Seagate Business Storage 1-Bay, 2-Bay, and 4-Bay NAS Administr - Page 11
Completing the Basic Setup Tasks, Creating User Accounts
 |
View all Seagate STBN100 manuals
Add to My Manuals
Save this manual to your list of manuals |
Page 11 highlights
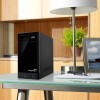
Setting Up Your Seagate® NAS Getting Started Tasks • Service: Set up your NAS as a Media Server. • Advanced Settings: Add new volumes, change RAID settings, enable power settings, enable virtualization (iSCSI), and add printers. To initially set up your Seagate NAS, you need to complete the Basic and Protection tasks. To learn how to set up your Seagate NAS as a media server and configure other advanced settings, go to "Customizing Your Seagate® NAS" on page 19. Completing the Basic Setup Tasks Complete the following tasks to set up your NAS. To review information about these tasks in the NAS Manager, go to Home > Getting Started. Click a link on the Getting Started page to go directly to the task you want to complete. Creating User Accounts Your Seagate NAS comes with one administrator account only. Your next step is to use the NAS Manager application to create individual user accounts. Note: When you create user accounts you'll also need to assign each user to the default shared folders (Download and Public) or the new shares you create. In the NAS Manager, go to Users & Groups > Users, and then click the Add User. You need to supply the following information for each user account that you create. • User Name: The name the user enters when logging into the NAS Manager. • Admin Rights: You can assign another individual administrator rights to help you monitor and manager activities on your Seagate NAS. • Full Name: The user's first and last name. • Password and Confirm Password: Enter up to 16 alphanumeric characters. • Group Membership: If groups exists, assign each user to a group. See "Creating User Groups" on page 13. • Create User Private Share: You can quickly create a private share (shared folder) for each user. The private share has the same name as the user name and a password is required to access the share. A private share can be used (for example) by each user to back up their local data, save pictures and videos, etc. • Volume: Which volume (if there is more than one) the private share should be created in. • Services: Which type(s) of file service should be supported by the private share: • CIFS (Common Internet File System): People with different computers running Windows operating systems can share files without having to install special software. • FTP (File Transfer Protocol): Provides secure file sharing over the internet between your Seagate NAS and other computers. Seagate Business Storage NAS Administrator Guide 11
-
 1
1 -
2
-
3
-
4
-
5
-
 6
6 -
 7
7 -
 8
8 -
 9
9 -
 10
10 -
 11
11 -
 12
12 -
 13
13 -
 14
14 -
 15
15 -
 16
16 -
17
-
18
-
19
-
20
-
21
-
22
-
23
-
24
-
25
-
26
-
27
-
28
-
29
-
30
-
31
-
32
-
33
-
34
-
35
-
36
-
37
-
38
-
39
-
40
-
41
-
42
 |
 |
