Sealey SAC125 Instruction Manual - Page 2
fig.1, fig.2
 |
View all Sealey SAC125 manuals
Add to My Manuals
Save this manual to your list of manuals |
Page 2 highlights
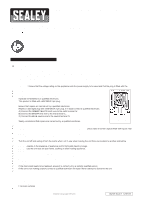
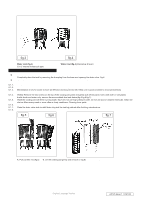
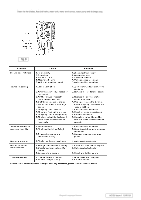
9 The castor wheels must be attached before use. NOTE: This appliance can be used by children aged from 8 years and above and persons with reduced physical, sensory or mental capabilities or lack of experience and knowledge if they have been given supervision or instruction concerning use of the appliance in a safe way and understand the hazards involved. Children shall not play with the appliance. Cleaning and user maintenance shall not be made by children without supervision. 2. INTRODUCTION Portable, robust commercial air cooling unit. The cooler uses water evaporation technology with air movement to provide more economical cooling without refrigerants. Three easy touch wind speeds for desired air flow as well as three different modes. Fully closable louvres and auto vertical louvre with long distance air throw. Large 125L water tank with inlet float value and shortage alarm. Easy clean with removable high quality dust filters and honeycomb cooling pads on all three sides. Large wheels make it easily transportable to any indoor or outdoor application. 3. SPECIFICATION Model no SAC125 Power 250W Max. airflow 9000m³/h Supply 230V A B C D E 33.9 (860) 56.1 (1425) 20.9 (530) 22.8 (580) 22.4 (570) Sizes shown are Inches (mm) 4. ASSEMBLY Take out unit carefully from package, check the product to see if any part is damaged, if so contact your Sealey stockist immediately. Before use of the product, the product needs to be assembled as in the fig.1 NO Description Quantity 1 Wheel with brake 2 2 Water tank bracket 2 3 Screws ST5*25 32 4 Wheel without brake 2 fig.1 5. OPERATION 5.1. FILL WATER TANK ‰ WARNING! disconnect from mains supply before filling the water tank. IMPORTANT! DO NOT use water with any chemical additives added. Water must be cold or lukewarm. DO NOT use water above 40°C. NOTE: Make sure that the water level in the tank does not go above the 'MAX' level indicated on the sight window located in the front bottom tank near filling point. 5.1.1. Once water is filled, take extra care to ensure that you don't tilt the cooler. Push the unit gently if you wish to move it to a new position 5.1.2. Keep the unit on a flat, stable ground without any obstacles near it. 5.1.3. C onnect to the mains supply. 5.2. LIGHT (LED) INDICATORS: High / Middle / Low (Fig.2.1): light shows the currently set airspeed level. Power (Fig.2.2): light is on when the unit is powered. Cool (Fig.2.3): light is on when the unit is working in cooling mode. Swing light (Fig.2.4) is on when the vertical louvres are oscillating. Shortage of Water (Fig.2.5):The light will flicker if the water goes below the minimum requirement. If the water level is not brought up to normal after 15 seconds the light will remain on and the pump and cooling will shut off. fig.2 5.3. PUSH-BUTTON (KEYS) 5.3.1. ON/OFF: Press the ON/OFF button to start the unit Press the ON/OFF button again if the "Standby" mode is needed. 5.3.2. Wind Speed: Set the desired air flow speed of the Evaporative Cooler by pressing the "Wind Speed" button, the indicator light will show. 5.3.3. "High", "Middle" or "Low" accordingly. Cool: Press the COOL key during the "Standby" mode. The cooling indicator light will stay on, then flash, the pump will start and then the machine will start. This will take approximately 30 seconds. 5.3.4. SWING: Press the SWING button to start or stop the vertical louvres from oscillating. 5.4. ALARMS See also lights 5.2 5.4.1. WATER SHORTAGE ALARM: If the water level in the tank goes below minimum the Evaporative Cooler will beep and the "SHORTAGE OF WATER" light will flicker. If the water level is not brought back up to the normal level after 15 seconds, the "SHORTAGE OF WATER" light will keep on, the pump and the cooling will shut off. Note: The Fan and Swing will still remain operable when the Cooling is shut off. © Jack Sealey Limited Original Language Version SAC125 Issue 1 12/01/23
-
 1
1 -
 2
2 -
 3
3 -
 4
4 -
 5
5
 |
 |