Sharp 2652H VX-2652H/1652H Operation Manual - Page 9
Ink Ribbon Replacement - manual
 |
UPC - 074000016941
View all Sharp 2652H manuals
Add to My Manuals
Save this manual to your list of manuals |
Page 9 highlights
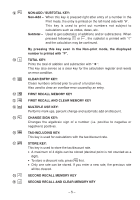
INK RIBBON REPLACEMENT 1. Remove the paper roll from the calculator. (Tear the paper and remove it from the print mechanism by using .) 2. Set the power switch to OFF. Make sure that the print wheel has stopped. 3. Remove the printer cover by sliding it towards the back of the calculator. (Fig. 1) 4. Remove the used ribbon. 5. Install the new ribbon. 6. With the black side of the ribbon facing upwards, place one of the reels on the reel shaft on the right. (Fig. 2) Make sure that the reel is securely in place. 7. Thread the ribbon around the outside of the metal guides. (Fig. 3) 8. Take up any slack by manually turning one of the reels. 9. Replace the printer cover. 10. Replace the paper roll. Printer cover Ink ribbon Fig. 1 Fig. 2 Reel Reel shaft Ink ribbon Fig. 3 - 7 -
-
 1
1 -
2
-
3
-
 4
4 -
 5
5 -
 6
6 -
 7
7 -
 8
8 -
 9
9 -
 10
10 -
 11
11 -
 12
12 -
 13
13 -
 14
14 -
15
-
16
-
17
-
18
-
19
-
20
-
21
-
22
-
23
-
24
-
25
-
26
-
27
-
28
-
29
-
30
-
31
-
32
-
33
-
34
-
35
-
36
-
37
-
38
-
39
-
40
 |
 |
