Sharp 45D40U Service Manual - Page 8
Part names, Appendix, Remote control unit, Removing the stand - lc settings
 |
UPC - 074000363199
View all Sharp 45D40U manuals
Add to My Manuals
Save this manual to your list of manuals |
Page 8 highlights
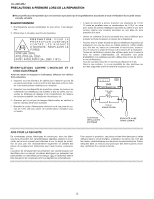
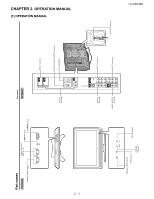
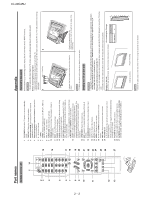
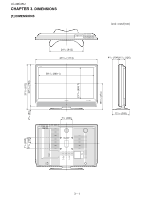
LC-40C45U 2 - 2 Part names Remote control unit 1 14 2 3 4 5 6 7 8 9 10 11 12 13 1 TV POWER: Switch the TV power on or enters standby mode. 2 DISPLAY: Display the channel information. 3 SOURCE POWER: Turns the power of the external equipment on and off. 4 External equipment operational buttons: Operate the external equipment. 5 0 - 9: Set the channel. 6 • (DOT): 15 7 INPUT: Select a TV input source. (TV, INPUT 1, INPUT 2, INPUT3, INPUT4, INPUT5) 8 VOL + / - : Set the volume. 9 SURROUND: Select Surround settings. 16 10 FREEZE: Set the still image. Press again to return to normal screen. 11 EXIT: Turn off the menu screen. 12 SLEEP: Set the sleep timer. 13 AUDIO: Selects the MTS/SAP or the audio mode during multi-channelaudio broadcasts. 14 FUNCTION: Switches the remote control for TV, CBL/ 17 SAT, VCR, DVD and AUDIO operation. Indicator lights up for the current mode. 18 * To enter the code registration mode, you need to press FUNCTION and DISPLAY at the same time. 15 LIGHT : When pressed all buttons on the remote 19 control unit will light. The lighting will turn off if no operations are performed within about 5 seconds. This 20 button is used for performing operations in low-light situations. 16 VIEW MODE: Select the screen size. 21 17 ENT: Jumps to a channel after selecting with the 0-9 buttons. 22 18 FLASHBACK: Return to the previous channel or input external mode. 23 19 CH / : Select the channel. 20 MUTE: Mute the sound. 24 21 MENU: Display the menu screen. 22 / / / /ENTER: Select a desired item on the 25 screen. 23 RETURN: Return to the previous menu screen. 26 24 FAVORITE CH A, B, C, D: Select four preset favorite channels in four different categories. While watching, you can toggle the selected channels by pressing A, B, C and D 27 25 FAVORITE: Register favorite channel. 26 CC: Display captions from a closed-caption source. 27 AV MODE: Select an audio or video setting. (STANDARD, MOVIE,GAME, USER,DYNAMIC(Fixed), DYNAMIC.) Appendix Removing the stand Before detaching (or attaching) stand, unplug the AC cord from the AC INPUT terminal. CAUTION • Do not remove the stand from the TV unless using an optional wall mount bracket to mount it. Before attaching/detaching stand • Before performing work make sure to turn off the TV. • Before performing work spread cushioning over the base area to lay the TV on. This will prevent it from being damaged. 1 hex key 2 Unfasten the four screws used to secure the stand in place. Detach the stand from the TV. (Hold the stand so it will not drop from the edge of the base area.) NOTE • To attach the stand, perform the above steps in reverse order. Setting the TV on the wall CAUTION • Installing the TV requires special skill that should only be performed by qualie- d service personnel. Customers should not attempt to do the work themselves. SHARP bears no responsibility for improper mounting or mounting that results in accident or injury. Using an optional bracket to mount the TV • You can ask a qualie- d service professional about using an optional AN-37AG2 bracket to mount the TV to the wall. • Carefully read the instructions that come with the bracket before beginning work. Hanging on the wall About setting the TV angle AN-37AG2 wall mount bracket. (See the bracket instructions for details.) Angle of TV LC-40C45U 0° Vertical mounting Angular mounting NOTE • Detach the cable clamp on the rear of the TV when using the optional mount bracket.
-
 1
1 -
2
-
 3
3 -
 4
4 -
 5
5 -
 6
6 -
 7
7 -
 8
8 -
 9
9 -
 10
10 -
 11
11 -
 12
12 -
 13
13 -
14
-
15
-
16
-
17
-
18
 |
 |
