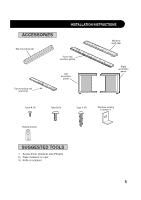
Sharp AF-Q60RX AF-Q60RX AF-Q80RX Operation Manual - Page 7
FIG.5A, FIG.5B, FIG.3, FIG.4 - screws
 |
View all Sharp AF-Q60RX manuals
Add to My Manuals
Save this manual to your list of manuals |
Page 7 highlights
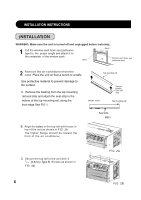
the unit. A. See FIG 3. FIG.3 6 7 B. Slide the left and right accordion panels into the top and bottom mounting rails.See FIG.4. FIG.4 4 Type C 8A and FIG.8B FIG.8A C.Attach the accordion panels to the case using 3 /1 4 (6.5mm)Type A screws on each side.FIG.5A, FIG.5B & FIG.11. FIG.5A FIG.5B SCREW FIG.8B SCREW SCREW SCREW
-
 1
1 -
 2
2 -
 3
3 -
 4
4 -
 5
5 -
 6
6 -
 7
7 -
 8
8 -
 9
9 -
 10
10 -
 11
11 -
 12
12 -
13
-
14
-
15
-
16
-
17
-
18
-
19
-
20
 |
 |

FIG.5A
FIG.5B
See FIG 3.
A.
C.
B.
6
7
Slide the left and right accordion panels into the
top and bottom mounting rails.See FIG.4.
Attach the accordion panels to the case using
3
Type A screws on each side.FIG.5A,
FIG.5B & FIG.11.
(6.5mm)
1
/
4
FIG.3
FIG.4
SCREW
SCREW
SCREW
SCREW
FIG.8A
8A and FIG
Type C
4
.8B
FIG.8B
the unit.