Sharp AF-R100EX AF-R100EX , AF-R120EX Operation Manual - Page 5
Suggested Tools, Installation, Warning, Caution
 |
View all Sharp AF-R100EX manuals
Add to My Manuals
Save this manual to your list of manuals |
Page 5 highlights
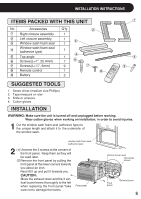
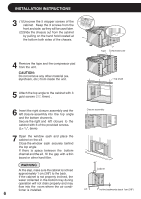
INSTALLATION INSTRUCTIONS ITEMS PACKED WITH THIS UNIT No. Accessories Q'ty 1 Right closure assembly 1 2 Left closure assembly 1 ! 3 Window sash foam seal 1 Window sash foam seal 4 (adhesive type) 1 " 5 Top angle 1 6 Screws(L=1", 25.4mm) 7 $ 7 Screws(L=1/4", 6mm) 9 % 8 Remote control 1 & 9 Battery 2 5 ' SUGGESTED TOOLS 1. Screw driver (medium size Phillips) 2. Tape measure or ruler 3. Knife or scissors 4. Cotton gloves INSTALLATION WARNING: Make sure the unit is turned off and unplugged before working. Wear cotton gloves when working on installation, in order to avoid injuries. 1 Cut the window sash foam seal (adhesive type) to the proper length and attach it to the underside of the window sash. window sash foam seal (adhesive type) 2 (1) Unscrew the 2 screws at the corners of the front panel. Keep them as they will be used later. (2)Remove the front panel by pulling the front panel at the lower corners towards you about an inch. Next lift it up and pull it towards you. CAUTION: Move the exhaust lever and the 3 vertical louver levers thoroughly to the left when replacing the front panel.Take care not to damage the levers. Front panel Vertical louver lever Horizontal Louver Front panel Exhaust Lever 5
-
 1
1 -
 2
2 -
 3
3 -
 4
4 -
 5
5 -
 6
6 -
 7
7 -
 8
8 -
 9
9 -
 10
10 -
 11
11 -
12
-
13
-
14
-
15
-
16
-
17
-
18
-
19
-
20
 |
 |
