Sharp AF-R120DX AF-R100DX , AF-R120DX , AF-R140DX Operation Manual - Page 14
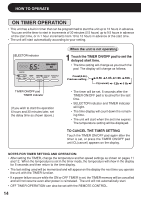
ON TIMER OPERATION, Touch the TIMER ON/OFF pad to set the, delayed start time.
 |
View all Sharp AF-R120DX manuals
Add to My Manuals
Save this manual to your list of manuals |
Page 14 highlights
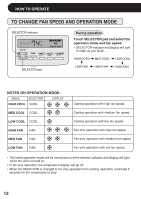
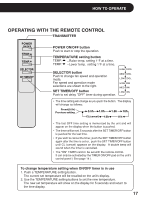
HOW TO OPERATE ON TIMER OPERATION • This unit has a built-in timer that can be programmed to start the unit up to 12 hours in advance. You can set the timer to start in increments of 30 minutes (0.5 hours) up to 9.5 hours in advance of the start time, or in 1 hour increments from 10 to 12 hours in advance of the start time. • The unit will start automatically according to your setting. SELECTOR indicator F hr SELECTOR COOL / FAN TEMP TIMER ON/OFF ENERGY SAVER POWER ON/OFF TIMER ON/OFF pad TIMER indicator (If you wish to start the operation 6 hours and 30 minutes later, set the delay time as shown above.) When the unit is not operating 1 Touch the TIMER ON/OFF pad to set the delayed start time. • The time setting will change as you touch the pad. The display will change as follows; Preset(0.5h) Previous setting 0.5h 1.0h 1.5h 10h CL(cancel) 12h 11h • The timer will be set, 5 seconds after the TIMER ON/OFF pad is touched for the last time. • SELECTOR indicator and TIMER indicator will light. • The time display will count down the remaining time. • The unit will start when the set time expires. The temperature setting will be displayed. TO CANCEL THE TIMER SETTING Touch the TIMER ON/OFF pad again after the timer is set, or press the TIMER ON/OFF pad until CL(cancel) appears on the display. NOTES FOR TIMER SETTING AND OPERATION: • After setting the TIMER, change the temperature and fan speed settings as shown on pages 11 and 12. When the temperature is set in the timer mode, the temperature will show in the display for 5 seconds and then return to the time display. • The last setting used will be memorized and will appear on the display the next time you operate the unit with the TIMER function. • If a power failure occurs while the ON or OFF TIMER is set, the TIMER memory will be cancelled and will not resume even after power is reinstated. The unit will not automatically start. • OFF TIMER OPERATION can also be set with the REMOTE CONTROL. 14
-
 1
1 -
2
-
3
-
4
-
5
-
6
-
7
-
8
-
 9
9 -
 10
10 -
 11
11 -
 12
12 -
 13
13 -
 14
14 -
 15
15 -
 16
16 -
 17
17 -
 18
18 -
 19
19 -
20
 |
 |
