Sharp AL-1200 AL-1041 AL-1200 Operation Manual - Page 32
Copier lens cleaning
 |
View all Sharp AL-1200 manuals
Add to My Manuals
Save this manual to your list of manuals |
Page 32 highlights
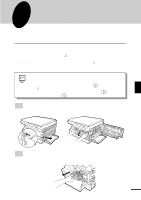
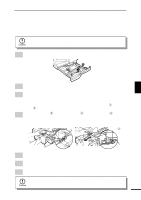
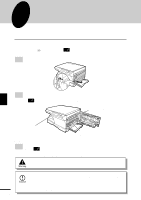
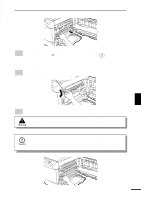
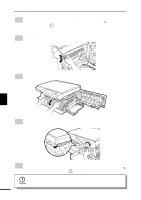
USER MAINTENANCE Copier lens cleaning If white lines appear on copies from top edge to bottom edge, do the following test. Make a reduction or enlargement copy and check to see if the position of the white lines change on the copy paper. If the lines appear in the same position, clean the copier lens using the following procedure. When you open the front cover to clean the lens, be sure to finish cleaning and close the front cover as soon as possible in order to minimize exposure of the drum cartridge to external light. 1 Pull the paper tray out and take the lens cleaning tool out of the tray. Be careful not to touch the brush portion of the tool. Lens cleaning tool Supplies and user maintenance 2 Ensure that the bypass tray is open and then press the side cover open button to open the cover. Push gently on both sides of the front cover and open the cover. 5 3 Press the lock release button on the TD cartridge and remove the cartridge from the machine (refer to page 27, step 2) and then grasp the handle of the drum cartridge and gently pull the cartridge to remove it from the machine (refer to page 28, step 3). Handle the cleaning tool by holding the end of the lens cleaner rod q and the rod guide w. 4 Place the rod guide w onto the copier frame e and align the groove r on the right side of the cleaning brush with the guide inside the copier. Use the lens cleaner rod to push the lens cleaner all the way into the copier and then pull it back. Make sure that the groove follows the guide within the copier. Repeat this action 2 or 3 times. Groove Rod guide Guide 5 Replace the lens cleaning tool into the front of the paper tray. Gently push the paper tray back into the copier. 6 Reinstall the drum cartridge (refer to page 29, step 4) and the TD cartridge (refer to page 13, step 6). 7 Close the front cover and then close the side cover by pressing the round projections near the side cover open button. When closing the covers, be sure to close the front cover securely and then close the side cover. If the covers are closed in the wrong order, the covers may be damaged. 31
-
 1
1 -
2
-
3
-
4
-
5
-
6
-
7
-
8
-
9
-
10
-
11
-
12
-
13
-
14
-
15
-
16
-
17
-
18
-
19
-
20
-
21
-
22
-
23
-
24
-
25
-
26
-
 27
27 -
 28
28 -
 29
29 -
 30
30 -
 31
31 -
 32
32 -
 33
33 -
 34
34 -
 35
35 -
 36
36 -
 37
37 -
38
-
39
-
40
-
41
-
42
-
43
-
44
-
45
-
46
-
47
 |
 |
