Sharp AR M207 Operation Manual - Page 4
Print, Basic Printing
 |
View all Sharp AR M207 manuals
Add to My Manuals
Save this manual to your list of manuals |
Page 4 highlights
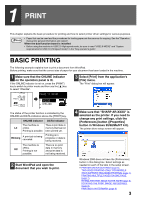
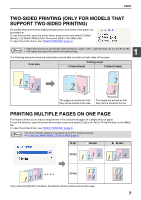
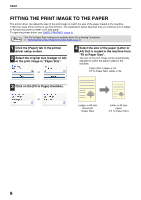
1 PRINT This chapter explains the basic procedure for printing and how to select printer driver settings for various purposes. Note • Paper that can be used and the procedures for loading paper are the same as for copying. See the "Operation manual (for general information and copier)". When the dual function board is installed • Before using the machine in USB 2.0 High-speed mode, be sure to read "USB2.0 MODE" and "System requirements for USB 2.0 (Hi-Speed mode)" in the "Key operator's guide". BASIC PRINTING The following example explains how to print a document from WordPad. Before printing, make sure that the correct size of paper for your document has been loaded in the machine. 1 Make sure that the ONLINE indicator on the operation panel is lit. If the ONLINE indicator is not on, press the [PRINT] key to switch to printer mode and then use the [ ] key to select "ONLINE". COPY Ready to print. ON LINE DATA PRINT ONLINE OFFLINE SCAN 3 Select [Print] from the application's [File] menu. The "Print" dialog box will appear. The status of the printer function is indicated by the ONLINE and DATA indicators above the [PRINT] key. ONLINE indicator DATA indicator The machine is There is print data in Lit online. memory that has not Printing is possible. been printed yet. Blinking A print job is being canceled. Printing is in progress or data is being received. The machine is Off offline. Printing is not possible. There is no print data in memory and print data is not being received. 2 Start WordPad and open the document that you wish to print. 4 Make sure that "SHARP AR-XXXX" is selected as the printer. If you need to change any print settings, click the [Preferences] button ([Properties] button in Windows 95/98/Me/NT 4.0). The printer driver setup screen will appear. Windows 2000 does not have the [Preferences] button in this dialog box. Select settings as needed on each of the tabs in the setup screen. PRINTER DRIVER SETTINGS (page 6), TWO-SIDED PRINTING (ONLY FOR MODELS THAT SUPPORT TWO-SIDED PRINTING) (page 7), PRINTING MULTIPLE PAGES ON ONE PAGE (page 7), FITTING THE PRINT IMAGE TO THE PAPER (page 8), ROTATING THE PRINT IMAGE 180 DEGREES (page 9), PRINTING A WATERMARK (page 9) 3
-
 1
1 -
 2
2 -
 3
3 -
 4
4 -
 5
5 -
 6
6 -
 7
7 -
 8
8 -
 9
9 -
 10
10 -
11
-
12
-
13
-
14
-
15
-
16
-
17
-
18
-
19
-
20
-
21
-
22
-
23
-
24
-
25
-
26
-
27
-
28
-
29
-
30
-
31
-
32
-
33
-
34
-
35
 |
 |