Sharp AR M550U AR-M550 AR-M620 AR-M700 Operation Manual
Sharp AR M550U - B/W Laser - Copier Manual
 |
View all Sharp AR M550U manuals
Add to My Manuals
Save this manual to your list of manuals |
Sharp AR M550U manual content summary:
- Sharp AR M550U | AR-M550 | AR-M620 | AR-M700 Operation Manual - Page 1
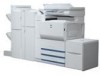
MODEL AR-M550U AR-M620U AR-M700U AR-M550N AR-M620N AR-M700N (Option) Saddle stitch finisher + Punch module + Inserter + Large capacity tray DIGITAL LASER COPIER/PRINTER DIGITAL MULTIFUNCTIONAL SYSTEM OPERATION MANUAL (for general information and copier operation) Page PART 1: GENERAL INFORMATION - Sharp AR M550U | AR-M550 | AR-M620 | AR-M700 Operation Manual - Page 2
compliance with FCC regulations. Model Number: AR-M550U/AR-M550N/AR-M620U/AR-M620N/AR-M700U/AR-M700N AR-M550U J/AR-M550N J/AR-M620U J/AR-M620N J/AR-M700U J/AR-M700N J Declaration of Conformity This device complies with Part 15 of the FCC rules. Operation is subject to the following two conditions - Sharp AR M550U | AR-M550 | AR-M620 | AR-M700 Operation Manual - Page 3
Part 1: General Information - Sharp AR M550U | AR-M550 | AR-M620 | AR-M700 Operation Manual - Page 4
- Sharp AR M550U | AR-M550 | AR-M620 | AR-M700 Operation Manual - Page 5
2004) Model Product configuration AR-M550U/AR-M620U/AR-M700U Digital Laser Copier/Printer AR-M550N/AR-M620N/AR-M700N Digital Multifunctional System OPERATION MANUALS The following operation manuals are provided for the machine. Please read the appropriate manuals as needed for the features - Sharp AR M550U | AR-M550 | AR-M620 | AR-M700 Operation Manual - Page 6
space around the machine for servicing and proper ventilation. 6-1/8" (15cm) 11-13/16" (30cm) 23-5/8" (60cm) A small amount of ozone is produced within the printer during operation. The emission level have an objectionable odor, it is advisable to place the copier in a ventilated area. 0-2 - Sharp AR M550U | AR-M550 | AR-M620 | AR-M700 Operation Manual - Page 7
Driver's licenses Fusing unit Adjuster Lock Release Caution: This connector (A) is only intended for service purposes. Any connection to this terminal may cause malfunctions of the machine. Instruction for service of instances provided for by law, Sharp Corporation bears no responsibility for any - Sharp AR M550U | AR-M550 | AR-M620 | AR-M700 Operation Manual - Page 8
to 0.8 MILLIWATT PLUS 10 % and is maintained constant by the operation of the Automatic Power Control (APC). Caution Use of controls or adjustments result in hazardous radiation exposure. For North America: SAFETY PRECAUTIONS This Digital Equipment is rated Class 1 and complies with 21 CFR 1040.10 - Sharp AR M550U | AR-M550 | AR-M620 | AR-M700 Operation Manual - Page 9
2-15 REPLACING THE TONER CARTRIDGES 2-16 STORAGE Staple cartridge replacement and staple jam removal 3-7 G Removing a misfeed 3-11 G Troubleshooting finisher/saddle stitch finisher problems 3-13 INSERTER 3-14 G Part names 3-14 G Specifications 3-14 G Loading paper 3-15 G Manual operation - Sharp AR M550U | AR-M550 | AR-M620 | AR-M700 Operation Manual - Page 10
5-32 G Deleting a stored job program 5-32 INTERRUPTING A COPY RUN 5-33 CHAPTER 6 MACHINE MAINTENANCE (FOR COPYING) USER MAINTENANCE 6-2 G Cleaning the document glass and the automatic document feeder 6-2 TROUBLESHOOTING 6-3 CHAPTER 7 DOCUMENT FILING FUNCTION OVERVIEW 7-2 G Document filing - Sharp AR M550U | AR-M550 | AR-M620 | AR-M700 Operation Manual - Page 11
This chapter contains basic information that should be read before using the product. Page INTRODUCTION 1-2 MAIN FEATURES 1-3 PART NAMES AND FUNCTIONS 1-9 G Exterior 1-9 G Interior 1-10 G Operation panel 1-12 G Touch panel 1-13 Turning the power ON and OFF 1-16 AUDITING MODE 1-17 G Using - Sharp AR M550U | AR-M550 | AR-M620 | AR-M700 Operation Manual - Page 12
paper and remove misfeeds. It also explains how to use the copier and document filing functions. Separate manuals have been provided for the fax function, printer function, and network scanner function. I Original and paper sizes This machine allows use of standard sizes in both the inch and AB - Sharp AR M550U | AR-M550 | AR-M620 | AR-M700 Operation Manual - Page 13
page 1-4 G Staple sort mode See page 1-7 G Pamphlet Copy See page 1-4 (When the Finisher or Saddle stitch finisher is installed.) G Job Build See page 1-5 G Saddle stitch See page 1-7 G Tandem Copy See page 1-5 (When the Saddle stitch finisher is installed.) (AR-M550N, AR-M620N or AR-M700N - Sharp AR M550U | AR-M550 | AR-M620 | AR-M700 Operation Manual - Page 14
See page 4-18 Separate ratio settings can be selected for the length and width of a copy. Original Copy Dual Page Copy See page 5-5 The left and right pages of a book can be successively copied onto separate sheets. Book original Copy Margin Shift See page 5-3 Margins can be added to - Sharp AR M550U | AR-M550 | AR-M620 | AR-M700 Operation Manual - Page 15
machines can be used to run a large copy job in parallel. Multi Shot See page 5-23 Multiple original pages can be copied onto a single sheet of paper in a uniform layout. Originals (1-sided) Originals (2-sided) Copy 100 sheets 50 sets of copies 50 sets of copies *AR-M550N, AR-M620N or AR - Sharp AR M550U | AR-M550 | AR-M620 | AR-M700 Operation Manual - Page 16
Various steps of a copy operation can be stored as trouble of selecting those settings each time you wish to use them. JOB PROGRAMS PRESS PROGRAM NUMBER. RECALL B/W Reverse See page 5-30 White and black can be inverted on a copy to produce a negative image. Original Copy Interrupting a copy - Sharp AR M550U | AR-M550 | AR-M620 | AR-M700 Operation Manual - Page 17
or Saddle stitch finisher is installed. Staple sort mode See page 3-4 Sets of copies can be automatically stapled. Original Copy *When the Punch module is installed printed or transmitted. Document Image Save to machine's hard disk HDD Printed Call up a Transmitted saved file to reuse 1-7 - Sharp AR M550U | AR-M550 | AR-M620 | AR-M700 Operation Manual - Page 18
The preheat mode is the first level of power reduction. The power is reduced to the fuser unit a preset time after the machine has completed a job and no further machine operations have been performed. The machine can recover to the ready condition within a short period of time. The preset time to - Sharp AR M550U | AR-M550 | AR-M620 | AR-M700 Operation Manual - Page 19
two-sided originals can be scanned at once. 5 Front cover Open to replace toner cartridge. 6 Operation panel 7 Center tray (See page 4-9) Finished sheets are deposited here 8 Bypass tray Special papers (including transparency film) and copy paper can be fed from the bypass tray. 9 Power switch (See - Sharp AR M550U | AR-M550 | AR-M620 | AR-M700 Operation Manual - Page 20
cartridge*2 This holds toner for printing. The toner cartridge must be replaced when indicated on the operation panel. 18 Main power switch (See page 1-16) Keep this switch turned on when the fax option or network scanner option is installed. 19 Right side cover Open when a misfeed has occurred - Sharp AR M550U | AR-M550 | AR-M620 | AR-M700 Operation Manual - Page 21
PART NAMES AND FUNCTIONS I Other optional equipment GPrinter expansion kit (AR-P19) This is required to add the printer function to models that do not include the printer function as a standard feature. The kit includes a network interface that allows the machine to be used as a network printer. - Sharp AR M550U | AR-M550 | AR-M620 | AR-M700 Operation Manual - Page 22
PART NAMES AND FUNCTIONS Operation panel 1 Touch panel The machine status, messages and touch keys are displayed on the panel. The document filing, copy, network scanner*1, and fax user names and folder names for the document filing function, and to configure the key operator programs and printer - Sharp AR M550U | AR-M550 | AR-M620 | AR-M700 Operation Manual - Page 23
selection without further operation. [Example 2] DUAL PAGE COPY TANDEM COPY Copier feature G Dual page copy G Job build G Tandem copy G Mirror image operator program. (See page 10 of the key operator's guide.) [Example 3] READY TO SCAN FOR COPY. A corresponding icon SPECIAL MODES 2-SIDED COPY - Sharp AR M550U | AR-M550 | AR-M620 | AR-M700 Operation Manual - Page 24
PART NAMES AND FUNCTIONS I Job status screen (common to print, copy, fax, network scan and Internet fax) This screen is displayed when the [JOB STATUS] key on the operation panel is pressed. This screen can be used to display the "JOB QUEUE" (showing stored jobs and the current job) or the " - Sharp AR M550U | AR-M550 | AR-M620 | AR-M700 Operation Manual - Page 25
PART NAMES AND FUNCTIONS 3 [PRINT JOB] key This displays the print job list of print mode (copying, printing, fax reception, Internet fax reception, and self printing). 4 [E-MAIL/FTP] key This displays the transmission status and finished jobs of scan mode (Scan to e-mail, Scan to FTP, and - Sharp AR M550U | AR-M550 | AR-M620 | AR-M700 Operation Manual - Page 26
. (Be sure to keep ON when using the fax function.) Power switch : Turn to ON position before using the machine. Turn OFF at night when the machine is not used. Main power switch ON, Power switch ON The copy, printer, fax*, Internet fax*, network scanner*, and document filing functions can be - Sharp AR M550U | AR-M550 | AR-M620 | AR-M700 Operation Manual - Page 27
be viewed and totaled as needed. - Sharp AR M550U | AR-M550 | AR-M620 | AR-M700 Operation Manual - Page 28
- Sharp AR M550U | AR-M550 | AR-M620 | AR-M700 Operation Manual - Page 29
CHAPTER 2 MANAGING THE MACHINE This chapter explains how to load paper, replace the toner cartridge, and remove paper large capacity tray 2-5 G Specifications (optional large capacity tray 2-5 G Loading paper in the bypass tray 2-6 G Specifications of paper trays (Types TROUBLESHOOTING 2-26 2-1 - Sharp AR M550U | AR-M550 | AR-M620 | AR-M700 Operation Manual - Page 30
or interfere with operation. G Load paper service technician). 1 Pull out paper tray 1-tray 2. 2 Load paper in the left and right trays. Gently pull the tray out until it stops. Indicator line Indicator line Lift the paper guide and load paper in tray 1.*1 Approximately 800 sheets of SHARP - Sharp AR M550U | AR-M550 | AR-M620 | AR-M700 Operation Manual - Page 31
machine. 2 Load paper into the tray. The paper stack must not be higher than the indicator line (no more than 500 sheets of SHARP standard it. 4 Gently push tray 3 into the machine. Push the tray firmly all the way into the machine. 2 Adjust the guide plates A and B by squeezing their lock levers - Sharp AR M550U | AR-M550 | AR-M620 | AR-M700 Operation Manual - Page 32
edge of the tabbed paper. (Tabbed paper cannot be used in tray 4.) 1 Take out the tabbed paper guide. The guide is stored inside the left side of the machine as shown. Be sure to replace the guide when you have finished using it. 3 Place the tabbed paper in the tray. Place the tabbed paper - Sharp AR M550U | AR-M550 | AR-M620 | AR-M700 Operation Manual - Page 33
SHARP standard service technician). 1 Pull the tray out until it stops. When the tray is in operation Specifications (optional large capacity tray) Name Paper size Paper weight Paper capacity (plain) Dimensions Power supply Weight Overall dimensions when attached to machine Large capacity tray (AR - Sharp AR M550U | AR-M550 | AR-M620 | AR-M700 Operation Manual - Page 34
, tabbed paper, and other special papers. When using SHARP standard paper, up to 100 sheets can be loaded copy paper all the way into the bypass tray. (Do not force the paper in.) Place the copy paper face up. If the bypass tray guides are set wider than the copy paper, the inside of the machine - Sharp AR M550U | AR-M550 | AR-M620 | AR-M700 Operation Manual - Page 35
loading plain paper other than SHARP standard paper, special media other than postcards, SHARP-recommended transparency film, or paper not use paper that has already been printed on by a plain paper fax machine or a laser printer. This may cause printed images to become dirty. G When printing on - Sharp AR M550U | AR-M550 | AR-M620 | AR-M700 Operation Manual - Page 36
of paper trays (Types and sizes of paper that can be used in the trays) The specifications for the types and sizes of paper that can be loaded in the paper trays are shown below. Tray No. (tray name) Tray 1 Tray 2 Tray 3 - Sharp AR M550U | AR-M550 | AR-M620 | AR-M700 Operation Manual - Page 37
or A5 paper, the orientation must be landscape. • Use SHARP recommended paper. • Use only tabbed sheets that are made of machine. Please consult your retailer or your dealer when buying paper. G The image quality and toner fusibility of special papers may change due to ambient conditions, operating - Sharp AR M550U | AR-M550 | AR-M620 | AR-M700 Operation Manual - Page 38
. RINT SETTINGS TA ORWARD PRINTER CONDITION 3 Display the setting screen of the desired paper tray. CUSTOM SETTINGS PAPER TRAY SETTINGS TYPE / SIZE TRAY 1 PLAIN / 81/2x11 PRINT COPY DOC. FAX I-FAX FILING OK FIXED PAPER SIDE 1/8 DISABLE DUPLEX DISABLE STAPLE DISABLE PUNCH Touch the key - Sharp AR M550U | AR-M550 | AR-M620 | AR-M700 Operation Manual - Page 39
programs (page 11 of the Key operator's guide), do not use this setting. "DISABLE DUPLEX": Prohibits two-sided printing. Enable when the back side of the paper cannot be printed on. "DISABLE STAPLE": Prohibits stapling. Enable when using special papers such as transparency film and label sheets - Sharp AR M550U | AR-M550 | AR-M620 | AR-M700 Operation Manual - Page 40
LOADING PAPER Setting the paper size when a special size is loaded NOTE Special sizes of paper cannot be loaded in trays 1, 2, 4 and 5. Trays 3 and the bypass tray 1 Perform steps 1 through 5 of "Setting the paper type and paper size" (see page 2-10). 2 Touch the [SIZE INPUT] key and then touch - Sharp AR M550U | AR-M550 | AR-M620 | AR-M700 Operation Manual - Page 41
for the printer function (see the Operation manual (for printer)). G Document filing control*3 Used to configure default settings for the document filing function. (pages 7-22 to 7-25) G Key operator programs These are programs that are used by the key operator (administrator of the machine) to - Sharp AR M550U | AR-M550 | AR-M620 | AR-M700 Operation Manual - Page 42
, touch the [EXIT] key. CUSTOM SETTINGS EXIT TOTAL COUNT DEFAULT SETTINGS LIST PRINT FAX DATA ADDRESS CONTROL SENDER CONTROL RECEIVE/FORWARD DOCUMENT FILING CONTROL KEY OPERATOR PROGRAMS PAPER TRAY SETTINGS PRINTER CONDITION More information on setting procedures In the following type of - Sharp AR M550U | AR-M550 | AR-M620 | AR-M700 Operation Manual - Page 43
machine settings and a test page to check resident fonts. The following lists and pages are available: GAll custom setting list Shows the hardware status, software status, printer or disabled for each tray, and for printer mode, copy mode, fax mode, Internet fax mode, and document filing mode. To - Sharp AR M550U | AR-M550 | AR-M620 | AR-M700 Operation Manual - Page 44
cartridge must be replaced. NOTE To view the approximate amount of toner remaining, hold down the operation guide key or the [COPY] key during printing or when the machine is on standby. The percentage of toner remaining will appear in the display while you hold down the key. When the percentage - Sharp AR M550U | AR-M550 | AR-M620 | AR-M700 Operation Manual - Page 45
the user include paper, toner cartridges, and staple cartridges for the finisher. For best copying results, be sure to use only Sharp Genuine . Spare parts are those parts of the apparatus which may break down within the scope of the ordinary use of the product - whereas those parts which normally - Sharp AR M550U | AR-M550 | AR-M620 | AR-M700 Operation Manual - Page 46
in the touch panel display of the operation panel and printing including copying and facsimile output will stop. The approximate when a misfeed occurs, and thus any faxes or Internet faxes received at this time will be temporarily held in memory. The faxes will print out automatically as soon as - Sharp AR M550U | AR-M550 | AR-M620 | AR-M700 Operation Manual - Page 47
fusing unit is hot. Take care in removing paper. (Do not touch the metal parts.) 1 Remove the duplex unit. Grasp the finger hold and gently open the unit. unit open may adversely affect the photo-sensitive drum and cause poor copy quality. Be careful not to tear the misfed paper during removal. - Sharp AR M550U | AR-M550 | AR-M620 | AR-M700 Operation Manual - Page 48
unit, confirm that the misfeed message has been cleared and the normal display appears. 3 Remove the misfed paper. Misfeed in upper part of unit Be careful not to tear the misfed paper during removal. Misfeed in lower part of unit Be careful not to tear the misfed paper during removal. 2-20 - Sharp AR M550U | AR-M550 | AR-M620 | AR-M700 Operation Manual - Page 49
you open the tray without checking, the partially fed paper may tear and leave torn pieces in the machine, increasing the difficulty of removal. I Misfeed in paper tray 1 - tray 2 1 Remove the duplex (left-side tray)... Lift the paper guide and remove the misfed paper. Be sure to replace the paper - Sharp AR M550U | AR-M550 | AR-M620 | AR-M700 Operation Manual - Page 50
paper tray 3 1 Remove the duplex unit. Grasp the finger hold and gently open the unit. 5 Close the lower cover on the left side of the machine. 2 Remove the misfed paper. Turn roller rotating knob A in the direction of the arrow to remove the misfed paper. Roller rotating knob A 3 Open the lower - Sharp AR M550U | AR-M550 | AR-M620 | AR-M700 Operation Manual - Page 51
MISFEED REMOVAL I Misfeed in the bypass tray 1 Remove the misfed paper from the bypass tray. Be careful not to tear the misfed paper during removal. 5 Remove the misfed paper. Check the paper transfer unit inside the tray and remove any misfed paper. 2 If you did not find a misfeed in step - Sharp AR M550U | AR-M550 | AR-M620 | AR-M700 Operation Manual - Page 52
MISFEED REMOVAL I Misfeed in the tray 5 1 Open the side cover. 6 Open the top cover and remove the misfed paper. After removing the misfed paper, close the top cover. 2 Remove the misfed paper. Be careful not to tear the misfed paper during removal. 7 Remove tray 1 - tray 2. Grasp the finger hold - Sharp AR M550U | AR-M550 | AR-M620 | AR-M700 Operation Manual - Page 53
feeder cover. Opening and closing the cover clears the misfeed display. Copying cannot be resumed until this step is performed. However, this step Misfeed in the transfer unit Open the document transfer cover, hold the paper guide open, and remove the misfed original. G Misfeed in the document exit - Sharp AR M550U | AR-M550 | AR-M620 | AR-M700 Operation Manual - Page 54
switch, unplug the power cord. Problems related to general use of the machine are described below. For problems related to the copy function, see page 6-3. For problems related to document filing, see page 7-28. For fax, printer, and network scanner problems, see the manuals for those functions. For - Sharp AR M550U | AR-M550 | AR-M620 | AR-M700 Operation Manual - Page 55
TROUBLESHOOTING Problem sheets. The bypass guide is not adjusted to the Adjust the bypass guide to the size When printing on a special size of paper, part of the printed image is missing. The paper other than SHARPrecommended paper being used? Use SHARP-recommended paper. (Page 2-17) Paper - Sharp AR M550U | AR-M550 | AR-M620 | AR-M700 Operation Manual - Page 56
TROUBLESHOOTING Problem Check Solution or cause Is paper other than SHARPrecommended paper being used? Use SHARP the screen contrast using "DISPLAY CONTRAST" in "DEFAULT SETTINGS" of the custom settings. (Page " in the key operator programs (page 11 of the Key operator's guide), load the paper - Sharp AR M550U | AR-M550 | AR-M620 | AR-M700 Operation Manual - Page 57
and finisher functions 3-6 G Staple cartridge replacement and staple jam removal 3-7 G Removing a misfeed 3-11 G Troubleshooting finisher/saddle stitch finisher problems 3-13 INSERTER 3-14 G Part names 3-14 G Specifications 3-14 G Loading paper 3-15 G Manual operation of the inserter 3-15 - Sharp AR M550U | AR-M550 | AR-M620 | AR-M700 Operation Manual - Page 58
explanations, the finisher and saddle stitch finisher are referred to simply as "finisher". Part names Finisher (AR-F15) Saddle stitch finisher (AR-F16) Finisher (AR-F15) Saddle stitch finisher (AR-F16) 1 Tray Offset pages and stapled pages are delivered here. 2 Stapler compiler Paper to be - Sharp AR M550U | AR-M550 | AR-M620 | AR-M700 Operation Manual - Page 59
Separation from machine 15-3/4") (773 mm (W) x 630 mm (D) (Separation from machine 400 mm)) *For index paper, equivalent to 140-lbs. Name Punch module (AR-PN4A) -lbs. Specifications are subject to change for improvement without notice. NOTES G The following papers cannot be stapled and punched - Sharp AR M550U | AR-M550 | AR-M620 | AR-M700 Operation Manual - Page 60
will be delivered. Original Printouts Each set of copies is offset from the preceding set to allow easy separation. (The offset function operates in the finisher / saddle stitch finisher tray.) The offset function cannot be selected when the staple sort function is selected. Offset width : Approx - Sharp AR M550U | AR-M550 | AR-M620 | AR-M700 Operation Manual - Page 61
can automatically place two staples for centerline binding of prints or copies and fold them along operate. For the allowed paper sizes for punching, see the specifications on page 3-3. When using the punch function in copy mode, place the original with the top toward the inside of the machine - Sharp AR M550U | AR-M550 | AR-M620 | AR-M700 Operation Manual - Page 62
staple pages at the center and fold them in half to create a pamphlet. Touch this key to display the pamphlet copy setting screen (page 5-6). (This is only possible when a checkmark appears in the checkbox of the [AUTOMATIC SADDLE STITCH] key operator program (See page 12 of the key operator's guide - Sharp AR M550U | AR-M550 | AR-M620 | AR-M700 Operation Manual - Page 63
cover of the finisher. 4 Insert a new staple case into the cartridge. Push the staple case all the way in until it clicks into place. Do not remove the seal holding the staples until the staple case is set in the cartridge. NOTE Make a test print or copy in the staple sort mode to verify that - Sharp AR M550U | AR-M550 | AR-M620 | AR-M700 Operation Manual - Page 64
(AR-F16 machine and that 11" x 17", 8-1/2" x 11"R, or 8-1/2" x 14" (A3, A4R, or B4) size paper is loaded. If one of the above paper sizes is not set, test stapling cannot be performed. 7 Close the lower cover of the finisher. Test stapling is automatically performed on a blank sheet. This operation - Sharp AR M550U | AR-M550 | AR-M620 | AR-M700 Operation Manual - Page 65
" on page 3-7. 2 Holding the knob, lower part (A). 4 Holding the knob, return part (A) to its original position. Stapling area (A) (A) NOTE Do not touch the stapling area. The stapler could injure you. 3 Remove any jammed staples. 5 Return the staple case to its original position. Insert the - Sharp AR M550U | AR-M550 | AR-M620 | AR-M700 Operation Manual - Page 66
the machine and that 11" x 17", 8-1/2" x 11"R, or 8-1/2" x 14" (A3, A4R, or B4) size paper is loaded. If one of the above paper sizes is not set, test stapling cannot be performed. 8 Close the lower cover of the finisher. Test stapling is automatically performed on a blank sheet. This operation is - Sharp AR M550U | AR-M550 | AR-M620 | AR-M700 Operation Manual - Page 67
removal. 2 Remove the misfed paper from the main unit. After removing the misfed paper, perform steps 1 and 3 on page 219 to reset the machine. Close the upper cover of the finisher/ 7 3 saddle stitch finisher. 3 Open the upper cover of the finisher/ saddle stitch finisher. When an inserter - Sharp AR M550U | AR-M550 | AR-M620 | AR-M700 Operation Manual - Page 68
FINISHER AND SADDLE STITCH FINISHER 11Remove the misfed paper. Be careful not to tear the misfed paper during removal. 17Close the lower cover of the saddle stitch finisher. 12Close the entrance cover of the saddle stitch unit. 18Close the front cover of the inserter (only when an inserter is - Sharp AR M550U | AR-M550 | AR-M620 | AR-M700 Operation Manual - Page 69
STITCH FINISHER Troubleshooting finisher/saddle stitch finisher problems Check the list below before calling for service. Problem Check Solution or cause Stapling position is not correct (including saddle stitch). Stapling position not set properly? Check the stapling position setting - Sharp AR M550U | AR-M550 | AR-M620 | AR-M700 Operation Manual - Page 70
of the paper. 3 Top cover Open for misfeed removal. 4 Inserter operation panel Stapling and punching can be performed directly from the inserter operation panel without using the machine operation panel. 5 Paper guide lever Release the paper guide lock to remove misfed paper. 6 Front cover Open this - Sharp AR M550U | AR-M550 | AR-M620 | AR-M700 Operation Manual - Page 71
in the same top-bottom orientation as the original. Adjust the paper guide on the paper tray to the width of the paper. When using Manual operation of the inserter The inserter can be used for stapling or punching without performing a copy operation. These functions are selected at the operation - Sharp AR M550U | AR-M550 | AR-M620 | AR-M700 Operation Manual - Page 72
display If the [START] key indicator on the inserter operation panel is blinking and the [PUNCH] key or [STAPLE] key indicator is also blinking or solidly lit, operation will not start when the [START] key is pressed. Resolve the problem as indicated below, depending how the indicators are lit or - Sharp AR M550U | AR-M550 | AR-M620 | AR-M700 Operation Manual - Page 73
misfed paper during removal. 5 If a misfeed was not found in step 4, raise the paper guide lever. 9 Push the finisher to close the gap between the machine and the inserter. After attaching the inserter on the machine, make sure that the paper misfeed message has been cleared and the normal message - Sharp AR M550U | AR-M550 | AR-M620 | AR-M700 Operation Manual - Page 74
Troubleshooting inserter problems Check the list below before calling for service. Problem Check Solution or cause Stapling position is not correct (including saddle stitch). The desired staple sure that the punch or staple key has been selected on the operation panel of the inserter (page - Sharp AR M550U | AR-M550 | AR-M620 | AR-M700 Operation Manual - Page 75
Part 2: Copier Operation - Sharp AR M550U | AR-M550 | AR-M620 | AR-M700 Operation Manual - Page 76
- Sharp AR M550U | AR-M550 | AR-M620 | AR-M700 Operation Manual - Page 77
chapter explains the basic procedures for making copies, including selection of the copy ratio and other copy settings. Page AUTOMATIC DOCUMENT FEEDER 4-2 G Acceptable originals 4-2 PLACING ORIGINALS 4-3 CHECKING THE SIZE OF A PLACED ORIGINAL 4-5 G Manually setting the scanning size 4-5 STORING - Sharp AR M550U | AR-M550 | AR-M620 | AR-M700 Operation Manual - Page 78
originals into the machine, making continuous copying possible. In addition same width; however, some special functions may not operate correctly. I Size and weight of acceptable originals I the document feeder tray, be sure to remove any staples or paper clips. GIf originals have damp spots from - Sharp AR M550U | AR-M550 | AR-M620 | AR-M700 Operation Manual - Page 79
the document glass, and then gently close the document cover. 2 Adjust the original guides to the size of the originals. NOTE Do not place any objects under the The factory default setting is "INCH-1". The setting can be changed using "ORIGINAL SIZE DETECTOR SETTING" in the key operator programs. - Sharp AR M550U | AR-M550 | AR-M620 | AR-M700 Operation Manual - Page 80
(A4) size or staple sorting with the saddle stitch finisher, rotation will not be possible. [Example] Orientation of original Orientation of paper Copy after rotation Face down Face down GThis function operates in both the auto paper select or auto image mode. ("Rotation copy setting" can be - Sharp AR M550U | AR-M550 | AR-M620 | AR-M700 Operation Manual - Page 81
operator programs (see page 11 of the key operator's guide), automatic original detection at the document glass will not operate. In this case, follow the steps below to manually set the original scanning size. Manually This will save you the trouble of manually entering the size STANDARD SIZE - Sharp AR M550U | AR-M550 | AR-M620 | AR-M700 Operation Manual - Page 82
if the power is turned off. Storing a frequently used original size saves you the trouble of manually setting the size each time you copy that size of document. G To cancel an original size storing, using, or deleting operation, press the [CA] key or touch the [ORIGINAL] key on the screen. Storing - Sharp AR M550U | AR-M550 | AR-M620 | AR-M700 Operation Manual - Page 83
or A5)) are set and the auto paper select function is enabled. READY TO SCAN FOR COPY. If originals of a size other than the sizes above are 1. 81/2x11 2. 81/2x11 81/2x11 to be copied, manually PLAIN 3. 81/2x14 4. 11x17 PLAIN PLAIN PLAIN PLAIN 5. 81/2x11 PLAIN select the desired paper size - Sharp AR M550U | AR-M550 | AR-M620 | AR-M700 Operation Manual - Page 84
The 1-sided to 1-sided copying mode is set as the default in the initial settings. If the default setting has not been changed using the "Initial status settings" program (key operator program), steps 3 to 5 on page 4-7 can be omitted. To cancel copying... To cancel a copy job in progress, press the - Sharp AR M550U | AR-M550 | AR-M620 | AR-M700 Operation Manual - Page 85
G Grouping copies by page Original 4 SPECIAL MODES 2-SIDED COPY OUTPUT OUTPUT SORT GROUP 5 copies per page Set the number of copies (5) Touch the the appropriate key to select the desired output tray. OUTPUT SORT STAPLE SORT GROUP FINISHER TRAY OFFSET CENTER TRAY 0 OK SADDLE STITCH - Sharp AR M550U | AR-M550 | AR-M620 | AR-M700 Operation Manual - Page 86
document feeding function The machine can automatically copy two-sided originals, saving you the trouble of manually turning over each original page. Original Copy 1. Automatic two-sided copying from one-sided originals 2. Automatic two-sided copying from two-sided originals 3. Automatic - Sharp AR M550U | AR-M550 | AR-M620 | AR-M700 Operation Manual - Page 87
position for its size as shown above. 2 Ensure that the 1-sided to 1-sided copy mode is selected. ORIGINAL 81/2x11 The one-sided to onesided mode is selected sizes above are 1. 81/2x11 2. 81/2x11 81/2x11 to be copied, manually PLAIN 3. 81/2x14 4. 11x17 PLAIN PLAIN PLAIN PLAIN 5. 81/2x11 - Sharp AR M550U | AR-M550 | AR-M620 | AR-M700 Operation Manual - Page 88
COPY Group mode is the default mode. OUTPUT FILE To select sort mode, touch the [OUTPUT] key, touch the [SORT] key in the screen that appears, and then touch the [OK] key. 5 Use the numeric keys to set the desired number of copies [START] key. Repeat this operation until all originals have been - Sharp AR M550U | AR-M550 | AR-M620 | AR-M700 Operation Manual - Page 89
glass scale. GPlace the original in the appropriate position for its size as shown above. 2 Touch the [2-SIDED COPY] key. SPECIAL MODES 2-SIDED COPY OUTPUT When making automatic two-sided copies of a one-sided 11" x 17" (A3) or 8-1/2" x 14" (B4) size portrait original, or when you wish to invert - Sharp AR M550U | AR-M550 | AR-M620 | AR-M700 Operation Manual - Page 90
copied. The selections are AUTO, TEXT, TEXT/PHOTO and PHOTO. I Automatic exposure adjustment UTO ORIGINAL The default MANUAL 1 3 5 Touch the key to make darker copies. Touch the key to make lighter copies exposure mode, touch the [AUTO / MANUAL] key to highlight [AUTO], and then touch - Sharp AR M550U | AR-M550 | AR-M620 | AR-M700 Operation Manual - Page 91
REDUCTION/ENLARGEMENT/ZOOM Reduction and enlargement ratios can be selected automatically or manually. G Automatic selection: Auto image (see below) G Manual selection: Preset copy ratios/zoom (see page 4-16) Automatic selection (auto image) The reduction or enlargement ratio will be selected - Sharp AR M550U | AR-M550 | AR-M620 | AR-M700 Operation Manual - Page 92
ratio when a zoom key is continuously touched can be disabled in the key operator programs (see "Key operation setting (prohibit key repeat)" on page 10 of the key operator's guide). G If the message "IMAGE IS LARGER THAN COPY PAPER." appears when a ratio is selected, the image may not fit on the - Sharp AR M550U | AR-M550 | AR-M620 | AR-M700 Operation Manual - Page 93
copy, the copy can be made with the copy number display showing "0". Use the [C] (clear) key to cancel an entry if a mistake has been made. 8 If needed, touch the [FILE] key or the [QUICK FILE] key. Either key can be FILE touched to store the scanned document QUICK FILE image on the machine - Sharp AR M550U | AR-M550 | AR-M620 | AR-M700 Operation Manual - Page 94
: Selecting 100% for the length and 50% for the width Original Copy 1 Place the original in the document feeder tray or on the document can be disabled in the key operator programs (see "Key operation setting (prohibit key repeat)" on page 10 of the key operator's guide). 6 Touch the [Y] key - Sharp AR M550U | AR-M550 | AR-M620 | AR-M700 Operation Manual - Page 95
the [X] key once again to readjust the X zoom. 8 Touch the [OK] key. 129% OK 200% 400% 100% A PA 10Select any desired copy settings such as the exposure or number of copies, and then press the [START] key. To cancel an X or Y zoom setting... Touch the [XY ZOOM] key or the [CANCEL] key - Sharp AR M550U | AR-M550 | AR-M620 | AR-M700 Operation Manual - Page 96
COPY RATIO 2 Load the special paper in the bypass tray. See page 2-8 for the specifications of paper that can be used in the bypass tray. For the paper loading instructions paper type. APER N 5. 81/2 x11 PLAIN PAPER SELECT 100% COPY RATIO (X) (Y) 2 The (Y) key shows the size of paper - Sharp AR M550U | AR-M550 | AR-M620 | AR-M700 Operation Manual - Page 97
as needed. Page SPECIAL MODES 5-2 G General procedure for using special functions 5-2 G Margin shift 5-3 G Erase 5-4 G Dual page copy 5-5 G Pamphlet copy 5-6 G Job build 5-8 G Tandem copy 5-9 G Covers/inserts 5-11 G Transparency film with insert sheets 5-22 G Multi shot 5-23 G Book - Sharp AR M550U | AR-M550 | AR-M620 | AR-M700 Operation Manual - Page 98
following functions can be selected in the special modes screen. Touch the [SPECIAL MODES] key in the main screen. READY TO SCAN FOR COPY. SPECIAL MODES 2-SIDED COPY OUTPUT FILE QUICK FILE ORIGINAL 81/2x11 1. 2. 81/2x11 81/2x11 3. 81/2x14 4. 11x17 81/2x11 81/2x11 0 AUTO ORIGINAL AUTO EXPOSURE - Sharp AR M550U | AR-M550 | AR-M620 | AR-M700 Operation Manual - Page 99
. This function is convenient when stapling or binding copies with a string. NOTE The initial setting for the margin width can be changed in the key operator programs to any value from 0 to 1" (0 to 20 mm).. (Page 14 of the Key operator's guide) One-sided copying Original Image shifted to the - Sharp AR M550U | AR-M550 | AR-M620 | AR-M700 Operation Manual - Page 100
programs to any value from 0 to 1" (0 to 20 mm). (Page 14 of the Key operator's guide) Original Copy EDGE ERASE Eliminates shadow lines around the edges of copies caused when heavy paper or a book is used as an original. CENTER ERASE Eliminates shadow lines produced by the bindings of bound - Sharp AR M550U | AR-M550 | AR-M620 | AR-M700 Operation Manual - Page 101
left of the screen. 2 Touch the [OK] key on the special modes screen. You will return to the main screen of copy mode. 3 Place the originals on the document glass. When copying a thick book, press down lightly on the book to flatten it against the document glass. Index 81/2" x 11" A4 81 - Sharp AR M550U | AR-M550 | AR-M620 | AR-M700 Operation Manual - Page 102
scanning operation by a half.) [Example] Copying eight originals in the pamphlet copy mode Originals (one-sided) Finished copies are page. The order of copying will be automatically adjusted by the machine. G Either left binding copies can be stapled in two positions along the center of copies - Sharp AR M550U | AR-M550 | AR-M620 | AR-M700 Operation Manual - Page 103
this operation until 5 all originals have been scanned and then touch the [READ-END] key. NOTES G When the pamphlet copy function is set, the twosided copying mode will be automatically selected. G If this function is used in combination with the pamphlet copy function (pamphlet stapling) and - Sharp AR M550U | AR-M550 | AR-M620 | AR-M700 Operation Manual - Page 104
other copy settings, and press the [START] key. Scanning of originals will start. After scanning of the first set of originals (A in the example above) is completed, remove the scanned originals, place the next set of originals (set B in the example) and press the [START] key. Repeat this operation - Sharp AR M550U | AR-M550 | AR-M620 | AR-M700 Operation Manual - Page 105
asked to share the job is called the client machine. GTo use the tandem copy function, the tandem settings must be configured in the key operator programs. (See page 5-7 of the "Operation manual (for printer)") GWhen configuring the tandem settings in the server machine, the IP address of the client - Sharp AR M550U | AR-M550 | AR-M620 | AR-M700 Operation Manual - Page 106
is installed on the server machine and not on the client machine: (1) If tandem copying is executed for a twosided copy job with the number of copies set to 999 and "Non-staple" is selected, tandem copying will take place. (2) If tandem copying is executed for a twosided copy job with the number of - Sharp AR M550U | AR-M550 | AR-M620 | AR-M700 Operation Manual - Page 107
Covers/inserts can be disabled in the key operator programs (page 11 of the key operator's guide). Example of adding covers Example of adding used. G Tabbed paper can be used for cover/ inserts, however, two-sided copying cannot be performed on the tabbed paper. Tabbed paper can fed from the bypass - Sharp AR M550U | AR-M550 | AR-M620 | AR-M700 Operation Manual - Page 108
on page 5-2. 1 Touch the [COVERS/INSERTS] key in the special modes screen (2nd screen). SPECIAL MODES COVERS/INSERTS TRANSPARENCY INSERTS BOOK COPY TAB COPY 2 Touch the [PAPER TRAY SETTINGS] key. COVERS/INSERTS FRONT COVER BACK COVER INSERTION TYPE A SETTING INSERTION TYPE B SETTING CANCEL - Sharp AR M550U | AR-M550 | AR-M620 | AR-M700 Operation Manual - Page 109
and type. 4 If a paper tray with tabbed paper is selected in the screen of step 3, you can touch the [TAB COPY] key. This allows you to select the tab width. Twosided copying is not possible on tabbed paper. 6 Touch the [OK] key in the screen of step 5. You will return to the - Sharp AR M550U | AR-M550 | AR-M620 | AR-M700 Operation Manual - Page 110
SPECIAL MODES 8 Touch the [INSERTION SETTINGS] key to specify the pages where you wish to insert the insert papers of [INSERTION TYPE A SETTING] and [INSERTION TYPE B SETTING]. CANCE RTION SETTING TION SETTING INSERTION SETTINGS 9 Touch the [INSERTION TYPE A] key or the [INSERTION TYPE B] key, - Sharp AR M550U | AR-M550 | AR-M620 | AR-M700 Operation Manual - Page 111
TYPE B 7/8 OK 1/2 INSERTION TYPE A 12/- 1 If there are multiple screens, touch the or key to change screens. 2 Displayed icons: : Front side copy only : Back side copy only : Two-sided copy : No copying For inserts, the insertion page also appears. " " represents a page number. /- : Front side - Sharp AR M550U | AR-M550 | AR-M620 | AR-M700 Operation Manual - Page 112
Front cover 2 Front cover after two-sided 1 copying. (One page is not copied on.) Front cover after two-sided 1 copying. Insert after one-sided 3 copying. (One page is not copied on.) Insert after two-sided 3 copying. Back cover 6 6 6 Back cover when not copied on. Back cover after one-sided - Sharp AR M550U | AR-M550 | AR-M620 | AR-M700 Operation Manual - Page 113
cover Back cover No copying No copying Resulting copies 1 2 3 4 5 6 One-sided 1 2 3 4 5 6 copying No copying Two-sided 2 1 3 4 5 6 copying No copying 5 6 No copying One-sided copying 1 2 3 4 5 6 No copying Two-sided copying 1 2 3 4 5 6 One-sided One - Sharp AR M550U | AR-M550 | AR-M620 | AR-M700 Operation Manual - Page 114
copying No copying 2 Resulting copies 1 3 5 4 One-sided 3 1 2 4 6 5 copying No copying 6 Two-sided 2 1 3 5 4 copying No copying No copying One-sided copying 2 1 3 5 4 No copying Two-sided copying 2 1 3 5 4 5 One-sided One-sided 1 2 3 4 copying copying - Sharp AR M550U | AR-M550 | AR-M620 | AR-M700 Operation Manual - Page 115
6 No copying copying Two-sided 2 1 3 4 5 6 copying No copying No copying One-sided 1 2 3 4 5 6 5 copying 6 No copying Two-sided copying 1 2 3 4 5 6 One-sided One-sided 1 2 3 4 5 copying copying 6 One-sided Two-sided 1 2 3 4 5 copying copying 6 Two - Sharp AR M550U | AR-M550 | AR-M620 | AR-M700 Operation Manual - Page 116
Front cover Back cover No copying No copying 2 Resulting copies 1 3 5 4 6 One-sided 1 3 5 4 No copying copying 6 Two-sided 2 1 3 5 4 copying No copying 4 No copying One-sided copying 2 1 3 No copying Two-sided copying 2 1 3 5 4 6 4 One-sided One-sided - Sharp AR M550U | AR-M550 | AR-M620 | AR-M700 Operation Manual - Page 117
on insert 1 No copying Resulting copies (one-sided copying) 2 3 4 5 6 2 Resulting copies (two-sided copying) 1 3 5 4 6 One-sided 1 2 3 4 5 6 copying 2 1 3 4 6 5 Two-sided 1 2 3 4 5 6 copying 1 3 5 6 4 2 5 I Inserts (One-sided copying of two-sided originals - Sharp AR M550U | AR-M550 | AR-M620 | AR-M700 Operation Manual - Page 118
sided originals are only supported when automatic document feeding is used. Insert sheets Inserts can also be copied on. If the 2-6 and 2-7.) G This function only operates in "one-sided to onesided" and "two-sided to one-sided" modes. G Multiple copies cannot be selected in this mode. - Sharp AR M550U | AR-M550 | AR-M620 | AR-M700 Operation Manual - Page 119
will return to the main screen of copy mode. NOTE If insert paper is copied onto one sheet. The minimum reduction ratio is 25%. The original size, copy paper size, and selected number of original pages may require that the ratio be less than 25%. As copying will take place at 25% in this case, part - Sharp AR M550U | AR-M550 | AR-M620 | AR-M700 Operation Manual - Page 120
SHOT] key in the special modes screen (2nd screen). TRANSPARENCY INSERTS TAB COPY MULTI SHOT CARD SHOT The MULTI SHOT setting screen will appear. A in the special modes screen. You will return to the main screen of copy mode. About the steps that follow If an automatic document feeder is being - Sharp AR M550U | AR-M550 | AR-M620 | AR-M700 Operation Manual - Page 121
first page to the last page. The order of copying will be automatically adjusted by the machine. G Either left binding (right to left turning) stitch finisher is installed, book copy can be used in combination with the pamphlet function to staple and fold the copies at the centerline. First page - Sharp AR M550U | AR-M550 | AR-M620 | AR-M700 Operation Manual - Page 122
is possible on the tabs of tabbed paper. Prepare appropriate originals for the tab captions. [Example] Original Tabbed paper Copy Area A INDEX INDEX Area B Tab width 8-1/2" x 11" : Maximum of 5/8" (A4 : Maximum of 20 mm) GThe tab caption is shifted by the amount of the tab - Sharp AR M550U | AR-M550 | AR-M620 | AR-M700 Operation Manual - Page 123
[OK] key in the special modes screen. You will return to the main screen of copy mode. 4 Load tabbed paper in the bypass tray. Place the tabbed paper so that the is being used, see pages 4-11 through 413. When performing tab copying with a right binding If you are using left-binding tabbed paper for - Sharp AR M550U | AR-M550 | AR-M620 | AR-M700 Operation Manual - Page 124
SHOT] key in the special modes screen (2nd screen). TRANSPARENCY INSERTS TAB COPY MULTI SHOT CARD SHOT The CARD SHOT setting screen will appear. A configured in the key operator programs, touch the [SIZE RESET] key. ("CARD SHOT SETTINGS" on page 14 of the key operator's guide). GTo have the - Sharp AR M550U | AR-M550 | AR-M620 | AR-M700 Operation Manual - Page 125
5 Place the original on the document glass. Place the front side of the original face down and close the document cover. 6 Follow steps 4 through 6 of "Copying from the document glass" (page 4-12). 7 Press the [START] key. The front side of the card is scanned. 10Touch the [READ-END] key. NOTE The - Sharp AR M550U | AR-M550 | AR-M620 | AR-M700 Operation Manual - Page 126
automatically changes to "Text". G Originals with large black areas (which use a large amount of toner) can be printed with black/white reverse to reduce toner consumption. Original B/W reverse copy To display the special modes screen... See "General procedure for using special functions" on page - Sharp AR M550U | AR-M550 | AR-M620 | AR-M700 Operation Manual - Page 127
3 and select a different number key. NOTE If overwriting of programmed copy settings has been prohibited in the key operator programs, you will not be able to store a job program. (See page 15 of the key operator's guide.) 4 Select the copy settings that you wish to store in the job program. TO - Sharp AR M550U | AR-M550 | AR-M620 | AR-M700 Operation Manual - Page 128
Press the [#/P] key. 3 Set the number of copies if needed and then press the [START] key. Copying will begin using the settings of the job program job program mode. NOTE If overwriting of programmed copy settings has been prohibited in the key operator programs, you will not be able to clear a job - Sharp AR M550U | AR-M550 | AR-M620 | AR-M700 Operation Manual - Page 129
size and type of the bypass tray cannot be changed for use by the interrupt job. G If the document glass is used for an interrupt copy job, two-sided copying, sort copying, and staple sort copying cannot be selected. If any of these functions are necessary, use the document feeder. 4 5 The previous - Sharp AR M550U | AR-M550 | AR-M620 | AR-M700 Operation Manual - Page 130
- Sharp AR M550U | AR-M550 | AR-M620 | AR-M700 Operation Manual - Page 131
CHAPTER 6 MACHINE MAINTENANCE (FOR COPYING) This chapter explains procedures for cleaning the machine, and troubleshooting. Page USER MAINTENANCE 6-2 G Cleaning the document glass and the automatic document feeder ....... 6-2 TROUBLESHOOTING 6-3 6-1 - Sharp AR M550U | AR-M550 | AR-M620 | AR-M700 Operation Manual - Page 132
USER MAINTENANCE To ensure good service from this product over a long period of time, it is recommended that the following maintenance procedures be performed on a regular basis. CAUTION Do not use flammable spray to clean the machine are printed. Always keep these parts clean. Wipe with a clean, - Sharp AR M550U | AR-M550 | AR-M620 | AR-M700 Operation Manual - Page 133
Check the following troubleshooting list before requesting service as many problems can be fixed by the user. If you are unable to solve the problem by checking the list, turn off the main power switch and the power switch, and unplug the power cord. Problems related to the copy function are - Sharp AR M550U | AR-M550 | AR-M620 | AR-M700 Operation Manual - Page 134
- Sharp AR M550U | AR-M550 | AR-M620 | AR-M700 Operation Manual - Page 135
function 7-2 TO USE THE DOCUMENT FILING FUNCTION 7-4 G A look at the operation panel 7-4 G Saving files 7-4 G Main screen of document filing 7-5 G 7-15 CUSTOM SETTINGS 7-21 G Creating, editing, and deleting user names and folders 7-21 ENTERING CHARACTERS 7-26 TROUBLESHOOTING 7-28 7-1 - Sharp AR M550U | AR-M550 | AR-M620 | AR-M700 Operation Manual - Page 136
be used in document filing mode AR-M550U AR-M620U AR-M700U Copier model G Only Quick File in copy mode G When the optional printer expansion kit is installed, the same functions can be used as on the copier/printer models. AR-M550N AR-M620N AR-M700N Copier/printer model G Images can be saved - Sharp AR M550U | AR-M550 | AR-M620 | AR-M700 Operation Manual - Page 137
be deleted using a key operator program. If you have a user name (see [CUSTOM SETTINGS] on page 7-21) can be specified and any file name can be assigned. A password can be set for a file saved in one of these folders. *1 Machines without the printer for by law, SHARP Corporation bears no - Sharp AR M550U | AR-M550 | AR-M620 | AR-M700 Operation Manual - Page 138
at the operation panel 1 Touch machine does not have the printer function, the files in the Quick File folder will appear. 4 Numeric keys Use these keys to enter a password or delete a user name or custom folder. Saving files To save files to the main folder or custom folders, a user name must - Sharp AR M550U | AR-M550 | AR-M620 | AR-M700 Operation Manual - Page 139
in the Quick File folder appear. If the machine does not have the printer function, the following screen will appear: QUICK FILE FOLDER FILE NAME 20031020_091025 20031020_101330 20031020_152011 ALL FILES USER NAME User unknown User unknown User unknown SEARCH DATE 1 1 2003/10/20 2003/10 - Sharp AR M550U | AR-M550 | AR-M620 | AR-M700 Operation Manual - Page 140
When printing or transmitting a document in copy mode, printer mode, or fax/image transmission mode,"QUICK FILE" can be [QUICK FILE] key is no longer highlighted. 3 Press the [START] key on the operation panel. To prevent accidental saving of the document, the warning "THE SCANNED DATA IS STORED - Sharp AR M550U | AR-M550 | AR-M620 | AR-M700 Operation Manual - Page 141
Sasaki Hasegawa Nakata Ono Yamada ALL USERS ABCD EFGHI JKLMN OPQRST UVWXYZ User names must be previously stored ("Programming a user name" on page 7-22). When a user name is touched, a password entry screen appears. Enter the 5-digit password for the user name. 8 Touch the desired folder name - Sharp AR M550U | AR-M550 | AR-M620 | AR-M700 Operation Manual - Page 142
entry XYYY 12Enter a 5-digit password with the numeric keys. As each digit is entered, CANCEL "-" changes to " ". ENTER PASSWORD VIA THE 10-KEY PAD. 15Touch the [OK] key. You will return to the main screen. 16Press the [START] key on the operation panel. When copying begins, the image is saved - Sharp AR M550U | AR-M550 | AR-M620 | AR-M700 Operation Manual - Page 143
up. A menu screen will appear. If a password is set for the file, a password entry screen will appear. Enter the 5-digit password with the numeric keys. 5 7 Touch the key of the operation that you wish to perform. (1) (2) (3) JOB SETTINGS Basic specifications SELECT THE JOB. PRINT Yamada Taro - Sharp AR M550U | AR-M550 | AR-M620 | AR-M700 Operation Manual - Page 144
machine has the printer function. Scan save is used to save a scanned document image in the main folder or the custom folder without copying or transmitting it. 1 Press the [DOCUMENT FILING] key on the operation INFORMATION 5 The screens for selecting the user name, file name, folder, and - Sharp AR M550U | AR-M550 | AR-M620 | AR-M700 Operation Manual - Page 145
screen of step 5. OK MANUAL 17Place the original and touch the [START] key. [Placing the original] GFor information on placing the original, see "NORMAL COPYING" in chapter 4. GIf up using the file name, folder name, or user name, or from the filing folder. GTo call up the image by entering the - Sharp AR M550U | AR-M550 | AR-M620 | AR-M700 Operation Manual - Page 146
or network scanner option is installed, this is equivalent to the 2in1 function described in the fax and network scanner manuals. It is also equivalent to the "Multi shot" function in copy mode; however, only 2in1 is possible for scan save.) This function reduces two original pages and arranges the - Sharp AR M550U | AR-M550 | AR-M620 | AR-M700 Operation Manual - Page 147
When calling up a file, you can enter the file name, folder name, or user name to quickly search for the file. To search for a file, touch the that shows folders or files in a folder. If the machine does not TUS SEARCH have the printer function, touch the [SEARCH] key FILE RETRIEVE in the - Sharp AR M550U | AR-M550 | AR-M620 | AR-M700 Operation Manual - Page 148
an operation using the file, go to step 5 on page 7-16.) GTo change the order of file display, touch the [FILE OR FOLDER NAME] key, [USER NAME] key, or [DATE] key. If you touch a file name or folder name that has a password, a password entry screen will appear. Enter the 5-digit password with - Sharp AR M550U | AR-M550 | AR-M620 | AR-M700 Operation Manual - Page 149
password with the numeric keys. 4 Touch the desired file key. MAIN FOLDER FILE NAME Basic specifications presentaion_0903 Product_info COPY CUSTOM FOLDER SEARCH BACK USER NAME Yamada Sato Akata DATE 1 1 2003/10/20 2003/10/20 2003/10/20 If the machine does not have the printer function - Sharp AR M550U | AR-M550 | AR-M620 | AR-M700 Operation Manual - Page 150
of the operation that you wish to perform. (1) (2) (3) JOB SETTINGS Basic specifications SELECT THE key Use this key to select sort, group or staple sort functions, and to select the output tray. 3 setting key Use this key to set the number of copies. 6 [PRINT AND DELETE THE DATA] key Touch this - Sharp AR M550U | AR-M550 | AR-M620 | AR-M700 Operation Manual - Page 151
SEND] key is grayed out in the operation selection screen.) Pamphlet copying, covers/insert, card shot, Multi shot. user name of the file to be transmitted. 4[ ] key (Speed dial key) Use this key to specify a destination by entering the 3-digit number that is assigned to an e-mail address or fax - Sharp AR M550U | AR-M550 | AR-M620 | AR-M700 Operation Manual - Page 152
code fax transmission. NOTE See the "Operation manual (for facsimile)" and "Operation manual operation selection screen. Note the restrictions below on changing the attribute. JOB SETTINGS / PROPERTY CHANGE CANCEL OK Basic specifications Yamada Taro A4 SHARING PROTECT CONFIDENTIAL PASSWORD - Sharp AR M550U | AR-M550 | AR-M620 | AR-M700 Operation Manual - Page 153
JOB SETTINGS / MOVE Basic specifications Yamada Taro SELECT THE FOLDER THE FILE IS MOVED TO. FILE NAME Basic specifications 8A1/24x11 MOVE TO: PROPERTY CHANGE] to change the attribute to [SHARING].) I [Detail] This operation is used to show detailed information on the selected file. Touch the - Sharp AR M550U | AR-M550 | AR-M620 | AR-M700 Operation Manual - Page 154
touched key is highlighted. DETAIL OF COPY FILE NAME COPY_20031021_153050 DATA SIZE: 21,987,543KB SPECIAL MODES: FILE FORMAT: DOCUMENT 1-SIDED STYLE: OUTPUT: OK CALL 2/2 5 Touch the [CALL] key. The operation selection screen appears. CALL X JOB INTERNET-FAX Select and perform the desired - Sharp AR M550U | AR-M550 | AR-M620 | AR-M700 Operation Manual - Page 155
and edited at the operation panel of the machine or in the Web page. NOTES G A previously stored name cannot be used when creating a new user name or custom folder. However, the same password can be used more than once. G A password cannot be omitted when creating a user name. I General procedure - Sharp AR M550U | AR-M550 | AR-M620 | AR-M700 Operation Manual - Page 156
7-26 for the procedure for entering characters. 3 Touch the [PASSWORD] key. CUSTOM No.001 USER NAME Yamada A password cannot be omitted. PASSWORD SELECT THE DEFAULT FOLDER THE FIL STORED TO: 4 Set a password for the user name (enter a 5-digit password with the numeric keys). This will be the - Sharp AR M550U | AR-M550 | AR-M620 | AR-M700 Operation Manual - Page 157
NAME TO AMEND/DELETE. Suzuki Sasaki 1/1 Hasegawa Nakata Ono Yamada ALL USERS ABCD EFGHI JKLMN OPQRST UVWXYZ A password entry screen will appear. 3 Enter the 5-digit password with the numeric keys. ENTER PASSWORD VIA THE 10-KEY PAD. CANCEL BCD EFGHI JKLMN OPQRST UVWXYZ [Editing] 4 Touch - Sharp AR M550U | AR-M550 | AR-M620 | AR-M700 Operation Manual - Page 158
If you touched the [ADD NEW] key, program a user name as explained on page 7-22. The folder name programmed in step 1 will be selected as the folder for the user. 8 Enter the 5-digit password of the selected user name with the numeric keys. ENTER PASSWORD VIA THE 10-KEY PAD. CANCEL BCD EFGHI JKLMN - Sharp AR M550U | AR-M550 | AR-M620 | AR-M700 Operation Manual - Page 159
5-digit password with the numeric keys. 3 Edit or delete the folder. [Editing] 4 Touch the key of each item that you wish to edit (edit as explained in steps 1 to 10 of "Creating a custom folder" on page 7-24). CUSTOM FOLDER / AMEND/DELETE No.001 REGISTRATION IS COMPLETED. FOLDER NAME USER - Sharp AR M550U | AR-M550 | AR-M620 | AR-M700 Operation Manual - Page 160
ABC/abc] key during entry to return to alphabetical character entry. You can also enter numbers and symbols. 9 When finished, touch the [OK] key. Sharp äÄ The cursor ( ) moves forward and a space is entered. 7-26 You will exit the character entry screen and return to the programming screen. If you - Sharp AR M550U | AR-M550 | AR-M620 | AR-M700 Operation Manual - Page 161
I Entering numbers and symbols 1 Touch the [AB/ab 12#$%] key. ENTERING CHARACTERS 3 When you have finished entering characters, touch the [OK] key. 1&1 When the characters "12#$%" are highlighted, number/symbol entry mode is selected. 2 Enter the desired number or symbol. Numbers and symbols that - Sharp AR M550U | AR-M550 | AR-M620 | AR-M700 Operation Manual - Page 162
difficulty, refer to the following table. For information on general machine problems, printer problems, fax problems, and network scanner problems, please see the troubleshooting sections of the appropriate manuals. Problem A saved file has disappeared. A file cannot be deleted. A file's attribute - Sharp AR M550U | AR-M550 | AR-M620 | AR-M700 Operation Manual - Page 163
CHAPTER 8 SPECIFICATIONS This chapter contains useful information about the machine. Page SPECIFICATIONS 8-2 INDEX ...8-4 8-1 - Sharp AR M550U | AR-M550 | AR-M620 | AR-M700 Operation Manual - Page 164
SPECIFICATIONS Type Print system Exposure system Developer system Paper feed system Fusing system Resolution Gradation Originals Copy paper Copy sizes Warm-up time First-copy time Copy ratio Continuous copy or less AR-M550U/AR-M620U/AR-M550N/AR-M620N 3.9 seconds or less* AR-M700U/AR-M700N 3.3 - Sharp AR M550U | AR-M550 | AR-M620 | AR-M700 Operation Manual - Page 165
SPECIFICATIONS Continuous copying speed (when the offset function is not used) AR-M550U/AR-M550N AR-M620U/AR-M620N Copy paper size 100% / Reduced / Enlarged 11" x 17" (A3) 30 copies/min. 34 copies/min. 8-1/2" x 14" (B4) 35 copies/min. 39 copies/min. 8-1/2" x 11" (A4) 55 copies Operator - Sharp AR M550U | AR-M550 | AR-M620 | AR-M700 Operation Manual - Page 166
Auxiliary tray 2-6 IB B/W reverse 1-6, 5-2, 5-30 Barcode font kit 1-11 Binding change 4-13 Book copy 1-5, 5-2, 5-25 Book original 5-5 Bypass tray 1-9, 2-23, 4-20 IC [C] key 1-12, 7-4 [CA] key 1-12, 7-4 Call for service 2-26 [CALL] key 1-15 Calling up and using a file 7-13 Calling up and - Sharp AR M550U | AR-M550 | AR-M620 | AR-M700 Operation Manual - Page 167
Inserter 1-7, 1-9, 3-14 Installation requirements 0-2 Interior 1-10 [INTERNET-FAX] key 1-15 Interrupting a copy run 1-6, 5-33 IJ Job build 1-5, 5-2, 5-8, 7-12 ] key 3-6 Operation panel 1-9, 1-12 -Document filing function 7-4 -Inserter 3-15 Original guides 4-3 Original orientation - Sharp AR M550U | AR-M550 | AR-M620 | AR-M700 Operation Manual - Page 168
Stapling positions 3-4 [START] key 1-12, 3-15 [STOP/DELETE] key 1-15 Storage of supplies 2-17 IT Tab copy 1-6, 5-2, 5-26 Tabbed paper.........2-4, 2-6, 2-8 to 2-9, 2-17, 3-15, 4-20, 5-11, 5-26 Tandem copy 1-5, 5-2, 5-9 Text 4-14 Text/photo 4-14 The machine does not operate 2-26, 6-3 Toner - Sharp AR M550U | AR-M550 | AR-M620 | AR-M700 Operation Manual - Page 169
Troubleshooting -Copier operation 6-3 -Document filing function 7-28 -Finisher/saddle stitch finisher 3-13 -General information 2-26 to 2-28 -Inserter 3-18 Types and sizes of paper 2-8 to 2-9 Types and sizes of paper that can be used 2-8 IU Upper cover of large capacity tray 1-10 User - Sharp AR M550U | AR-M550 | AR-M620 | AR-M700 Operation Manual - Page 170
- Sharp AR M550U | AR-M550 | AR-M620 | AR-M700 Operation Manual - Page 171
or warranties on behalf of Sharp. Specifically, SHARP DOES NOT EXTEND TO YOU, THE END-USER, ANY EXPRESS WARRANTY OR ANY IMPLIED WARRANTY OF MERCHANTABILITY, FITNESS FOR USE OR FITNESS FOR ANY PARTICULAR PURPOSE IN CONNECTION WITH THE HARDWARE, SOFTWARE OR FIRMWARE EMBODIED IN, OR USED IN - Sharp AR M550U | AR-M550 | AR-M620 | AR-M700 Operation Manual - Page 172
OPERATION MANUAL (for general information and copier operation) SHARP ELECTRONICS CORPORATION Sharp Plaza, Mahwah, New Jersey 07430-1163. www.sharpusa.com SHARP ELECTRONICS OF CANADA LTD. 335 Britannia Road East, Mississauga, Ontario, L4Z 1W9 PRINTED IN JAPAN 2004B DSC1 CINSE2473FC52
-
 1
1 -
 2
2 -
 3
3 -
 4
4 -
 5
5 -
 6
6 -
 7
7 -
8
-
9
-
10
-
11
-
12
-
13
-
14
-
15
-
16
-
17
-
18
-
19
-
20
-
21
-
22
-
23
-
24
-
25
-
26
-
27
-
28
-
29
-
30
-
31
-
32
-
33
-
34
-
35
-
36
-
37
-
38
-
39
-
40
-
41
-
42
-
43
-
44
-
45
-
46
-
47
-
48
-
49
-
50
-
51
-
52
-
53
-
54
-
55
-
56
-
57
-
58
-
59
-
60
-
61
-
62
-
63
-
64
-
65
-
66
-
67
-
68
-
69
-
70
-
71
-
72
-
73
-
74
-
75
-
76
-
77
-
78
-
79
-
80
-
81
-
82
-
83
-
84
-
85
-
86
-
87
-
88
-
89
-
90
-
91
-
92
-
93
-
94
-
95
-
96
-
97
-
98
-
99
-
100
-
101
-
102
-
103
-
104
-
105
-
106
-
107
-
108
-
109
-
110
-
111
-
112
-
113
-
114
-
115
-
116
-
117
-
118
-
119
-
120
-
121
-
122
-
123
-
124
-
125
-
126
-
127
-
128
-
129
-
130
-
131
-
132
-
133
-
134
-
135
-
136
-
137
-
138
-
139
-
140
-
141
-
142
-
143
-
144
-
145
-
146
-
147
-
148
-
149
-
150
-
151
-
152
-
153
-
154
-
155
-
156
-
157
-
158
-
159
-
160
-
161
-
162
-
163
-
164
-
165
-
166
-
167
-
168
-
169
-
170
-
171
-
172
 |
 |
PART 1: GENERAL INFORMATION
•
BEFORE USING
THE PRODUCT
•
MANAGING THE MACHINE
•
PERIPHERAL DEVICES
PART 2: COPIER OPERATION
•
MAKING COPIES
•
CONVENIENT COPY
FUNCTIONS
•
MACHINE MAINTENANCE
(FOR COPYING)
•
DOCUMENT FILING
FUNCTION
•
SPECIFICATIONS
1-1
2-1
3-1
4-1
5-1
6-1
7-1
8-1
Page
OPERATION MANUAL
(for general information and copier operation)
(Option) Saddle stitch finisher + Punch module
+ Inserter + Large capacity tray
MODEL
AR-M550U
AR-M620U
AR-M700U
AR-M550N
AR-M620N
AR-M700N
DIGITAL LASER COPIER/PRINTER
DIGITAL MULTIFUNCTIONAL
SYSTEM
Be sure to become thoroughly familiar with this manual to
gain the maximum benefit from the product.
Before installing this product, be sure to read the
installation requirements and cautions sections.
Be sure to keep all operation manuals handy for reference
including this manual, the "Operation manual (for general
information and copier operation)" and operation manuals
for any optional equipment which has been installed.