Sharp IRW-220X HT/LT/O Owners Manual - Page 5

Connecting the IRW-1S IR Sensors

Page 5 highlights

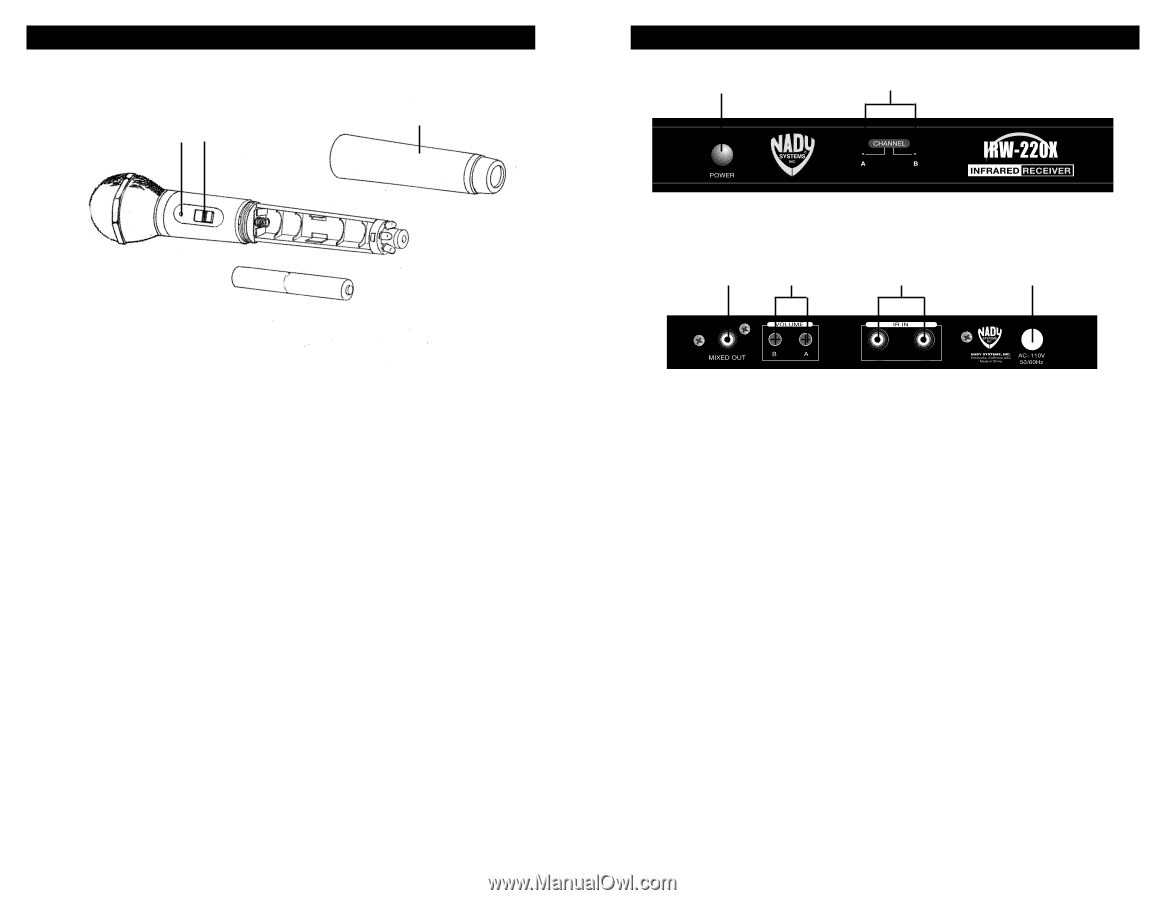
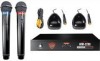
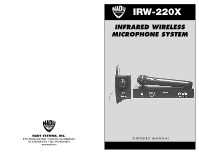
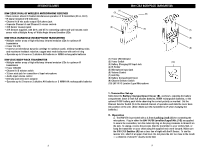
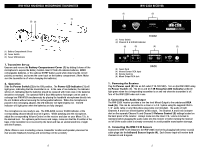
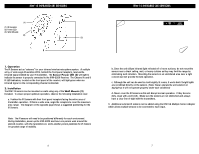
IRW-HT6X HANDHELD MICROPHONE TRANSMITTER (1) (3) (2) (1) Battery Compartment / Cover (2) Power Switch (3) Power LED Indicator 1. Transmitter Set-up Unscrew and remove the Battery Compartment Cover (1) by sliding it down off the microphone to expose the battery holders. Insert 2 fresh AA alkaline batteries, NiMH rechargeable batteries, or the optional IR-HBP battery pack while observing the correct polarity as marked, and screw the cover back on the battery compartment. (Note: Make sure the transmitter is off when changing the batteries.) 2. Operation Slide the Power Switch (2) to the O N position. The Power LED Indicator (1) will light green, indicating that the transmitter is on. In the case of low batteries, the indicator will be off, indicating that the batteries should be replaced with fresh ones or the batteries should be recharged. The optional IRDR-2 Dual Microphone Recharger can be used to recharge two IRW-HT6X simultaneously by placing the handheld microphones directly into the mic holders without removing the rechargeable batteries. When the microphone is placed in the recharging adapter, the LED Indicator will light brightly red. The LED indicator will light green when the batteries are fully charged. The microphone is now ready to use. The IRW-220X receiver IR LED Indicator of the corresponding channel should now be lit green. While speaking into the microphone, adjust the corresponding Volume Control on the receiver and also on your Mixer / P.A. to the desired level. For optimum performance and range, make sure that the IR emitter at the base of the transmitter is not covered by the hand and has an unobstructed line of sight with the IR sensor. [Note: Observe care in selecting volume, transmitter location and speaker placement so that acoustic feedback (howling and screeching) will be avoided.] 8 IRW-220X RECEIVER (1) (2) FRO NT (1) Power Switch (2) Channel A & B IR LED Indicator (6) (5) (4) (3) (3) Power Cord (4) Infrared Sensor RCA Input (5) Volume Controls (6) Mixed Output RCA Jack BACK 1. Powering the Receiver Plug the Power cord (3) into an AC outlet (110-120 VAC). Turn on the IRW-220X using the Power Switch (1). The Ch A and Ch B IR Reception LED Indicators (2) will light green when the corresponding transmitter is on and red when the transmitter is off. Turn off the IRW-220X when not in use. 2. Connecting the Audio Output The IRW-220X receiver provides a low line level Mixed Output to the unbalanced RCA Jack (6). This can be connected to a mixer or a P.A. System using the supplied RCA to 1 / 4" audio cable or any RCA phono plug cable (not included). The audio of both Channels A and B are mixed together at this output. The Channel A and B mix is dependent on the separate Channel A and Channel B Volume Control (5) settings located on the back panel of the receiver. Always make sure the mixer / P.A. volume is turned to minimum before plugging the audio cable into the receiver or before turning the receiver on / off (if the audio cable is already connected) to avoid possible sound system damage. 3. Connecting the IRW-1S IR Sensors Connect the IRW-1S IR Sensors to the IRW-220X receiver by plugging both sensor coaxial cable plugs into the Infrared Sensor Inputs (4). Each Sensor input will receive both channels A and B signals. 5

  • 1
  • 2
  • 3
  • 4
  • 5
  • 6

IRW-220X RECEIVER
F
R
ON
T
B
AC
K
(
1
)
P
owe
r
S
w
i
t
c
h
(
2
)
C
h
a
nne
l
A
&
B
I
R
L
E
D
I
n
di
c
a
t
o
r
(
3
)
P
owe
r
C
o
r
d
(
4
)
I
n
f
r
a
r
e
d
S
en
s
o
r
R
CA
I
n
p
u
t
(
5
)
V
o
l
um
e
C
on
t
r
o
l
s
(
6
)
Mi
xe
d O
u
t
p
u
t
R
CA
J
a
c
k
1.
Powering the Receiver
P
l
u
g
t
he
Power cord (3)
i
n
t
o
a
n
AC
o
u
t
l
e
t
(
110-120 VAC
)
.
T
ur
n
on
t
he
I
R
W-220
X
u
s
i
n
g
t
he
Power Switch (1)
.
T
he
C
h
A a
n
d C
h
B
IR Reception
LED Indicators (2)
w
i
ll
l
ig
h
t
g
r
een
when
t
he
c
o
rr
e
s
p
on
di
n
g
t
r
a
n
s
m
i
tt
e
r
i
s
on
a
n
d
r
e
d
when
t
he
t
r
a
n
s
m
i
tt
e
r
i
s
o
ff
.
T
ur
n
o
ff
t
he
I
R
W-220
X
when
no
t
i
n
u
s
e
.
2. Connecting the Audio Output
T
he
I
R
W-220
X
r
e
c
e
i
v
e
r
p
r
o
v
id
e
s
a
l
ow
l
i
ne
l
e
v
e
l
Mi
xe
d O
u
t
p
u
t
t
o
t
he
u
n
ba
l
a
n
c
e
d
RCA
Jack (6)
.
T
h
i
s
c
a
n
b
e
c
onne
c
t
e
d
t
o
a
m
i
xe
r
o
r
a
P
.
A
.
S
y
s
t
e
m
u
s
i
n
g
t
he
s
u
pp
l
i
e
d
R
CA
t
o
1/4" a
u
di
o
c
ab
l
e
o
r
a
ny
R
CA p
hono
p
l
u
g
c
ab
l
e
(
no
t
i
n
cl
u
d
e
d
)
.
T
he
a
u
di
o
o
f
b
o
t
h
C
h
a
nne
l
s
A a
n
d
B
a
r
e
m
i
xe
d
t
o
g
e
t
he
r
a
t
t
h
i
s
o
u
t
p
u
t
.
T
he
C
h
a
nne
l
A a
n
d
B
m
i
x
i
s
d
e
p
en
-
d
en
t
on
t
he
s
e
pa
r
a
t
e
C
h
a
nne
l
A a
n
d C
h
a
nne
l
B
Volume Control (5)
s
e
tt
i
n
g
s
l
o
c
a
t
e
d
on
t
he
ba
c
k
pa
ne
l
o
f
t
he
r
e
c
e
i
v
e
r
.
A
l
w
a
y
s
m
a
k
e
s
ur
e
t
he
m
i
xe
r
/
P
.
A
.
v
o
l
um
e
i
s
t
ur
ne
d
t
o
m
i
n
i
mum
b
e
f
o
r
e
p
l
u
ggi
n
g
t
he
a
u
di
o
c
ab
l
e
i
n
t
o
t
he
r
e
c
e
i
v
e
r
o
r
b
e
f
o
r
e
t
ur
n
i
n
g
t
he
r
e
c
e
i
v
e
r
on
/
o
ff
(
i
f
t
he
a
u
di
o
c
ab
l
e
i
s
a
l
r
e
ad
y
c
onne
c
t
e
d
)
t
o
a
v
o
id p
o
ss
ib
l
e
s
o
u
n
d
s
y
s
t
e
m
da
m
ag
e
.
3.
Connecting the IRW-1S IR Sensors
C
onne
c
t
t
he
I
R
W-1
S
I
R
S
en
s
o
r
s
t
o
t
he
I
R
W-220
X
r
e
c
e
i
v
e
r
b
y
p
l
u
ggi
n
g b
o
t
h
s
en
s
o
r
c
o
a
x
ia
l
c
ab
l
e
p
l
u
g
s
i
n
t
o
t
he
Infrared Sensor Inputs (4)
.
E
a
c
h
S
en
s
o
r
i
n
p
u
t
w
i
ll
r
e
c
e
i
v
e
b
o
t
h
c
h
a
nne
l
s
A a
n
d
B
s
ig
n
a
l
s
.
5
8
(
1
)
(
2
)
(
6
)
(
5
)
(
4
)
(
3
)
IRW-HT6X HANDHELD MICROPHONE TRANSMITTER
(
1
)
B
a
tt
e
r
y
C
o
m
pa
r
t
m
en
t
/C
o
v
e
r
(
2
)
P
owe
r
S
w
i
t
c
h
(
3
)
P
owe
r
L
E
D
I
n
di
c
a
t
o
r
1. Transmitter Set-up
U
n
s
c
r
ew
a
n
d
r
e
m
o
v
e
t
he
Battery Compartment Cover (1)
b
y
s
l
idi
n
g i
t
d
own
o
ff
t
he
m
i
c
r
o
p
hone
t
o
ex
p
o
s
e
t
he
ba
tt
e
r
y
ho
l
d
e
r
s
.
I
n
s
e
r
t
2
f
r
e
s
h
AA a
l
k
a
l
i
ne
ba
tt
e
r
i
e
s
,
NiMH
r
e
c
h
a
r
g
e
ab
l
e
ba
tt
e
r
i
e
s
,
o
r
t
he
o
p
t
i
on
a
l
I
R
-H
B
P
ba
tt
e
r
y
pa
c
k
wh
i
l
e
o
b
s
e
r
v
i
n
g
t
he
c
o
rr
e
c
t
p
o
l
a
r
i
t
y
a
s
m
a
rk
e
d
,
a
n
d
s
c
r
ew
t
he
c
o
v
e
r
ba
c
k
on
t
he
ba
tt
e
r
y
c
o
m
pa
r
t
m
en
t
.
(
N
o
t
e
:
Ma
k
e
s
ur
e
t
he
t
r
a
n
s
m
i
tt
e
r
i
s
o
ff
when
c
h
a
n
gi
n
g
t
he
ba
tt
e
r
i
e
s
.
)
2.
Operation
Sl
id
e
t
he
Power Switch (2)
t
o
t
he
ON p
o
s
i
t
i
on
.
T
he
Power LED Indicator (1)
w
i
ll
l
ig
h
t
g
r
een
,
i
n
di
c
a
t
i
n
g
t
h
a
t
t
he
t
r
a
n
s
m
i
tt
e
r
i
s
on
.
I
n
t
he
c
a
s
e
o
f
l
ow
ba
tt
e
r
i
e
s
,
t
he
i
n
di
c
a
t
o
r
w
i
ll
b
e
o
ff
,
i
n
di
c
a
t
i
n
g
t
h
a
t
t
he
ba
tt
e
r
i
e
s
s
ho
u
l
d b
e
r
e
p
l
a
c
e
d
w
i
t
h
f
r
e
s
h
one
s
o
r
t
he
ba
tt
e
r
i
e
s
s
ho
u
l
d b
e
r
e
c
h
a
r
g
e
d
.
T
he
o
p
t
i
on
a
l
I
R
D
R
-2 D
u
a
l
Mi
c
r
o
p
hone
R
e
c
h
a
r
g
e
r
c
a
n
b
e
u
s
e
d
t
o
r
e
c
h
a
r
g
e
t
wo
I
R
W-H
T
6
X
s
i
mu
l
t
a
neo
u
s
l
y
b
y
p
l
a
c
i
n
g
t
he
h
a
n
d
he
l
d
m
i
c
r
o
p
hone
s
di
r
e
c
t
l
y
i
n
t
o
t
he
m
i
c
ho
l
d
e
r
s
w
i
t
ho
u
t
r
e
m
o
v
i
n
g
t
he
r
e
c
h
a
r
g
e
ab
l
e
ba
tt
e
r
i
e
s
.
W
hen
t
he
m
i
c
r
o
p
hone
i
s
p
l
a
c
e
d i
n
t
he
r
e
c
h
a
r
gi
n
g adap
t
e
r
,
t
he
L
E
D
I
n
di
c
a
t
o
r
w
i
ll
l
ig
h
t
b
r
ig
h
t
l
y
r
e
d
.
T
he
L
E
D
i
n
di
c
a
t
o
r
w
i
ll
l
ig
h
t
g
r
een
when
t
he
ba
tt
e
r
i
e
s
a
r
e
f
u
ll
y
c
h
a
r
g
e
d
.
T
he
m
i
c
r
o
p
hone
i
s
now
r
e
ad
y
t
o
u
s
e
.
T
he
I
R
W-220
X
r
e
c
e
i
v
e
r
I
R
L
E
D
I
n
di
c
a
t
o
r
o
f
t
he
c
o
rr
e
s
p
on
di
n
g
c
h
a
nne
l
s
ho
u
l
d
now
b
e
l
i
t
g
r
een
.
W
h
i
l
e
s
p
e
a
k
i
n
g i
n
t
o
t
he
m
i
c
r
o
p
hone
,
adj
u
s
t
t
he
c
o
rr
e
s
p
on
di
n
g V
o
l
um
e
C
on
t
r
o
l
on
t
he
r
e
c
e
i
v
e
r
a
n
d a
l
s
o
on
yo
ur
Mi
xe
r
/
P
.
A
.
t
o
t
he
d
e
s
i
r
e
d
l
e
v
e
l
.
F
o
r
o
p
t
i
mum
p
e
r
f
o
rm
a
n
c
e
a
n
d
r
a
n
g
e
,
m
a
k
e
s
ur
e
t
h
a
t
t
he
I
R
e
m
i
tt
e
r
a
t
t
he
ba
s
e
o
f
t
he
t
r
a
n
s
m
i
tt
e
r
i
s
no
t
c
o
v
e
r
e
d b
y
t
he
h
a
n
d a
n
d
h
a
s
a
n
u
no
b
s
t
ru
c
t
e
d
l
i
ne
o
f
s
ig
h
t
w
i
t
h
t
he
I
R
s
en
s
o
r
.
[
N
o
t
e
:
Ob
s
e
r
v
e
c
a
r
e
i
n
s
e
l
e
c
t
i
n
g
v
o
l
um
e
,
t
r
a
n
s
m
i
tt
e
r
l
o
c
a
t
i
on
a
n
d
s
p
e
a
k
e
r
p
l
a
c
e
m
en
t
s
o
t
h
a
t
a
c
o
u
s
t
i
c
f
ee
dba
c
k
(
how
l
i
n
g a
n
d
s
c
r
ee
c
h
i
n
g
)
w
i
ll
b
e
a
v
o
id
e
d
.
]
(
2
)
(
1
)
(
3
)