Sharp KB-3411J KB-3411JS , KB-3411JK , KB-3411JW Operation Manual - Page 29
Other Features
 |
View all Sharp KB-3411J manuals
Add to My Manuals
Save this manual to your list of manuals |
Page 29 highlights
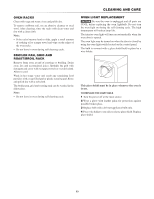
HOW TO START SELF-CLEAN Remember to allow time for the oven to cool down and the oven door to unlock (approx. 1 hour) if you are planning to use the oven after a self-clean cycle. Remove the broiler pan and broiler grid, all utensils and any foil. We recommend removing the oven racks. If they go through the clean cycle, they will darken, lose their luster and become hard to slide. With soap and water, clean any soil from the oven frame and the area outside the gasket on the door. These areas heat during self-cleaning cycle so soil could be burned on. To avoid heavy smoke or fire when subjected to high temperature, remove heavy spillovers in the oven using hot soapy water and cloth before cleaning cycle. We recommend venting your kitchen with an open window or using a ventilation fan during the self-cleaning cycle. 1 Touch Self Clean pad. NORM 2 Touch START pad. Oven locks automatically. Cleaning time appears and begins counting down. When self cleaning time is completed, a signal will sound and END will appear in the display. It will not be possible to open the door until the temperature drops below the lock temperature and LOCK indicator goes off. Touch Self Clean pad once for Normal (3 1/2 hours) or twice for Light (2 hours). After a self-clean cycle, you may notice some white ash in the oven. Wipe it up with a damp cloth after the oven cools. Gently lift the bottom element to wipe underneath it. It cannot be removed. If the racks become hard to slide, apply a small amount of cooking oil to a paper towel and wipe the edges of the oven racks. Note: • The health of some birds is extremely sensitive to the fumes given off during the self-cleaning cycle of any range. Move birds to another well-ventilated room. During the self-cleaning cycle, the outside of the oven can become very hot to touch. Do not leave small children unattended near the appliance. If heavy spillovers are not wiped up before the self-cleaning cycle, they may flame and cause more smoke and odor than usual. This is normal and safe and should not cause alarm. The glass ceramic cooktop and the Microwave Drawer can be used while the oven is self-cleaning. OVEN LIGHT The oven light automatically comes on when the door is opened. When the door is closed, press Oven Light pad on the control panel to turn the light on or off. The oven light will come on automatically one minute before the end of a time controlled oven cooking operation. OTHER FEATURES TIMER See page 12. 1 Touch Timer/Hold to Clear/3 Min Plus pad. SET TIME 2 Touch the number pads to enter time in hours and minutes. For 30 minutes, enter 3 0. :30 PUSH TIMER 3 Touch Timer/Hold to Clear/3 Min Plus pad. Timer will count down in minutes and seconds for times under one hour. To cancel, touch and hold Timer/Hold to Clear/3 Min Plus pad for 3 seconds. 3 MINUTE PLUS 3 Minute Plus allows you to set 3 minutes quickly. You can also extend time in multiples of 3 minutes for Timer or Timed Cook. 1 Touch Timer/Hold to Clear/3 Min Plus pad. SET TIME 2 Touch Timer/Hold to Clear/3 Min Plus pad again. 3.00 3 Touch Timer/Hold to Clear/3 Min Plus pad again. 6.00 CONTROL LOCK The Control Lock prevents unwanted oven, drawer and Cooktop Warm operation, such as by small children. They can be set so that the control panel is deactivated or locked. All range functions must be off and the Microwave Drawer closed before setting. TO LOCK Touch Control Lock 2 pad and hold for 3 seconds. The display shows LOCK ON . TO UNLOCK Touch Control Lock 2 pad and hold for 3 seconds. The display shows LOCK OFF . Note: • Control Lock can be used only when neither lower oven nor microwave drawer is in operation, cook top warm and oven light are OFF and drawer door is closed. SETUP/CUSTOM HELP AUDIBLE SIGNAL ELIMINATION At the end of timed cook or when the oven temperature reaches set temperature, beeps will sound. If you wish to have the appliance with no audible signals, you can turn the audible signals off. TO TURN SOUND OFF 1 Touch Setup/Custom Help pad. TOUCH AGAIN 29
-
 1
1 -
2
-
3
-
4
-
5
-
6
-
7
-
8
-
9
-
10
-
11
-
12
-
13
-
14
-
15
-
16
-
17
-
18
-
19
-
20
-
21
-
22
-
23
-
 24
24 -
 25
25 -
 26
26 -
 27
27 -
 28
28 -
 29
29 -
 30
30 -
 31
31 -
 32
32 -
 33
33 -
 34
34 -
35
-
36
-
37
-
38
-
39
-
40
 |
 |