Sharp LC 52SE94U LC-46SE94U LC-52SE94U LC-65SE94U Operation Manual - Page 8
Attaching the Stand, QUICK REFERENCE - settings
 |
UPC - 074000370852
View all Sharp LC 52SE94U manuals
Add to My Manuals
Save this manual to your list of manuals |
Page 8 highlights
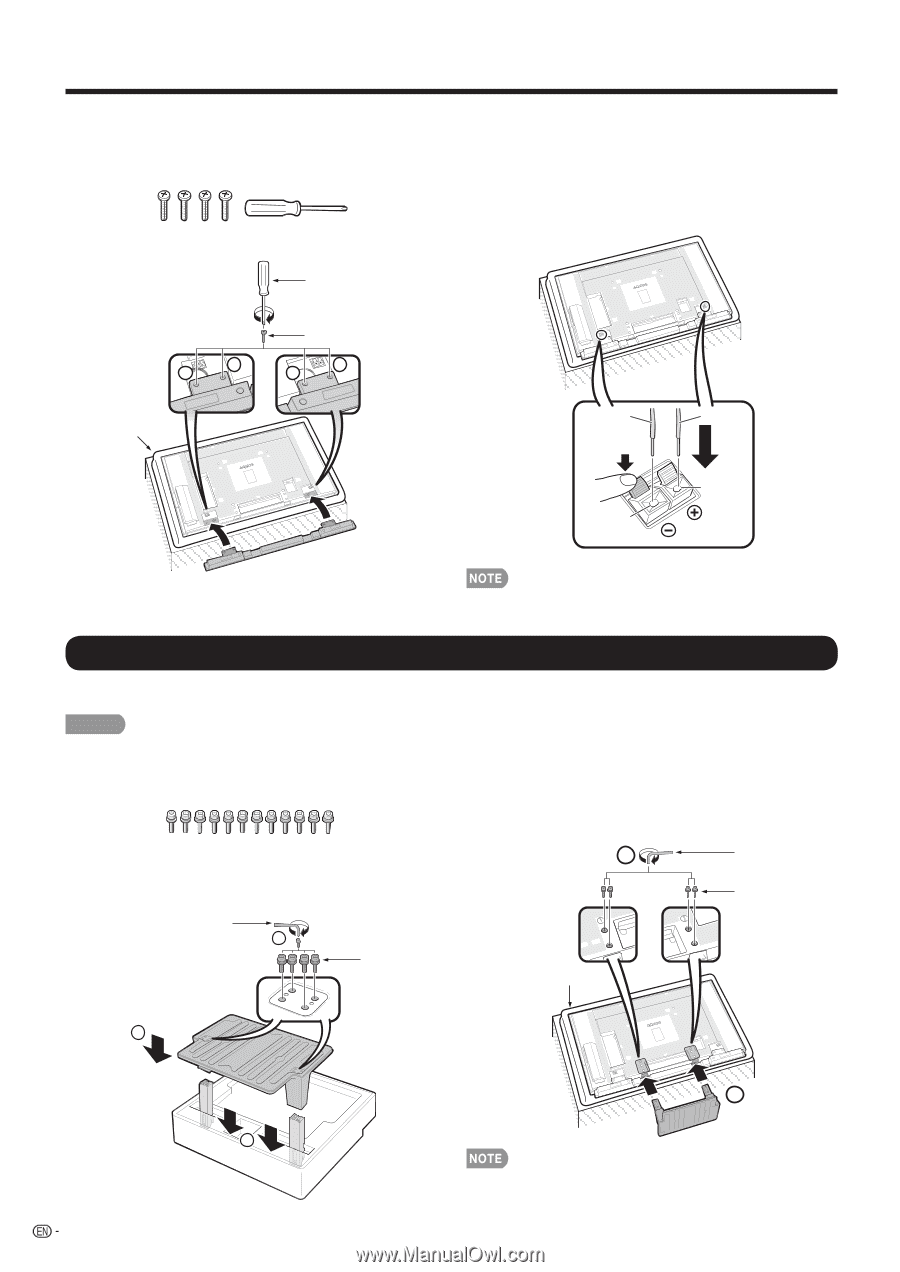
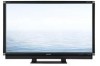
QUICK REFERENCE ■ LC-46SE94U/LC-52SE94U • Before performing work spread cushioning over the base area to lay the TV on. This will prevent it from being damaged. 1 Confirm that there are 4 screws and a screwdriver supplied with the speaker unit. 2 Insert the projections on the speaker unit into the corresponding slots on the TV, then fasten the screws. 3 Connect the ends of the cables to the speaker terminals as shown below. Connect the leads to the speaker terminals of the same color. Screwdriver 1 3 Soft cushion Screws 4 2 Black Red Red Black Insert and tighten the 4 screws with the screwdriver (supplied with the product) in the order of 1, 2, 3 and 4. • To detach the speaker unit, perform the steps in reverse order. Attaching the Stand • Before attaching (or detaching) the stand, unplug the AC cord from the AC INPUT terminal. • Before performing work spread cushioning over the base area to lay the TV on. This will prevent it from being damaged. CAUTION • Attach the stand in the correct direction. • Be sure to follow the instructions. Incorrect installation of the stand may result in the TV falling over. 1 Confirm that there are 12 screws (all the same size) supplied with the TV. 2 1 Set the post for the stand unit onto the box. 2 Attach the base to the post. 3 Insert and tighten the 8 screws into the 8 holes on the bottom of the base. 3 1 Insert the stand into the openings on the bottom of the TV. 2 Insert and tighten the 4 screws into the 4 holes on the rear of the TV. 2 Hex key Screws Hex key 3 Screws Soft cushion 2 1 6 1 • To detach the stand, perform the steps in reverse order.
-
 1
1 -
2
-
 3
3 -
 4
4 -
 5
5 -
 6
6 -
 7
7 -
 8
8 -
 9
9 -
 10
10 -
 11
11 -
 12
12 -
 13
13 -
14
-
15
-
16
-
17
-
18
-
19
-
20
-
21
-
22
-
23
-
24
-
25
-
26
-
27
-
28
-
29
-
30
-
31
-
32
-
33
-
34
-
35
-
36
-
37
-
38
-
39
-
40
-
41
-
42
-
43
-
44
-
45
-
46
-
47
-
48
-
49
-
50
-
51
-
52
-
53
-
54
-
55
-
56
-
57
-
58
-
59
 |
 |