Sharp LC-60LE632U LC-70LE732U Operation Manual - Page 63
Internet Setup - service manual
 |
UPC - 074000373105
View all Sharp LC-60LE632U manuals
Add to My Manuals
Save this manual to your list of manuals |
Page 63 highlights
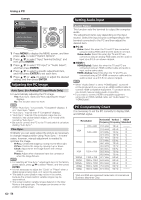
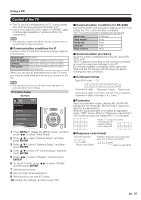
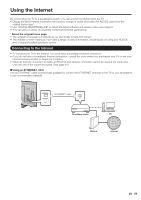
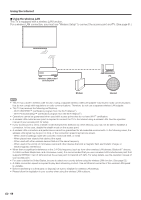
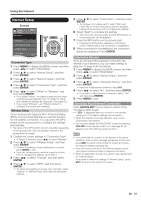
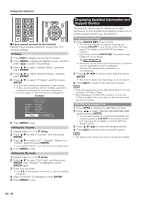
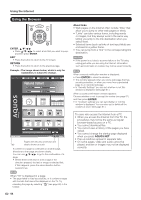
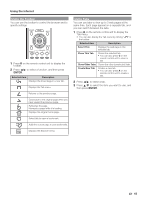
Using the Internet Internet Setup Example Initial Setup Initial Setup Menu EZ Setup Broadcasting Setup Internet Setup Language DivX ® Setup [English] Connection Type 1 Press MENU to display the MENU screen, and then press c/d to select "Initial Setup". 2 Press a/b to select "Internet Setup", and then press ENTER. 3 Press a/b to select "Network Setup", and then press ENTER. 4 Press a/b to select "Connection Type", and then press ENTER. 5 Press c/d to select "Wired" or "Wireless", and then press ENTER. • If you select "Wired", the signal is detected and setup is performed automatically. Use "IP Setup" to check and change the settings as necessary. (See page 62.) • If you select "Wireless", use "Wireless Setup" to configure the access point settings. Wireless Setup If your access point supports Wi-Fi Protected Setup (WPS), it is recommended that you use this function for the wireless connection. You can press the WPS button on the access point to configure the settings automatically. • The name of the WPS button function may differ depending on the access point. See the operation manual of the access point for details. 1 Confirm the current settings in "Connection Type". • If "Wired" is selected, press c/d to select "Wireless". 2 Press a/b to select "Wireless Setup", and then press ENTER. • Confirm the settings. If each setting item is correct, press MENU to exit. • If you are configuring the wireless setup for the first time or changing the settings, go to step 3. 3 Press c/d to select "Change", and then press ENTER. 4 Press a/b to select "WPS", and then press ENTER. • To select and register an access point manually, select "Search" or "Manual Setup" and make the necessary settings. 5 Press a/b to select "Push button", and then press ENTER. • To configure the setting via PC, select "PIN code". Follow the on-screen instructions and the operation manual of the access point to configure the settings. 6 Select "Next" to complete the settings. • The connection process starts and the WPS button on the access point can be pressed. 7 Press the WPS button on the access point. • Pressing the WPS button displays a confirmation screen. Please wait until a connection is established. 8 When a connection is established, the connection details are displayed. Press ENTER. Interactive Service If you do not want other people to connect to the Internet in your absence, you can make settings to keep the TV away from the Internet. 1 Press MENU to display the MENU screen, and then press c/d to select "Initial Setup". 2 Press a/b to select "Internet Setup", and then press ENTER. 3 Press a/b to select "Interactive Service", and then press ENTER. • Input the 4-digit secret number by using 0-9. 4 Press c/d to select "No", and then press ENTER. • If you want to allow Internet connection, select "Yes", and then press ENTER. 5 Press MENU to exit. Checking Your Internet Connection Press AQUOS NET once or twice to switch to the TV+Web or Web screen. • If " " is displayed after you connect to the Internet, check your TV's network settings and connection. • When the original home page appears, now you are connected to the Internet. • You can also display the AQUOS NET screen by pressing FAV APP on the remote control unit. See page 34 for details on the FAV APP key Assign function. • If you have failed to connect to the Internet in the above operation, then an error message will appear. In this case, press EXIT to return to the normal TV screen and check the relevant settings (see page 62). • If you still cannot connect to the Internet, please consult your Internet service provider or telephone company. • When an application is used, you cannot make adjustments for "Internet Setup". If you need to make the settings of "Internet Setup", press EXIT to return to the normal TV screen. 61
-
 1
1 -
2
-
3
-
4
-
5
-
6
-
7
-
8
-
9
-
10
-
11
-
12
-
13
-
14
-
15
-
16
-
17
-
18
-
19
-
20
-
21
-
22
-
23
-
24
-
25
-
26
-
27
-
28
-
29
-
30
-
31
-
32
-
33
-
34
-
35
-
36
-
37
-
38
-
39
-
40
-
41
-
42
-
43
-
44
-
45
-
46
-
47
-
48
-
49
-
50
-
51
-
52
-
53
-
54
-
55
-
56
-
57
-
 58
58 -
 59
59 -
 60
60 -
 61
61 -
 62
62 -
 63
63 -
 64
64 -
 65
65 -
 66
66 -
 67
67 -
 68
68 -
69
-
70
-
71
-
72
-
73
-
74
-
75
-
76
-
77
-
78
-
79
-
80
-
81
-
82
-
83
 |
 |
