Sharp LC22DV17UT LC-22DV17U Operation Manual - Page 20
View mode for 4:3 programs, View mode for HD programs, Labeling channels, Selecting the digital - 1080i
 |
UPC - 074000372016
View all Sharp LC22DV17UT manuals
Add to My Manuals
Save this manual to your list of manuals |
Page 20 highlights
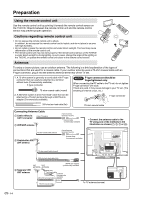
Watching TV Selecting the digital audio language When two or more audio languages are included in a digital signal, you can select one of the audio languages. 1 In digital TV mode, press AUDIO and the "Audio Language" menu screen displays. 2 Press ▲/▼ or 0-6 to select your desired language. 3 Press EXIT to return to the normal screen. NOTE • Digital audio is active only when receiving digital boardcasting, not when receiving analog boardcasting. View mode for 4:3 programs 1 Press VIEW MODE. • The View mode menu displays. • The menu lists the view mode options selectable for the type of video signal currently being received. 2 Press 0-3 to select each view mode directly while the View mode menu is still on the screen. • Each time VIEW MODE is pressed, View Mode item toggles. • You can also select View Mode item by pressing You can sequentially select a view mode that has its own aspect ratio. • You can select "Dot by Dot" in PC input mode. Side Bar: Suitable for viewing conventional 4:3 programs in their normal format. S.Stretch (Smart stretch): Suitable for stretching 4:3 programs to fill the screen. Zoom: Suitable for viewing wide-screen 2.35:1 anamorphic DVDs in full screen. Stretch: This mode is useful for 1.78:1 DVDs. When viewing 1.85:1 DVDs, stretch mode will still show very thin black bands at the top and bottom of the screen. Dot by Dot (for PC/HDMI mode only): Detects the resolution of the signal of the image and it will be shown on the screen with same amount of pixels. View mode for HD programs Stretch mode is available for HD programs. Suitable for viewing wide-screen 1.78:1 aspect-ratio programs. When viewing 1.85:1 programs, the stretch mode will still show very thin black bands at the top and bottom of the screen. Labeling channels To create channel labels 1 Select a channel you want to label. 2 Press TV MENU, then press ▲/▼ to select "Channel", then press ▶ or ENTER. Press ▲/▼ to select "Ch Label", then press ▶ or ENTER. The Ch Label menu will appear. 3 Press ◀/▶ to select a channel you want to label, then press ▼. Ch Label Channel Number Ch Label Label Clear 15-1 >> : Select : Adjust 4 Press ◀/▶ repeatedly until the character you want appears in the first space. The characters rotation as follows: SPACE If the character which you desire appears, press ENTER. Repeat this step to enter the rest of the characters. When you finish inputting the label name, press ENTER. 5 Press EXIT to return to the normal screen. 6 Repeat steps 1-5 for other channels. You can assign a label to each channel. To erase channel labels 1 Select a channel with a label which you want to remove. 2 Press TV MENU, then press ▲/▼ to select "Channel", then press ▶ or ENTER. Press ▲/▼ to select "Ch Label", then press ▶ or ENTER to display the Ch Label menu. 3 Press ▲/▼ to select "Label Clear". Press ▶ or ENTER. 4 Press EXIT to return to the normal screen. 5 Repeat steps 1-4 to erase other channel labels. NOTE • You can enter to the same menu screen from "Picture" menu. • You cannot select "Side Bar" and "S.Stretch" when a 720p, 1080i or 1080p signal is being input. • Some High Definition and/or Digital broadcasts may not allow you to change the picture size. • In PC Mode, only the "Side Bar", "Stretch" and "Dot by Dot" picture size features are available. In PC Mode (WXGA), only the "Stretch" and "Dot by Dot" picture size features are available. 18
-
 1
1 -
2
-
3
-
4
-
5
-
6
-
7
-
8
-
9
-
10
-
11
-
12
-
13
-
14
-
 15
15 -
 16
16 -
 17
17 -
 18
18 -
 19
19 -
 20
20 -
 21
21 -
 22
22 -
 23
23 -
 24
24 -
 25
25 -
26
-
27
-
28
-
29
-
30
-
31
-
32
-
33
-
34
-
35
-
36
-
37
-
38
-
39
-
40
-
41
 |
 |
