Sharp LC37D64U LC-32D64U LC-37D64U Operation Manual - Page 28
Option Menu - aquos manual
 |
UPC - 074000370753
View all Sharp LC37D64U manuals
Add to My Manuals
Save this manual to your list of manuals |
Page 28 highlights
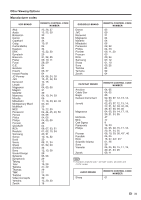
On-Screen Display Menu Option Menu Example Option AQUOS LINK Setup Audio Only Digital Noise Reduction Output Select Caption Setup Digital Caption Info. Program Title Display Favorite CH Game Play Time Operation Lock Out [Low] [Fixed] [No] [Off] [Off] 1 Press MENU to display the MENU screen, and then press c/d to select "Option". 2 Press a/b to select a specific adjustment item and then press ENTER. 3 Press a/b (or c/d) to select the desired setting, and then press ENTER. 4 Press MENU to exit. Skip this step for "Audio Only". Audio Only When listening to music from a music program, you can turn the screen off and enjoy audio only. On: Audio is output without screen image. Off: Both screen images and audio are output. • The screen image will return to normal when a button (except those for audio adjustment, such as VOL, MUTE, SURROUND, AUDIO) is pressed. Digital Noise Reduction Produces a clearer video image. Off: No adjustment High: For enhanced Digital Noise Reduction Low: For moderate Digital Noise Reduction Input Select If the image does not come in clearly from the external equipment connected to INPUT 1 or 3, you may need to change the input signal type setting from the list below: Auto/COMPONENT/VIDEO • If the selected signal type is incorrect, images are not displayed at all or are displayed without any color. • Refer to your external equipment operation manual for the signal type. • If you set INPUT 1 or 3 to Auto, the TV will automatically select the input signal. • Setting INPUT 1 or 3 signal selection to "Auto" when other equipment is connected will result in the following connection priority. INPUT 1 or 3: 1 COMPONENT VIDEO 2 VIDEO HDMI Setup To watch an HDMI or PC-IN equipment image, select "INPUT4" or "INPUT5" from "INPUT SOURCE" menu using INPUT on the remote control unit or on the TV. Auto View: Enable: To use View Mode based on signal recognition, including an HDMI signal. Disable: No function. Audio Select: Digital: For an audio signal via the HDMI terminal. Analog: For an audio signal via the R-AUDIO -L terminal. • Refer to your external equipment operation manual for the signal type. • "Audio Select" is only available for INPUT 5. • When connecting an HDMI-DVI conversion adapter/cable to the HDMI terminal, the image may not come in clearly. Output Select Allows you to select what controls the audio output. Fixed: Sound via speaker is adjusted with VOLk/l on the remote control unit or VOLl/k on the TV. Sound via the AUDIO OUTPUT terminal is not adjustable and outputs at a consistent level. Variable: Sound via the AUDIO OUTPUT terminal is adjusted with VOLk/l on the remote control unit or VOLl/k on the TV. Sound via speaker is muted. Color System Select the video signal system compatible with your equipment from the list below: Auto/NTSC/PAL-M/PAL-N • "Color System" can only be set for the INPUT 1 VIDEO, INPUT 2 and INPUT 3 VIDEO. • If you have already set the Secret No., input the 4-digit secret number here. See page 23 for setting a secret number. 26
-
 1
1 -
2
-
3
-
4
-
5
-
6
-
7
-
8
-
9
-
10
-
11
-
12
-
13
-
14
-
15
-
16
-
17
-
18
-
19
-
20
-
21
-
22
-
 23
23 -
 24
24 -
 25
25 -
 26
26 -
 27
27 -
 28
28 -
 29
29 -
 30
30 -
 31
31 -
 32
32 -
 33
33 -
34
-
35
-
36
-
37
-
38
-
39
-
40
-
41
-
42
-
43
-
44
 |
 |
