Sharp LC4662U LC-46D62U LC-52D62U Operation Manual - Page 32
Useful adjustment settings
 |
UPC - 074000370401
View all Sharp LC4662U manuals
Add to My Manuals
Save this manual to your list of manuals |
Page 32 highlights
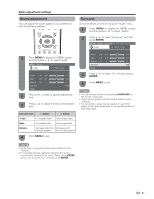
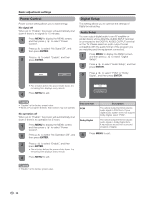
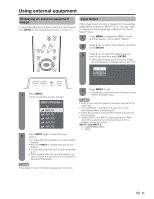
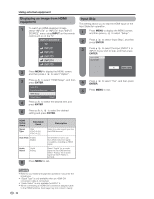
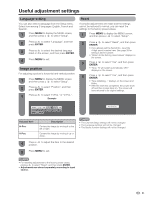
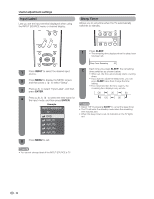
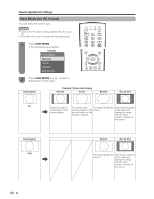
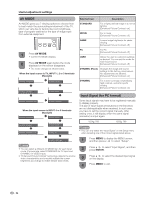
Useful adjustment settings Language setting You can also select a language from the Setup menu. Select from among 3 languages: English, French and Spanish. 1 Press MENU to display the MENU screen, and then press c/d to select "Setup". 2 Press a/b to select "Language", and then press ENTER. 3 Press a/b to select the desired language listed on the screen, and then press ENTER. 4 Press MENU to exit. Image position For adjusting a picture's horizontal and vertical position. 1 Press MENU to display the MENU screen, and then press c/d to select "Setup". 2 Press a/b to select "Position", and then press ENTER. 3 Press a/b to select "H-Pos." or "V-Pos.". Example Reset If complex adjustments are made and the settings cannot be restored to normal, you can reset the settings to the factory preset values. 1 Press MENU to display the MENU screen, and then press c/d to select "Setup". 2 Press a/b to select "Reset", and then press ENTER. • If you already set the Secret No., input the 4-digit secret number here. See page 39 for setting a secret number. • "Return to the factory preset values" displays on the screen. 3 Press c/d to select "Yes", and then press ENTER. • "Now, TV will restart automatically. OK?" displays on the screen. 4 Press c/d to select "Yes", and then press ENTER. • "Now initializing..." displays on the screen and blinks. • After the reset has completed, the power shuts off and then comes back on. The screen will have returned to its original settings. H-Pos. [ 0] a10 b10 V-Pos. [ 0] a20 b20 Reset Now initializing... Selected item H-Pos. V-Pos. Description Centers the image by moving it to the left or right. Centers the image by moving it up or down. 4 Press c/d to adjust the item to the desired position. 5 Press MENU to exit. NOTE • The Channel Setup settings will not be changed. • The Language settings will not be changed. • The Secret number settings will not be changed. NOTE • For resetting adjustments to the factory preset values, press a/b to select "Reset", and then press ENTER. • Adjustments are stored separately according to input source. 31
-
 1
1 -
2
-
3
-
4
-
5
-
6
-
7
-
8
-
9
-
10
-
11
-
12
-
13
-
14
-
15
-
16
-
17
-
18
-
19
-
20
-
21
-
22
-
23
-
24
-
25
-
26
-
 27
27 -
 28
28 -
 29
29 -
 30
30 -
 31
31 -
 32
32 -
 33
33 -
 34
34 -
 35
35 -
 36
36 -
 37
37 -
38
-
39
-
40
-
41
-
42
-
43
-
44
-
45
-
46
-
47
-
48
-
49
-
50
-
51
-
52
-
53
-
54
-
55
-
56
 |
 |