Sharp MX-M550N MX-M550 MX-M620 MX-M700 Operation Manual - Page 145
Printing the number on copies
 |
View all Sharp MX-M550N manuals
Add to My Manuals
Save this manual to your list of manuals |
Page 145 highlights
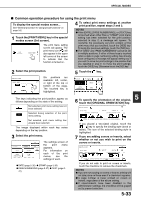
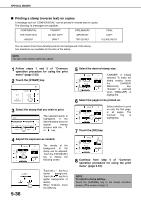
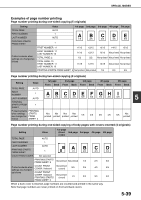
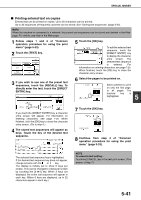
SPECIAL MODES ■ Printing the page number on copies The page number can be printed on copies. One of 6 formats can be selected for the page number. 1 Follow steps 1 and 2 of "Common operation procedure for using the print menu" (page 5-33). 2 Touch the [PAGE NUMBERING] key. 4 If you need to change the starting or ending number of page numbering, the first page printed on, or the print settings for covers/ inserts, touch the [PAGE NUMBER] key. CANCEL OK LAYOUT CANCEL DATE STAMP PAGE NUMBERING TEXT OK OK 1/2 3 Select the page number format. PAGE NUMBERING PAGE NUMBERING FORMAT 1,2,3.. (1),(2),(3).. -1-,-2-,-3-.. P.1,P.2,P.3.. ,,.. 1/5,2/5,3/5.. The selected format is highlighted. If you selected "1/5, 2/5, 3/5", "PAGE NUMBER/TOTAL PAGES" will be printed. "AUTO" is initially selected for "TOTAL PAGE", which means that the number of scanned original pages is automatically used. If you need to enter the total pages manually (for example, when a large number of originals are scanned in batches), touch the [MANUAL] key to display the total page entry screen. PAGE NUMBERING PAGE NUMBERING FORMAT 1,2,3.. (1),(2),(3).. -1-,-2-,-3-.. P.1,P.2,P.3.. ,,.. 1/5,2/5,3/5.. CANCEL OK TOTAL PAGE AUTO MANUAL OK TOTAL PAGE 30 PAGE Enter the total pages (1 to 999) with the numeric keys and touch the [OK] key. NOTES ● When two-sided copying is performed, each side of the paper is counted as a page. If the last page is blank, it will not be included in the total pages. However, if [COUNT BACK COVER] is selected, the last page will be counted. (See step 7.) ● When used in combination with "Dual page copy", "Multi shot", or "Card shot", the number of copied images is the total pages. ● When used in combination with "Pamphlet copy" or "Book copy", the number of pages in the "book" is the total pages. TOTAL PAGE AUTO MANUAL PAGE NUMBER 5 Touch the [MANUAL] key. PAGE NUMBER AUTO FIRST NUMBER LA 1 MANUAL PRINTING STARTS FROM 1 6 Enter settings for "FIRST NUMBER", "LAST NUMBER", and "PRINTING STARTS FROM SHEET". 5 Touch each key so that it is highlighted, and FIRST NUMBER LAST NUMBER then enter the number 1 AUTO with the numeric keys PRINTING STARTS FROM SHEET 1 (1 to 999). To return a number to its initial value (FIRST NUMBER: 1, LAST NUMBER: AUTO, PRINTING STARTS FROM SHEET: 1), touch the [C] (clear) key while the key of the number is highlighted. If you enter the wrong number, press the [C] (clear) key and enter the correct number. NOTES ● A last number smaller than the "FIRST NUMBER" cannot be set. ● "LAST NUMBER" is initially set to "AUTO", which means that the page number is printed on each page through the final page in accordance with the "FIRST NUMBER" and "PRINTING STARTS FROM SHEET" settings. ● A number less than the total page number is set as the last number, the page number will not be printed on the pages that follow the set number. ● Unlike the first and last page numbers, "PRINTING STARTS FROM SHEET" specifies the sheet of paper (not the page number) from which printing of the page number begins. For example, when "3" is selected for one-sided copying, printing of the page number will start from the 3rd sheet of copy paper (the copy of the 3rd original page). When "3" is selected for two-sided copying, printing of the page number will start from the 3rd sheet of copy paper, which is the copy of the 5th original page. 5-37
-
 1
1 -
2
-
3
-
4
-
5
-
6
-
7
-
8
-
9
-
10
-
11
-
12
-
13
-
14
-
15
-
16
-
17
-
18
-
19
-
20
-
21
-
22
-
23
-
24
-
25
-
26
-
27
-
28
-
29
-
30
-
31
-
32
-
33
-
34
-
35
-
36
-
37
-
38
-
39
-
40
-
41
-
42
-
43
-
44
-
45
-
46
-
47
-
48
-
49
-
50
-
51
-
52
-
53
-
54
-
55
-
56
-
57
-
58
-
59
-
60
-
61
-
62
-
63
-
64
-
65
-
66
-
67
-
68
-
69
-
70
-
71
-
72
-
73
-
74
-
75
-
76
-
77
-
78
-
79
-
80
-
81
-
82
-
83
-
84
-
85
-
86
-
87
-
88
-
89
-
90
-
91
-
92
-
93
-
94
-
95
-
96
-
97
-
98
-
99
-
100
-
101
-
102
-
103
-
104
-
105
-
106
-
107
-
108
-
109
-
110
-
111
-
112
-
113
-
114
-
115
-
116
-
117
-
118
-
119
-
120
-
121
-
122
-
123
-
124
-
125
-
126
-
127
-
128
-
129
-
130
-
131
-
132
-
133
-
134
-
135
-
136
-
137
-
138
-
139
-
 140
140 -
 141
141 -
 142
142 -
 143
143 -
 144
144 -
 145
145 -
 146
146 -
 147
147 -
 148
148 -
 149
149 -
 150
150 -
151
-
152
-
153
-
154
-
155
-
156
-
157
-
158
-
159
-
160
-
161
-
162
-
163
-
164
-
165
-
166
-
167
-
168
-
169
-
170
-
171
-
172
-
173
-
174
-
175
-
176
-
177
-
178
-
179
-
180
-
181
-
182
-
183
-
184
-
185
-
186
-
187
-
188
-
189
-
190
-
191
-
192
-
193
-
194
-
195
-
196
-
197
-
198
-
199
-
200
 |
 |