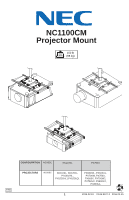
Sharp NC1100CM Installation Manual - NEC - Page 2
WARNING, Parts List
 |
View all Sharp NC1100CM manuals
Add to My Manuals
Save this manual to your list of manuals |
Page 2 highlights
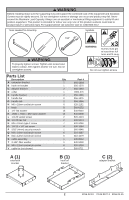
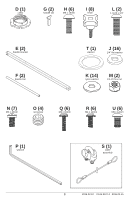
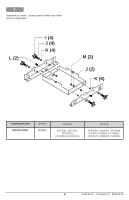
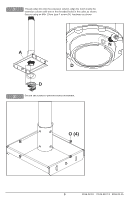
WARNING Before installing make sure the supporting truss will support the combined load of the equipment and hardware. Screws must be tightly secured. Do not overtighten screws or damage can occur and product may fail. Never exceed the Maximum Load Capacity. Always use an assistant or mechanical lifting equipment to safely lift and position equipment. This product is intended for indoor use only. Use of this product outdoors could lead to product failure or personal injury. For support please call customer care at 1-800-865-2112. Tools Needed for Assembly. Symbols 7/16" WARNING x3 Screws must get at least three full turns and fit snug. WARNING To properly tighten screws: Tighten until screw head makes contact, then tighten another 1/2 turn. Do not overtighten screws. Do not over tighten screws Parts List Description A extension bracket B hook-on bracket C adapter bracket D collar E handle bracket F handle bar G handle tab H M6 x 16mm socket pin screw I knob J 1/4" flat washer K .26ID x .7OD x .062 nylon washer L 1/4-20 socket screw M 1/4-20 hex nut N M5 x 10mm type F screw O 1/4-20 x 1/4" set screw P 5/32" (4mm) security wrench Q M4 x 16mm socket pin screw R M4 x 12mm socket pin screw S cable assembly T 2.125" fiber washer U M6 x 12mm socket pin screw V cable tie (not shown) Qty Part # 1 056-1369 1 056-1370 2 056-1364 1 1800-375 2 056-1365 2 056-1371 2 056-1366 6 520-1132 8 560-0252 16 540-9440 14 540-9439 2 520-1013 2 530-9413 7 520-9250 4 500-1084 1 560-9646 6 510-1087 6 510-1079 1 130-8012 1 540-9432 6 520-1050 4 560-9711 A (1) extension bracket B (1) hook on bracket C (2) adapter bracket 2 2016-02-10 #:126-9107-2 2016-04-15
-
 1
1 -
 2
2 -
 3
3 -
 4
4 -
 5
5 -
 6
6 -
 7
7 -
 8
8 -
9
-
10
-
11
-
12
 |
 |
