Sharp NP01UCM Installation Guide
Sharp NP01UCM Manual
 |
View all Sharp NP01UCM manuals
Add to My Manuals
Save this manual to your list of manuals |
Sharp NP01UCM manual content summary:
- Sharp NP01UCM | Installation Guide - Page 1
, INC. Ceiling Mount Model: NP01UCM Maximum Load Capacity: 50 lb (22.7 kg) Read instruction sheet before you start installation and assembly. WARNING • Make sure that the supporting surface will safely support the combined load of the equipment and all attached hardware and components. IMPORTANT - Sharp NP01UCM | Installation Guide - Page 2
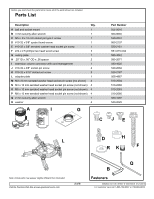
Before you start check the parts list to insure all of the parts shown are included. Parts List Description Qty. A ball and socket mount 1 B 4 mm security allen wrench 1 C M5 x .8 x 10 mm socket pin type F screw 1 D #10-32 x 3/8" spade thumb screw 1 E #10-32 x 3/8" serrated - Sharp NP01UCM | Installation Guide - Page 3
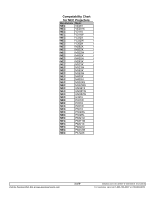
Compatability Chart for NEC Projectors Manufacturer Model NNEECC LVTE228081 NNEECC NNEECC NNNNNEEEEECCCCC NNEECC LVTE328081X NVP311110X NNNVVPPP332231311012560WX NVP333120W NNEECC NVP340020H NNEECC NMP248120X NNEECC NNNNNNNEEEEEEECCCCCCC NNEECC NMP342120WX NNNMMPPP345552000022000WWWX S - Sharp NP01UCM | Installation Guide - Page 4
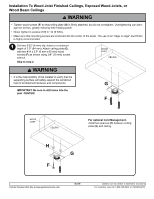
(10 mm) socket wrench. Skip to step 2. WOOD JOIST CEILING WARNING • It is the responsibility of the installer to verify that the supporting surface will safely support the combined load of all attached hardware and components. G IMPORTANT: Be sure to drill holes into the joist CENTER! F WOOD - Sharp NP01UCM | Installation Guide - Page 5
specifications. • Concrete must be 2000 psi density minimum. Lighter density concrete may not hold concrete anchor. • Make sure that the supporting surface will safely support the combined load of the equipment and all attached hard- ware and components. • Never exceed the Maximum Load Capacity of - Sharp NP01UCM | Installation Guide - Page 6
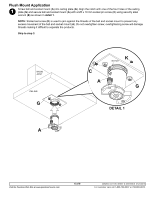
Flush Mount Application 1 Screw ball and socket mount (A) into ceiling plate (G). Align the notch with one of the four holes of the ceiling plate (G) and secure ball and socket mount (A) with a M5 x 10 mm socket pin screw (C) using security allen wrench (B) as shown in detail 1. NOTE: Slotted set - Sharp NP01UCM | Installation Guide - Page 7
Installation to Extension Column 2 Screw extension column to ceiling plate (G). Align the notch with one of the four holes in the ceiling plate (G) and secure extension column with a M5 x 10 mm socket pin screw (C) using security allen wrench (B). See detail 4. Screw extension column connector (I) - Sharp NP01UCM | Installation Guide - Page 8
Attaching Universal Adapter Plate to Projector NOTE: The projector you are installing may differ in appearance from the sample illustrated below. 3 Place projector upside down. Locate adapter plate (L) with notch facing forward as close to projector center of gravity as possible without covering any - Sharp NP01UCM | Installation Guide - Page 9
NOTE: The projector adapter plate and projector you are installing may differ in appearance from the sample illustrated below. 5 Attach projector, with adapter plate already on it, to the ball and socket mount (A) by inserting the ball and socket mount (A) into the adapter plate connection and
-
 1
1 -
 2
2 -
 3
3 -
 4
4 -
 5
5 -
 6
6 -
 7
7 -
8
-
9
 |
 |
ISSUED: 04-11-06
SHEET #: 055-9458-8
07-24-2015
Visit the Peerless Web Site at www.peerlessmounts.com
1 of 9
For customer care call 1-800-729-0307 or 708-865-8870.
°±²³´µ¶·¸¹º³¶»¸¼½µ»°¶³»¾³¹¿±Àµ²¹Á³µ°²Â
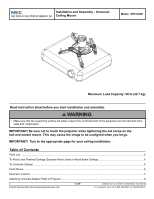
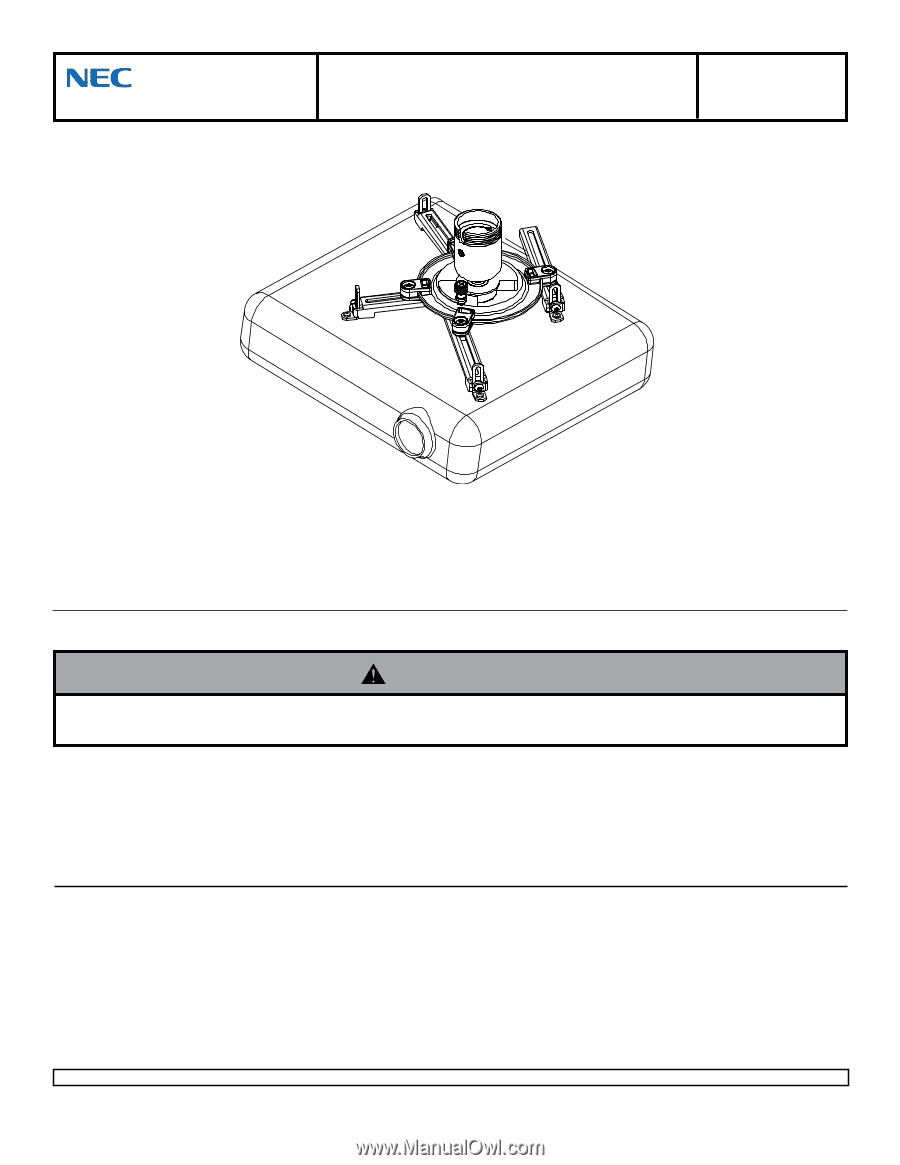
Read instruction sheet before you start installation and assembly.
Maximum Load Capacity: 50 lb (22.7 kg)
IMPORTANT! Be sure not to touch the projector while tightening the set screw on the
ball and socket mount. This may cause the image to be unaligned when you let go.
IMPORTANT!
Turn to the appropriate page for your ceiling installation.
• Make sure that the supporting surface will safely support the combined load of the equipment and all attached hard-
ware and components.
WARNING
Model:
NP01UCM
Installation and Assembly - Universal
Ceiling Mount
Table of Contents
Parts List
.................................................................................................................................................................................
2
To Wood Joist Finished Ceilings, Exposed Wood Joists or Wood Beam Ceilings
.................................................................
4
To Concrete Ceilings
..............................................................................................................................................................
5
Flush Mount
............................................................................................................................................................................
6
Extension Column
..................................................................................................................................................................
7
Attaching Universal Adapter Plate to Projector
.......................................................................................................................
8