Sharp NP01UCM Installation Guide - Page 9
feature, fasten thumb screw
 |
View all Sharp NP01UCM manuals
Add to My Manuals
Save this manual to your list of manuals |
Page 9 highlights
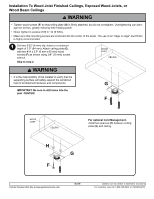
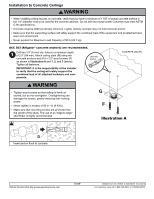
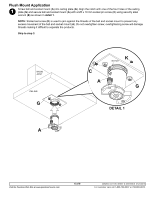
NOTE: The projector adapter plate and projector you are installing may differ in appearance from the sample illustrated below. 5 Attach projector, with adapter plate already on it, to the ball and socket mount (A) by inserting the ball and socket mount (A) into the adapter plate connection and twisting until the adapter plate will no longer turn (about 75°). The spring loaded captive screw should line up with a corresponding hole on the adapter plate (this should line up automatically when the two are connected). Push down and tighten the spring loaded captive screw to secure the adapter plate to the mount. If not using the optional security 6 To adjust roll, pitch, and yaw loosen the set screw (shown below) using security allen wrench (B) or standard 4 mm allen wrench. You should be able to just slightly loosen the screw so that your adjustments can be set without having to hold the projector. Move projector to desired position and slowly tighten set screw. NOTE: Be sure not to touch the projector while tightening the set screw. This may cause the image to be unaligned when you let go. feature, fasten thumb screw (D) in the hole opposite the spring loaded captive screw. IMPORTANT: Allen wrench is your key for projector removal. Store it in a safe place. OPTIONAL: For security, insert serrated washer head socket pin security screw (E) in the hole opposite the spring loaded captive screw. Tighten with security allen wrench (B). This will prevent the projector from being removed. NOTE: Be sure to only use the #10-32 x 3/8" screw (E) (or the thumb screw (D)) opposite the spring loaded captive screw. WOOD JOIST CEILING SET SCREW CUTAWAY VIEW OF CEILING PLATE (G) CEILING CAPTIVE SCREW A WOOD JOIST E D PROJECTOR 1 PROJECTOR ADAPTER PLATE 2 WARNING PROJECTOR • Do not lift more weight than you can handle! Use additional man power or mechanical lifting equipment to safely handle placement of the projector! Visit the Peerless Web Site at www.peerlessmounts.com 9 of 9 ISSUED: 04-11-06 SHEET #: 055-9458-8 07-24-2015 For customer care call 1-800-729-0307 or 708-865-8870.
-
 1
1 -
2
-
3
-
 4
4 -
 5
5 -
 6
6 -
 7
7 -
 8
8 -
 9
9
 |
 |
