Sharp R1870 R-1870 , R- 1871 , R-1872 , R-1874 Installation Instructions - Page 3
Installation Hardware, Preparation Of The Oven - parts
 |
View all Sharp R1870 manuals
Add to My Manuals
Save this manual to your list of manuals |
Page 3 highlights
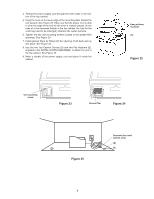
6 INSTALLATION HARDWARE The INSTALLATION HARDWARE (items 1-7) packed with the oven should contain the following: ITEM NAME 1 Wood Screw 5 X 30 mm 2 Toggle Bolt #10 - 24 X 50 mm 3 Top Cabinet Screw 5 X 60 mm 4 Flat Washer 30 mm diameter 5 Grommet 6 Tapping Screw 4 x 12 mm 7 Exhaust Damper Assembly QUANTITY 6 4 2 2 1 1 1 PART CODE XTSS750P35000 LX-BZ0195WRE0 XBRS750P60000 XWHS750-16300 LBSHC0040MRE0 XOTS740P12000 FFTA-B004MRK0 Figure 5 7 PREPARATION OF THE OVEN Utilization of the carton may make installation easier. 1. Open the bottom of the carton, remove oven and all packing materials. 2. CHECK THE OVEN. Check the oven for any damage, such as misaligned or bent door, damaged door seals and sealing surfaces, broken or loose door hinges and latches and dents inside the cavity or on the door. If there is any damage, do not operate the oven and contact your dealer or SHARP AUTHORIZED SERVICER. 3. Place carton upside down as shown in Figure 6-1. 4. Using cutting line around the carton, cut into two pieces (A) and (BC). See Figure 6-2. 5. Cut the remaining portion (BC) into portion (B) and portion (C) according to cutting line. See Figure 6-3. (B) (B) Cutting line Top side Figure 6-1 (C) (A) Figure 6-2 3 (C) (A) Figure 6-3
-
 1
1 -
 2
2 -
 3
3 -
 4
4 -
 5
5 -
 6
6 -
 7
7 -
 8
8
 |
 |
