Sharp UX-P200 UX-P200 Operation Manual - Page 15
Close the operation panel press down - gear
 |
View all Sharp UX-P200 manuals
Add to My Manuals
Save this manual to your list of manuals |
Page 15 highlights
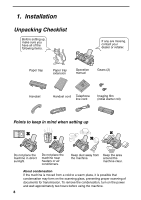
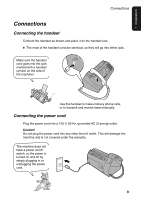
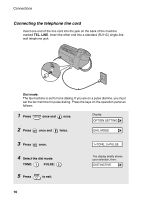
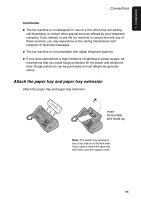
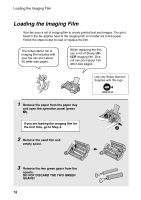
1. Installation Loading the Imaging Film 4 Remove the new roll of imaging film from its packaging. • Cut the band that holds the rolls together. 5 Insert the green gears. Make sure the gears fit into the slots in the ends of the rolls. 1 slot 2 slots 6 Insert the film into the print compartment. Fit ends of rolls onto hubs Thick roll to rear 7 Rotate the front gear as shown until the film is taut. 8 Close the operation panel (press down on both sides to make sure it clicks into place). 13
-
 1
1 -
2
-
3
-
4
-
5
-
6
-
7
-
8
-
9
-
 10
10 -
 11
11 -
 12
12 -
 13
13 -
 14
14 -
 15
15 -
 16
16 -
 17
17 -
 18
18 -
 19
19 -
 20
20 -
21
-
22
-
23
-
24
-
25
-
26
-
27
-
28
-
29
-
30
-
31
-
32
-
33
-
34
-
35
-
36
-
37
-
38
-
39
-
40
-
41
-
42
-
43
-
44
-
45
-
46
-
47
-
48
-
49
-
50
-
51
-
52
-
53
-
54
-
55
-
56
-
57
-
58
-
59
-
60
-
61
-
62
-
63
-
64
-
65
-
66
-
67
-
68
-
69
-
70
-
71
-
72
-
73
-
74
-
75
-
76
-
77
-
78
-
79
-
80
 |
 |

Loading the Imaging Film
13
1. Installation
4
Remove the new roll of imaging film
from its packaging.
•
Cut the band that holds the rolls
together.
5
Insert the green gears.
6
Insert the film into the print
compartment.
7
Rotate the front gear as shown until
the film is taut.
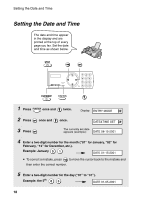
8
Close the operation panel (press down
on both sides to make sure it clicks
into place).
Fit ends of rolls
onto hubs
Make sure the
gears fit into the
slots in the ends
of the rolls.
1 slot
2 slots
Thick roll
to rear