Sharp VN-EZ1U VNEZ1U Operation Manual
Sharp VN-EZ1U Manual
 |
View all Sharp VN-EZ1U manuals
Add to My Manuals
Save this manual to your list of manuals |
Sharp VN-EZ1U manual content summary:
- Sharp VN-EZ1U | VNEZ1U Operation Manual - Page 1
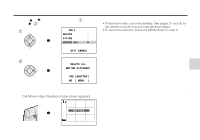
To delete protected movies, unprotect them before the deletion (see pages 37 and 38). • Do not open the battery compartment cover while the Digital Recorder deletes movies. 1 Set the Movie Playback mode (see page 29), then press the MENU button to display . 2 Press ' or " on the Operation - Sharp VN-EZ1U | VNEZ1U Operation Manual - Page 2
EDIT DELETE DIVIDE DELETE ALL EXIT [MENU] 2 DELETE ALL MOTION PICTURES? YES [SHUTTER] NO [ MENU ] 4 Press the Shutter button to delete all recorded movies. • The Movie Index Playback mode screen appears. Basic Operations Notes: • Protected movies cannot be deleted. See pages 37 and 38 for the - Sharp VN-EZ1U | VNEZ1U Operation Manual - Page 3
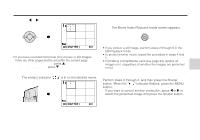
Basic Operations Basic Operations Protecting Important Movie and Images from Deletion This function protects your important movies or still images against accidental deletion. Note: • You can perform this procedure in the Playback mode. Example: • Protecting an important movie. 1 Slide the POWER - Sharp VN-EZ1U | VNEZ1U Operation Manual - Page 4
the MENU button twice to end the protect setting procedure. • The Movie Index Playback mode screen appears. MENU OK[SHUTTER] ‰‰1 Note: • If you have recorded more than nine movies or still images, there are other pages before and after the current page. To go to the previous page, press '. To - Sharp VN-EZ1U | VNEZ1U Operation Manual - Page 5
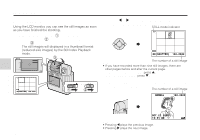
the Operation button to move the frame to the desired image. STILL mode indicator OK[SHUTTER] 1 2 Note: The number of a still image • If you have recorded more than nine still images, there are other pages before and after the current page. To go to the previous page, press '. To go to - Sharp VN-EZ1U | VNEZ1U Operation Manual - Page 6
To Return to the Still Index Playback Mode Press the MENU button and hold it until the Still Index Playback mode screen appears. MENU Basic Operations Basic Operations 40 - Sharp VN-EZ1U | VNEZ1U Operation Manual - Page 7
. To delete a protected still image, unprotect it before the deletion (see pages 37 and 38). • Do not open the battery compartment cover while the Digital Recorder deletes a still image. 1 Slide the POWER switch (1), set the Mode select switch to STILL (2) and then rotate the lens body to PLAY - Sharp VN-EZ1U | VNEZ1U Operation Manual - Page 8
Playback mode with a "DELETE" frame. If you want to delete another still image, repeat the procedure from step 4 to 6. OK[SHUTTER] 1 1 Note: • If you have recorded more than nine still images, there are other pages before and after the current page. To go to the previous page, press '. To go to - Sharp VN-EZ1U | VNEZ1U Operation Manual - Page 9
delete protected still images, unprotect them before the deletion (see pages 37 and 38). • Do not open the battery compartment cover while the Digital Recorder deletes still images. 1 Set the Still Playback mode (see page 39), then press the MENU button to display . MENU AUTO - Sharp VN-EZ1U | VNEZ1U Operation Manual - Page 10
3 Press the Shutter button to delete all recorded still images. • The Still Index Playback mode screen appears. NO FILE Notes: • Protected still images cannot be deleted. See pages 37 and 38 for the - Sharp VN-EZ1U | VNEZ1U Operation Manual - Page 11
image differs according to image contents. Movie Resolution Mode NORMAL: Recording with the standard picture quality. LP: Images in this mode .8/16 * "Frame rate" is the number of the frames the Digital Recorder can record per second. It depends on the image of the movie. 45 Advanced Features - Sharp VN-EZ1U | VNEZ1U Operation Manual - Page 12
72 36 640 × 480 NORMAL 576 288 144 72 To Select a Resolution Mode Note: • You can perform this procedure in the Recording mode. 1 Set the Movie (or Still Image) Recording mode (see page 23 or 26), press the MENU button to display . MENU REC.MODE NORMAL DISPLAY ON BLC - Sharp VN-EZ1U | VNEZ1U Operation Manual - Page 13
possible to brighten the subject and suppress the whitening of the background to improve the image. Example: • Setting during a movie recording. 1 During a movie recording (see page 23), press the MENU button to display . MENU REC.MODE NORMAL DISPLAY ON BLC OFF BACKLIGHT - Sharp VN-EZ1U | VNEZ1U Operation Manual - Page 14
Normal focus Macro focus Normal focus : The focal distance will be about 24˝ (60 cm) to ∞. Recording outdoors or a bust shot indoors Macro focus : The focal distance will be about 4˝ (10 cm). Recording a close-up shot outdoors or indoors Note: • Slide the switch until it stops at the end - Sharp VN-EZ1U | VNEZ1U Operation Manual - Page 15
a blooming flower in ×100 mode of the time-lapse movie. The motion for 8-hour is played back in about 5 minutes. Recording time 1 Set the Movie Recording mode (see page 23), then press the MENU button to display . MENU REC.MODE DISPLAY BLC NORMAL ON OFF BACKLIGHT NORMAL - Sharp VN-EZ1U | VNEZ1U Operation Manual - Page 16
movie setting will return to "OFF" whenever the power is turned off. • You can play back the time-lapse recording with the normal procedure. To Cancel the Time-Lapse Movie Recording Perform steps 1 and 2, and then press \ or | to select "OFF" for the item "TIME LAPSE". Advanced Features OCT.27 - Sharp VN-EZ1U | VNEZ1U Operation Manual - Page 17
natural colors in most situations. Select the "OUTDOOR" mode for outdoor recording or the "INDOOR" mode for indoor recording to obtain more natural colors. Example: • Setting during a movie recording. 1 During a movie recording (see page 23), press the MENU button to display . MENU - Sharp VN-EZ1U | VNEZ1U Operation Manual - Page 18
4 Press the MENU button to turn off the White balance setting screen. • The selected White balance indicator appears. MENU NORMAL LAP REM ‰:‰3:45 OCT.27.2‰‰‰ 1‰:31 AM OUTDOOR White balance indicator To Return to Auto-White Balance Mode Select "AUTO" in step 3. Note: • The White balance setting - Sharp VN-EZ1U | VNEZ1U Operation Manual - Page 19
Advanced Features Selecting the Iris Mode When the amount of light that the lens receives is too much or insufficient for recording, the Lighting indicator appears on the LCD monitor. or Notes: • Make sure the iris select switch is not set in between the and positions. • Under - Sharp VN-EZ1U | VNEZ1U Operation Manual - Page 20
180° so the LCD monitor faces the same direction as the lens. This way you can record yourself while watching yourself on the LCD monitor. Try recording you and your friends together while holding the Digital Recorder by hand or fixing it on a tripod. Precautions: • Do not rotate the lens body over - Sharp VN-EZ1U | VNEZ1U Operation Manual - Page 21
off the indicators on the LCD monitor. Note: • You can perform this procedure in any mode. Example: • Setting during a movie recording. 1 During a movie recording (see page 23), press the MENU button to display . MENU REC.MODE NORMAL DISPLAY ON BLC OFF BACKLIGHT NORMAL - Sharp VN-EZ1U | VNEZ1U Operation Manual - Page 22
procedure lets you turn the beep off. Note: • You can perform this procedure in any mode. Example: • Setting during a movie recording. 1 During a movie recording (see page 23), press the MENU button to display . MENU REC.MODE NORMAL DISPLAY ON BLC OFF BACKLIGHT NORMAL - Sharp VN-EZ1U | VNEZ1U Operation Manual - Page 23
PLAY ON SLOW PLAY OFF DISPLAY ON BACKLIGHT NORMAL EXIT [MENU] ON REPEAT OFF ON: Plays back all the movies once in order of recording. REPEAT: Repeats the Continuous Playback. 3 Press the MENU button to turn off the menu. • The Movie Index Playback mode screen appears. MENU OK[SHUTTER - Sharp VN-EZ1U | VNEZ1U Operation Manual - Page 24
5 Press the Shutter button. • The Playback starts with the selected movie and continues in the recording order. • After the Continuous Playback, the first scene of the playback is displayed and pauses. Continuous playback indicator NORMAL C-PLAY ‰‰3 5 Advanced Features Notes: • You can - Sharp VN-EZ1U | VNEZ1U Operation Manual - Page 25
Advanced Features Dividing a Movie You can divide a movie data. Use this function when you want to cut unnecessary scene from a movie recorded at random. Or divide a movie to sort it out into "chapters". Precaution: • Movies should be long enough for division. If not, the warning indicator "CAN'T - Sharp VN-EZ1U | VNEZ1U Operation Manual - Page 26
Index mode screen appears with a "DIVIDE" frame. 1 DELETE DIVIDE DELETE ALL EXIT [MENU] 2 DIVIDE Advanced Features 5 Press the Shutter button. • The Digital Recorder plays back the selected movie. 5 DIVIDE OK [SHUTTER] EXIT [ MENU ] 6 Press the Shutter button again at the desired scene for - Sharp VN-EZ1U | VNEZ1U Operation Manual - Page 27
to playback the divided movies on your computer, see page 66 and the online manual of the supplied software. • If you protect the latter file of the divided " appears. • If the SmartMedia card's capacity is insufficient to record the divided movies, the warning indicator "CARD FULL" appears. Delete - Sharp VN-EZ1U | VNEZ1U Operation Manual - Page 28
. MENU AUTO PLAY DISPLAY ON BACKLIGHT NORMAL DELETE EXIT [MENU] Advanced Features 2 Press |. • Playback starts in order of recording. NORMAL AUTO PLAY 1 1 OCT.27.2‰‰‰ 1‰:31 AM • To pause, press the Shutter button. Pressing the Shutter button again resumes the Auto - Sharp VN-EZ1U | VNEZ1U Operation Manual - Page 29
Advanced Features Advanced Features Darking the Backlight of the LCD Monitor Darkening the backlight of the LCD monitor makes it possible to conserve the power. Note: • You can perform this procedure in any mode. Example: • Setting during a movie playback. 1 Set the Movie Playback mode (see page - Sharp VN-EZ1U | VNEZ1U Operation Manual - Page 30
supplied AC adapter as the power source for this function. See page 16. • Do not open the battery compartment cover while the Digital Recorder formats a SmartMedia card. Notes: • You cannot format a SmartMedia card which is physically damaged. The warning indicator "CARD ERROR" appears. • You can - Sharp VN-EZ1U | VNEZ1U Operation Manual - Page 31
Importing Images into a Computer Image Files in the SmartMedia Card The Digital Recorder creates folders on the SmartMedia card when formatting it. A recorded image is stored as a image file with an automatically assigned file name. Movie image files are stored in the Dcmv folder and still image - Sharp VN-EZ1U | VNEZ1U Operation Manual - Page 32
the Digital Recorder (in ASF file format). .asb ..... Created by the DIVIDE mode. To play back an image file with this extension, convert it to ASF format file. Please refer to the online manual of the supplied software for details. Serial numbers : Assigned automatically in order of recording. For - Sharp VN-EZ1U | VNEZ1U Operation Manual - Page 33
see the instructions that come with the floppy disk adapter and the documentation attached to your computer for the operations. 3 Insert a commercially available floppy disk adapter into your computer's 3.5˝ floppy disk drive slot. 1 Remove the SmartMedia card from the Digital Recorder (see page - Sharp VN-EZ1U | VNEZ1U Operation Manual - Page 34
a SmartMedia card of 16 MB or more. • Also see the instructions that come with the PC card adapter and the documentation attached to your into your computer's PC card slot. 1 Remove the SmartMedia card from the Digital Recorder (see page 17). 2 Insert the SmartMedia card into a PC card adapter - Sharp VN-EZ1U | VNEZ1U Operation Manual - Page 35
to your computer. Refer to the operation manuals for your computer and PixLab Integrated Digital Media Software for details of installation and the Movies on Your Computer • To play back movies recorded by the Digital Recorder, install the following softwares. * Microsoft Windows Media Player - Sharp VN-EZ1U | VNEZ1U Operation Manual - Page 36
References Before Requesting Service Before calling for service, please check the following troubleshooting table. Power source Symptom No power Sudden power failure Possible cause Suggestion • The specified batteries not loaded correctly. • Correctly load batteries (page 14). • A formatted - Sharp VN-EZ1U | VNEZ1U Operation Manual - Page 37
Off). • The Battery power indicator may not work properly for nickel cadmium (Ni-Cd) rechargeable batteries. ------- The CLOCK SET • Occurs when turning on the Digital mode screen appears. Recorder without the built-in clock set. • Set the date and time before the first use (page 18). Cannot - Sharp VN-EZ1U | VNEZ1U Operation Manual - Page 38
the SmartMedia card. • The write-protect seal attached to the SmartMedia card. • Remove the write-protect seal (page 5). Note: • The Digital Recorder is equipped with a microprocessor. Its performance could be adversely affected by external electrical noise or interference. If this should happen - Sharp VN-EZ1U | VNEZ1U Operation Manual - Page 39
MPEG-4 Digital Recorer Power requirement: DC 6 V Power consumption: [Recording] 3.4 W [Playback] 2.7 W Record format/Image compression system: [Movie] MPEG-4/ASF [Still] JPEG base line conformance/JPEG (Exif 2.1) Sound recording balance: Automatic tracking, manual switching ("OUTDOOR"/"INDOOR") - Sharp VN-EZ1U | VNEZ1U Operation Manual - Page 40
location of the nearest Sharp Authorized Service, or to obtain product literature, accessories, supplies or customer assistance, please call 1-800-BE SHARP (1-800-237-4277) or visit SHARP's web site (http://www.sharp-usa.com). Operational Support If you have read the operation manual but are still - Sharp VN-EZ1U | VNEZ1U Operation Manual - Page 41
de hidruro de níquel-metal). Precaución: • No use distintos tipos de pilas conjuntamente. Instalación de las pilas 1 Asegúrese de que la Grabadora Digital esté apagada. 2 Deslice la tapa del compartimiento de las pilas (1) en la dirección de la flecha (2) para abrirla. 2 1 3 Instale las pilas - Sharp VN-EZ1U | VNEZ1U Operation Manual - Page 42
si las pilas se agotan o si el suministro de energía se interrumpe. Instalación de una tarjeta SmartMedia 1 Asegúrese de que la Grabadora Digital esté apagada. 2 Deslice la tapa del compartimiento de las pilas (1) en la dirección de la flecha (2) para abrirla. 2 1 3 Inserte la tarjeta SmartMedia - Sharp VN-EZ1U | VNEZ1U Operation Manual - Page 43
producir imágenes ligeramente movidas. En este caso, la imagen que aparece en el monitor LCD también es afectada. • El uso de la Grabadora Digital con luces fluorescentes, lámparas de mercurio o lámparas de vapor de sodio causa parpadeo en las imágenes grabadas. Asimismo, algunas veces este tipo - Sharp VN-EZ1U | VNEZ1U Operation Manual - Page 44
botón del obturador. • El indicador de tiempo de grabación "LAP" volverá a indicar 0:00:00. NORMAL LAP REM ‰:‰1:‰2 Desconexión automática La Grabadora Digital se apaga automáticamente para ahorrar la energía de las pilas cada vez que transcurren aproximadamente tres minutos sin que usted realice - Sharp VN-EZ1U | VNEZ1U Operation Manual - Page 45
producir imágenes ligeramente movidas. En este caso, la imagen que aparece en el monitor LCD también es afectada. • El uso de la Grabadora Digital con luces fluorescentes, lámparas de mercurio o lámparas de vapor de sodio causa parpadeo en las imágenes grabadas. Asimismo, algunas veces este tipo de - Sharp VN-EZ1U | VNEZ1U Operation Manual - Page 46
Reproducción de películas El monitor LCD le permite reproducir lo que acaba de grabar. Usted también puede escuchar el sonido a través del altavoz incorporado. 1 Deslice el interruptor POWER (encendido) (1), ajuste el interruptor selector de modo a la posición MOVIE (película) (2), y luego gire el - Sharp VN-EZ1U | VNEZ1U Operation Manual - Page 47
Guía de operación rápida en español Notas: • Para volver a la primera escena de la película actual, presione \ una vez. Si presiona \ dos veces, la película anterior comenzará a ser reproducida. Si no hay ninguna película anterior a la actual, la película que tenga el último número comenzará a ser - Sharp VN-EZ1U | VNEZ1U Operation Manual - Page 48
Guía de operación rápida en español 2 Presione la parte \ o | del botón de operación para cambiar de cuadro hasta encontrar la imagen deseada. Indicador de mode STILL (imagen estática) Cómo volver al modo de Reproducción de Índices de Imágenes Estáticas Presione el botón MENU (menú) y manté - Sharp VN-EZ1U | VNEZ1U Operation Manual - Page 49
RIGHTS WHICH VARY FROM STATE TO STATE. Model Specific Section Your Product Model Number & Description: VN-EZ1U MPEG-4 Digital Recorder including SmartMedia™, CD-ROM, VR-1FPN and AC Adapter (Be sure to have this information available when you need service for your Product.) Warranty Period for
-
 1
1 -
 2
2 -
 3
3 -
 4
4 -
 5
5 -
 6
6 -
 7
7 -
8
-
9
-
10
-
11
-
12
-
13
-
14
-
15
-
16
-
17
-
18
-
19
-
20
-
21
-
22
-
23
-
24
-
25
-
26
-
27
-
28
-
29
-
30
-
31
-
32
-
33
-
34
-
35
-
36
-
37
-
38
-
39
-
40
-
41
-
42
-
43
-
44
-
45
-
46
-
47
-
48
-
49
 |
 |
35
Basic Operations
Basic Operations
Deleting All the Movies
Use this function if you no longer need any of the movies, for
example, after transfering them to your computer.
Precautions:
• Please protect your important movies against accidental
deletion. To delete protected movies, unprotect them before
the deletion (see pages 37 and 38).
• Do not open the battery compartment cover while the Digital
Recorder deletes movies.
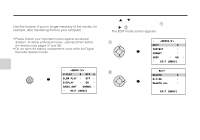
1
Set the Movie Playback mode (see page 29), then
press the MENU button to display <MENU 1/2>.
MENU
<MENU1/2>
C-PLAY
OFF
SLOW PLAY
OFF
DISPLAY
ON
BACKLIGHT
NORMAL
EXIT [MENU]
2
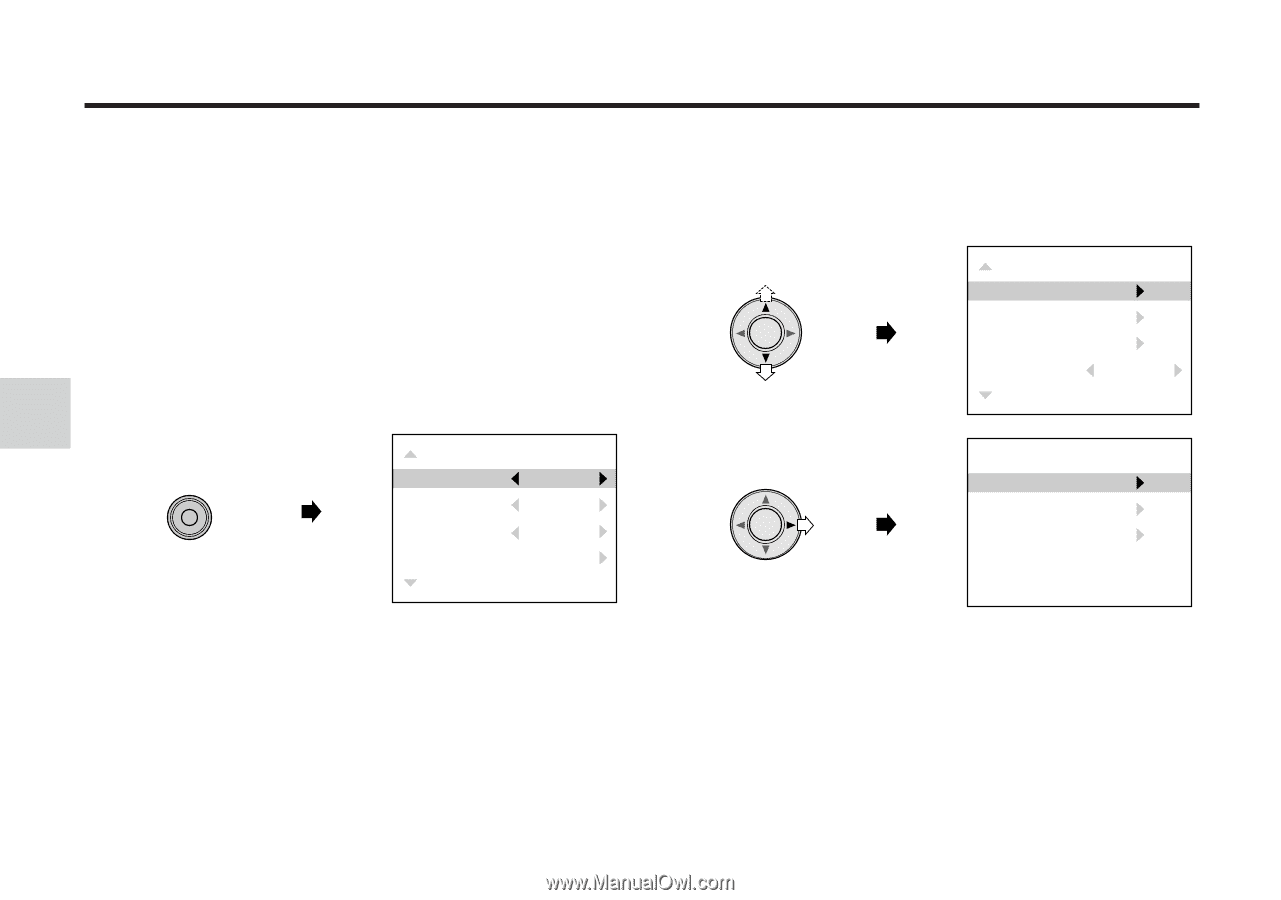
Press
'
or
"
on the Operation button to move the
pointer to “EDIT” in <MENU 2/2> (
1
) and then
press
|
(
2
).
•
The EDIT mode screen appears.
1
<MENU2/2>
EDIT
PROTECT
FORMAT
BEEP
ON
EXIT [MENU]
2
EDIT
DELETE
DIVIDE
DELETE ALL
EXIT [MENU]