Sharp XE-A43S XE-A407 XE-A43S Operation Manual in English - Page 108
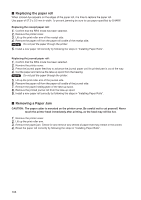
Set a paper roll in the paper roll cradle of the journal side as per
 |
View all Sharp XE-A43S manuals
Add to My Manuals
Save this manual to your list of manuals |
Page 108 highlights
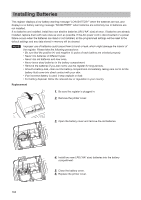
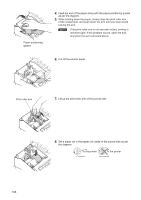
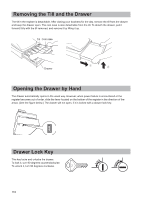
Paper positioning guides 4. Feed the end of the paper along with the paper positioning guides as per the diagram. 5. While holding down the paper, slowly close the print roller arm of the receipt side, and push down the arm until you hear a click locking the arm. NOTE If the print roller arm is not securely locked, printing is not done right. If this problem occurs, open the arm, and close the arm instructed above. 6. Cut off the excess paper. Print roller arm 7. Lift up the print roller arm of the journal side. 8. Set a paper roll in the paper roll cradle of the journal side as per the diagram. 106
-
 1
1 -
2
-
3
-
4
-
5
-
6
-
7
-
8
-
9
-
10
-
11
-
12
-
13
-
14
-
15
-
16
-
17
-
18
-
19
-
20
-
21
-
22
-
23
-
24
-
25
-
26
-
27
-
28
-
29
-
30
-
31
-
32
-
33
-
34
-
35
-
36
-
37
-
38
-
39
-
40
-
41
-
42
-
43
-
44
-
45
-
46
-
47
-
48
-
49
-
50
-
51
-
52
-
53
-
54
-
55
-
56
-
57
-
58
-
59
-
60
-
61
-
62
-
63
-
64
-
65
-
66
-
67
-
68
-
69
-
70
-
71
-
72
-
73
-
74
-
75
-
76
-
77
-
78
-
79
-
80
-
81
-
82
-
83
-
84
-
85
-
86
-
87
-
88
-
89
-
90
-
91
-
92
-
93
-
94
-
95
-
96
-
97
-
98
-
99
-
100
-
101
-
102
-
 103
103 -
 104
104 -
 105
105 -
 106
106 -
 107
107 -
 108
108 -
 109
109 -
 110
110 -
 111
111 -
 112
112 -
 113
113 -
114
-
115
-
116
 |
 |

106
4.
Feed the end of the paper along with the paper positioning guides
as per the diagram.
5.
While holding down the paper, slowly close the print roller arm
of the receipt side, and push down the arm until you hear a click
locking the arm.
NOTE
If the print roller arm is not securely locked, printing is
not done right. If this problem occurs, open the arm,
and close the arm instructed above.
6.
Cut off the excess paper.
7.
Lift up the print roller arm of the journal side.
8.
Set a paper roll in the paper roll cradle of the journal side as per
the diagram.
Paper positioning
guides
Print roller arm