Sharp XR40X Operation Manual - Page 39
Menu Items - lamp reset
 |
UPC - 074000365230
View all Sharp XR40X manuals
Add to My Manuals
Save this manual to your list of manuals |
Page 39 highlights
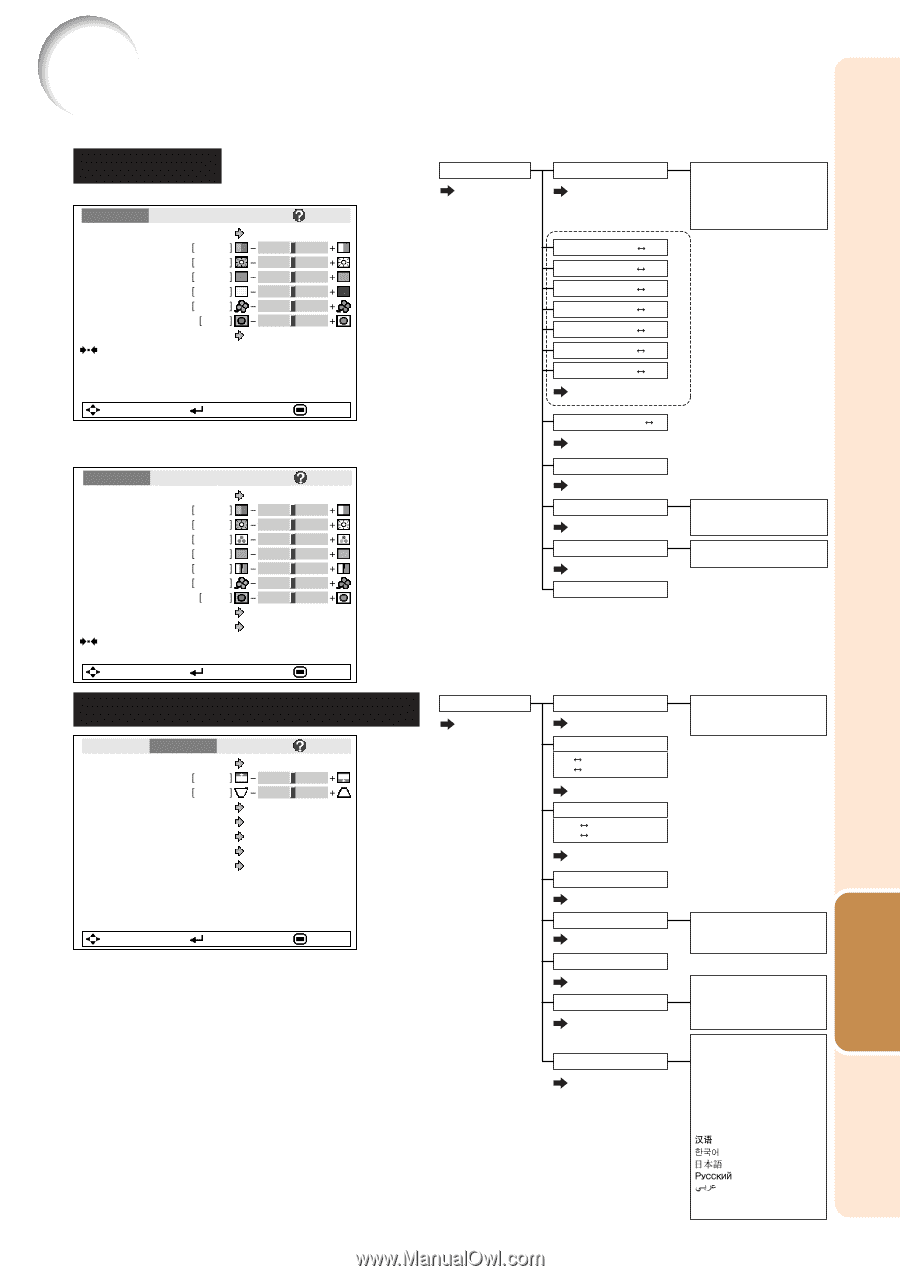
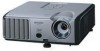
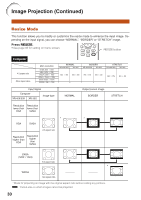
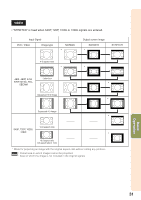
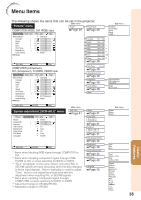
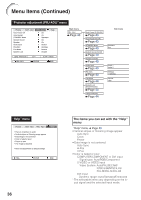
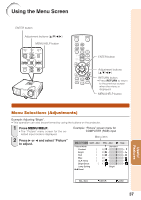
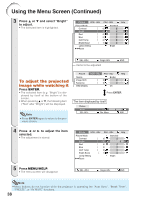
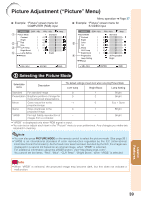
Menu Items The following shows the items that can be set in the projector. "Picture" menu Main menu Picture Picture Mode COMPUTER (RGB), DVI (RGB) input Page 39 Page 39 Picture SCR - ADJ Picture Mode Contrast Bright Red Blue CLR Temp Bright Boost Lamp Setting Reset PRJ - ADJ Standard 0 0 0 0 0 1 Bright Help Contrast -30 Bright -30 Red -30 Blue -30 Color -30 Tint -30 Sub menu Standard Presentation Movie Game sRGB*1 +30 +30 +30 *1 +30 *1 +30 *2 +30 *2*3 SEL./ADJ. ENTER END COMPUTER (Component), DVI (Component), S-VIDEO, VIDEO input Picture SCR - ADJ Picture Mode Contrast Bright Color Tint Sharp CLR Temp Bright Boost Progressive Lamp Setting Reset PRJ - ADJ Help Standard 0 0 0 0 0 0 1 3D Progressive Bright Sharp -30 +30 *2 Page 40 CLR Temp -2 2 Page 40 Bright Boost [0/1/2] Page 40 Progressive Page 40 Lamp Setting Page 40 Reset *4 2D Progressive 3D Progressive Film Mode Bright Eco + Quiet SEL./ADJ. ENTER END "Screen adjustment (SCR-ADJ)" menu Picture Resize Image Shift Keystone OSD Display Background Setup Guide PRJ Mode Language SCR - ADJ PRJ - ADJ Border 0 0 On Logo On Front English Help Main menu SCR - ADJ Page 41 SEL./ADJ. ENTER END *1 Items when inputting RGB signal through COMPUTER or DVI. *2 Items when inputting component signal through COMPUTER or DVI, or when selecting S-VIDEO or VIDEO. *3 "Tone" will appear on the menu screen only when PAL or SECAM signals are input (including when forcibly changed to those input signals). There is basically no need to adjust "Tone", but you can adjust the picture tone with this adjustment when inputting PAL or SECAM signals. *4 Items when inputting component signal through COMPUTER, or when selecting S-VIDEO or VIDEO. *5 Adjustment range for XR-40X/XR-30X. *6 Adjustment range for XR-30S. Resize Page 41 Image Shift -96 +96 *5 -75 +75 *6 Page 41 Keystone -168 +168 *5 -124 +124 *6 Page 41 OSD Display [On/Off] Page 42 Background Page 42 Setup Guide [On/Off] Page 42 PRJ Mode Page 42 Language Page 42 Sub menu Normal Border Stretch Logo Blue None Front Ceiling + Front Rear Ceiling + Rear English Deutsch Español Nederlands Français Italiano Svenska Português polski Türkçe 35 Useful Features
-
 1
1 -
2
-
3
-
4
-
5
-
6
-
7
-
8
-
9
-
10
-
11
-
12
-
13
-
14
-
15
-
16
-
17
-
18
-
19
-
20
-
21
-
22
-
23
-
24
-
25
-
26
-
27
-
28
-
29
-
30
-
31
-
32
-
33
-
 34
34 -
 35
35 -
 36
36 -
 37
37 -
 38
38 -
 39
39 -
 40
40 -
 41
41 -
 42
42 -
 43
43 -
 44
44 -
45
-
46
-
47
-
48
-
49
-
50
-
51
-
52
-
53
-
54
-
55
-
56
-
57
-
58
-
59
-
60
-
61
-
62
-
63
-
64
-
65
-
66
-
67
-
68
-
69
-
70
-
71
 |
 |