Singer 1 One Instruction Manual 3 - Page 22
Otension, Aturn Otension
 |
View all Singer 1 One manuals
Add to My Manuals
Save this manual to your list of manuals |
Page 22 highlights
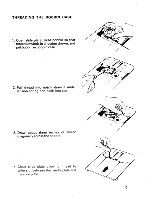
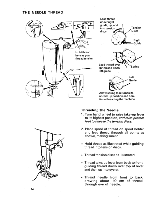
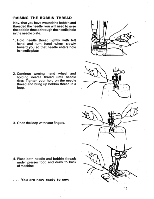
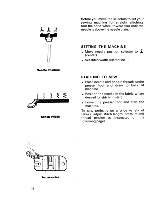
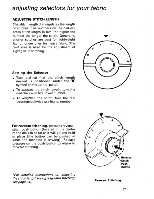
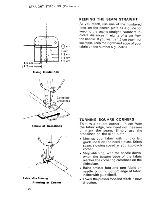
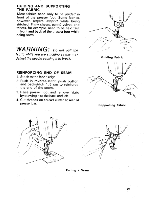
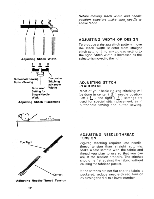
STRAIGHT STITCHING (Continued) Pressure Dial To increase To Decrease Lower Presser Foot Adjusting Pressure Dial ADJUSTING PRESSURE Numbered settings on pressure dial will assist you in obtaining correct pressure for fabric you are using. NORM (normal) setting is an all purpose setting for sewing a wide variety of fabrics of different weights and textures. Settings above and below NORM setting are also provided. When you need extra control, regulate the setting to heavier or lighter pressure to suit fabric being sewn. When darning without an embroidery hoop, set dial at lowest setting, == . See page 42for instructions. Lowerpresser footbefore settingpressure. ® To increase pressure, turn dial from NORM (normal) toward MAX (maximum). e To decrease pressure, turn dial from NORM (normal) toward i* . O For darning, set dial on 44 . - Too Tight Too Loose 23 4 5 Nina, woe Increase Decrease Correct Adjusting Thread Tension 18 REGULATING THREAD TENSION Correct tension is important because too much or too little will weaken your seams or cause your fabric to pucker, Make a test sample with fabric and thread you plan to use and examine it. A perfect stitch will have needle and bobbin threads locked between two layers of fabric with no loops on top or bottom and no puckers. The tension dial regulates the degree of tension on your needle thread. Set it according to the type of thread and fabric you use. The numbers on the dial eliminate guesswork in duplicating settings. if the stitches in your test sample look loose, increase needle-thread tension. If the fabric puckers, decrease tension. O To increase tension, turn dial to higher number. e To decrease tension, turn dial to lower number.
-
 1
1 -
2
-
3
-
4
-
5
-
6
-
7
-
8
-
9
-
10
-
11
-
12
-
13
-
14
-
15
-
16
-
 17
17 -
 18
18 -
 19
19 -
 20
20 -
 21
21 -
 22
22 -
 23
23 -
 24
24 -
 25
25 -
 26
26 -
 27
27 -
28
-
29
-
30
-
31
-
32
-
33
-
34
-
35
-
36
-
37
-
38
-
39
-
40
-
41
-
42
-
43
-
44
-
45
-
46
-
47
-
48
-
49
-
50
-
51
-
52
-
53
-
54
-
55
-
56
 |
 |
