Singer 1 One Instruction Manual 33 - Page 12
adjust, thread, tension
 |
View all Singer 1 One manuals
Add to My Manuals
Save this manual to your list of manuals |
Page 12 highlights
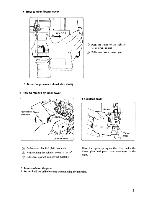
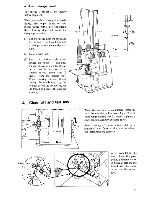
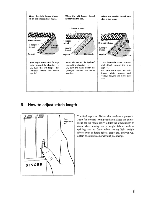
5. How to adjust thread tension Adjust thread tension to suit the type of material and size of the thread used. Tension becomes tighter as the tension dial is turned up toward the plus sign (+). • Correct thread tension Be sure the threads are correctly threaded since otherwise proper thread tension cannot be obtained (See page 6). Right looper thread Needle thread Left looper thread Topside Underside Correct thread tension can be obtained when the thread tension dials are set as follows. (1) Turn the needle thread tension dial and the left and right looper thread tension dials toward the minus sign (-) until the dials stop. Needle thread tension dial (blue) Right looper dial (orange) Left looper dial (yellow) (2) When the dials stop, turn the dials toward the plus sign (+) as shown in table below A and set the needle tension dial and left and right looper thread tension dials to suit the material to be sewn. Slight adjustment will give better thread ten- sions. Fabric Thread Tension Needle Thread Right Looper Thread Left Looper Thread Light Weight 1 turn 1 turn I 1 turn 1 A 1 - 1 Medium Weight Heavy Weight 1.5 turns 2 turns 1 turn 1 turn 1 turn IlI AI - 1 turn , 1 I 4 1 . 10
-
 1
1 -
2
-
3
-
4
-
5
-
6
-
 7
7 -
 8
8 -
 9
9 -
 10
10 -
 11
11 -
 12
12 -
 13
13 -
 14
14 -
 15
15 -
 16
16 -
 17
17 -
18
-
19
-
20
-
21
-
22
-
23
-
24
 |
 |
