Singer 1 One Instruction Manual 35 - Page 14
Topside
 |
View all Singer 1 One manuals
Add to My Manuals
Save this manual to your list of manuals |
Page 14 highlights
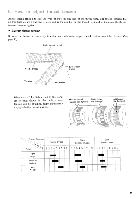
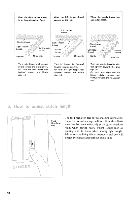
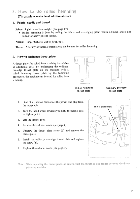
3. How to adjust thread tension 1. Standard rolled hem stitching Set each dial to the standard settings shown in the table for correct tension. For adjustments refer to page 9, Item 5. How To Adjust Thread Tension. Thread Tension Needle Thread Stitching t n9 1234 56789 Standard Rolled hem Rolled hem Variation Right Looper Thread 1 23456789 ----1--- I Left Looper Thread 1 234 56789 2. Right looper thread wrapped rolled hem stitching (rolled hem variation) • Correct thread tension Right looper (orange dial) - - A -- Needle thread (green dial) Topside Left looper thread (yellow dial) Underside For light and medium weight fabrics which are difficult to roll, a fine seam can be obtained by this stitching. To correctly adjust the thread tension, first set the dials to the standard settings shown in the above chart and adjust to proper tension. Next set the dials as follows from the above standard thread tension dial settings. a. Turn the right looper thread tension dial (orange) towards the minus (-) sign half settings. b. Turn the left looper thread tension dial (yellow) towards plus (+) sign 2 - 3 settings. When the right looper thread is too loose When the left looper thread is too loose When the needle thread is too loose Needle thread Right looper thread Topside Left looper thread Underside Turn right looper thread tension dial (orange) towards the plus (+) sign. Needle thread Right looper - thread 1 Left looper Topside thread )T Underside Right looper thread Topside Left looper thread Needle thread Underside Turn left looper thread tension dial (yellow) towards the plus (+) sign. Or, turn right looper thread tension dial (orange) towards the minus (-) sign. Turn needle thread dial (green) towards the plus (+) sign. Or, turn both right and left looper dials (orange and yellow) towards the minus (-) sign. 12
-
 1
1 -
2
-
3
-
4
-
5
-
6
-
7
-
8
-
 9
9 -
 10
10 -
 11
11 -
 12
12 -
 13
13 -
 14
14 -
 15
15 -
 16
16 -
 17
17 -
 18
18 -
 19
19 -
20
-
21
-
22
-
23
-
24
 |
 |
