Singer 14T968DC PROFESIONAL 5 Instruction Manual 31 - Page 41
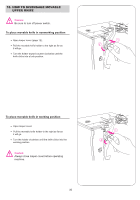
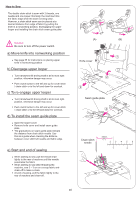
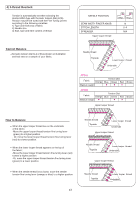
a Move knife into nonworking position, b Disengage upper looper, c To re-engage upper looper, d
 |
View all Singer 14T968DC PROFESIONAL 5 manuals
Add to My Manuals
Save this manual to your list of manuals |
Page 41 highlights
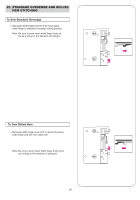
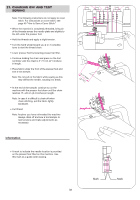
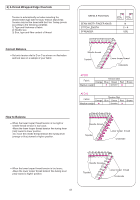
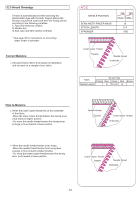
How to Sew The double chain stitch is sewn with 2 threads, one needle and one looper. Normally, the machine trims the fabric edge while the seam is being sewn. However, a chain stitch seam can be placed at a desired distance from edge of fabric by putting the knife in a nonworking position, disengaging the upper looper and installing the chain stitch seam guide plate Caution: Be sure to turn off the power switch. a) Move knife into nonworking position See page 35 for instructions on placing upper knife in nonworking position. b) Disengage upper looper Turn handwheel till driving shaft is at its most right position, otherwise danger may occur. Push clutch button to the left and up for cover stitch / chain stitch or to the left and down for overlock. c) To re-engage upper looper Turn handwheel till driving shaft is at its most right position, otherwise danger may occur. Push clutch button to the left and up for cover stitch / chain stitch or to the left and down for overlock. d) To install the seam guide plate Open the looper cover Remove knife cover and install seam guide plate. The graduations on seam guide plate indicate the distance from chain stitch needle. Use this as a guide when checking the distance between cover stitch left needle and fabric edge. e) Start and end of sewing When starting to sew, pull the thread chain lightly to the rear of machine until the needle penetrates the fabric. When starting to sew after threading the machine, sew 2 ~ 3 cm on a scrap fabric and chain-off to make a chain. At end of sewing, pull the fabric lightly to the rear of machine and chain-off. (A) (B) 1 Knife cover 2 3 Seam guide plate 4 Chain stitch needle 25mm (1") 23456 1 2 40
-
 1
1 -
2
-
3
-
4
-
5
-
6
-
7
-
8
-
9
-
10
-
11
-
12
-
13
-
14
-
15
-
16
-
17
-
18
-
19
-
20
-
21
-
22
-
23
-
24
-
25
-
26
-
27
-
28
-
29
-
30
-
31
-
32
-
33
-
34
-
35
-
 36
36 -
 37
37 -
 38
38 -
 39
39 -
 40
40 -
 41
41 -
 42
42 -
 43
43 -
 44
44 -
 45
45 -
 46
46 -
47
-
48
-
49
-
50
-
51
-
52
-
53
-
54
-
55
-
56
-
57
-
58
-
59
-
60
-
61
-
62
-
63
-
64
-
65
-
66
-
67
-
68
-
69
-
70
-
71
-
72
-
73
-
74
 |
 |
