Singer 191D-30 Instruction Manual - Page 13
Needle, Attachment
 |
View all Singer 191D-30 manuals
Add to My Manuals
Save this manual to your list of manuals |
Page 13 highlights
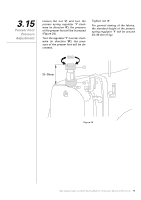
3.7 Needle Attachment Caution Choose a proper needle size according to the count of thread and the type of sewing material used. The power supply should be cut off before attaching the needle. Turn the hand wheel until the needle bar reaches the highest point of its stroke (Figure 12). Loosen screw '2' and hold needle '1' with its indented part 'A' facing exactly to the right in direction 'B'. Insert the needle in the direction of the arrow until it will go no further. Tighten the screw '2'. Make sure the long groove 'C' of the needle is facing exactly to the left in direction 'D'. Figure 12 High Speed Straight Lockstitch Sewing Machine | Instruction Manual and Parts List 10
-
 1
1 -
2
-
3
-
4
-
5
-
6
-
7
-
 8
8 -
 9
9 -
 10
10 -
 11
11 -
 12
12 -
 13
13 -
 14
14 -
 15
15 -
 16
16 -
 17
17 -
 18
18 -
19
-
20
-
21
-
22
-
23
-
24
-
25
-
26
-
27
-
28
-
29
-
30
-
31
-
32
-
33
-
34
-
35
-
36
-
37
-
38
-
39
-
40
-
41
-
42
-
43
-
44
-
45
 |
 |

10
High Speed Straight Lockstitch Sewing Machine
|
Instruction Manual and Parts List
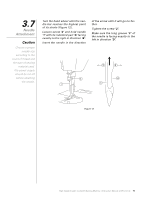
3.7
Needle
Attachment
Turn the hand wheel until the nee-
dle bar reaches the highest point
of its stroke (Figure 12).
Loosen screw
‘2’
and hold needle
‘1’
with its indented part
‘A’
facing
exactly to the right in direction
‘B’
.
Insert the needle in the direction
of the arrow until it will go no fur-
ther.
Tighten the screw
‘2’
.
Make sure the long groove
‘C’
of
the needle is facing exactly to the
left in direction
‘D’
.
Figure 12
Choose a proper
needle size
according to the
count of thread and
the type of sewing
material used.
The power supply
should be cut off
before attaching
the needle.
Caution