Singer 2259 Tradition Instruction Manual - Page 15
How to Choose Your Pattern
 |
View all Singer 2259 Tradition manuals
Add to My Manuals
Save this manual to your list of manuals |
Page 15 highlights
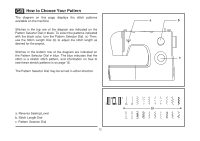
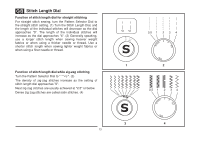
GB How to Choose Your Pattern The diagram on this page displays the stitch patterns available on the machine. Stitches in the top row of the diagram are indicated on the Pattern Selector Dial in black. To select the patterns indicated with the black color, turn the Pattern Selector Dial. (c) Then, use the Stitch Length Dial (b) to adjust the stitch length as desired for the project. Stitches in the bottom row of the diagram are indicated on the Pattern Selector Dial in blue. The blue indicates that the stitch is a stretch stitch pattern, and information on how to sew these stretch patterns is on page 16. The Pattern Selector Dial may be turned in either direction. a. Reverse Sewing Lever b. Stitch Length Dial c. Pattern Selector Dial 12 a b c S1
-
 1
1 -
2
-
3
-
4
-
5
-
6
-
7
-
8
-
9
-
 10
10 -
 11
11 -
 12
12 -
 13
13 -
 14
14 -
 15
15 -
 16
16 -
 17
17 -
 18
18 -
 19
19 -
 20
20 -
21
-
22
-
23
-
24
-
25
-
26
-
27
-
28
-
29
-
30
-
31
-
32
-
33
-
34
-
35
-
36
-
37
-
38
-
39
-
40
-
41
-
42
-
43
-
44
-
45
-
46
-
47
-
48
-
49
-
50
-
51
-
52
-
53
-
54
-
55
-
56
-
57
-
58
 |
 |
