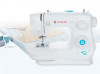
Singer 3337 SIMPLE Instruction Manual and Troubleshooting Guide - Page 23
Sewing a 1-Step Buttonhole
 |
View all Singer 3337 SIMPLE manuals
Add to My Manuals
Save this manual to your list of manuals |
Page 23 highlights
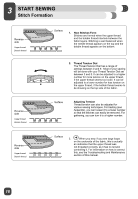
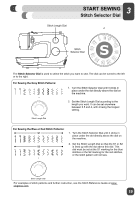
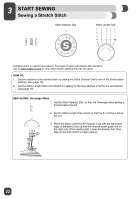
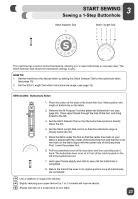
3 START SEWING Sewing a 1-Step Buttonhole Stitch Selector Dial Stitch Length Dial This machine has a built-in buttonhole feature, allowing you to sew buttonholes in one easy step. The Stitch Selector Dial shows the buttonhole settings in grey. HOW TO: 1. Set the machine to the desired stitch by setting the Stitch Selector Dial to the buttonhole stitch. (see page 19) 2. Set the Stitch Length Dial within the buttonhole range. (see page 19) SEW ALONG: Buttonhole Stitch 1. Place the button at the back of the buttonhole foot. Mark position and length of buttonhole on the fabric. 2. Remove the All-Purpose Foot and attach the Buttonhole Foot (see page 26). Pass upper thread through the hole of the foot and bring thread to the left. 3. Set the Stitch Selector Dial so that the buttonhole symbol is directly below the dot. 4. Set the Stitch Length Dial control so that the buttonhole range is directly below the dot. 5. Place the fabric under the foot so that the center line mark on your fabric is aligned with the center of the buttonhole foot and that the cross line mark on the fabric aligns with the center hole of the Buttonhole Foot. Lower the presser foot. 6. Pull the buttonhole lever all the way down and then carefully push it back. The buttonhole lever must sit in front of the notch located on the left of the buttonhole foot. 7. Hold upper thread slightly and start to sew until the buttonhole is completed. 8. Return the buttonhole lever to its original position once all buttonholes are completed. Use a stabilizer to support the stitches. Slightly reducing your upper tension by 1 or 2 numbers will improve results. Always test sew on a scrap piece of your fabric. 23
-
 1
1 -
2
-
3
-
4
-
5
-
6
-
7
-
8
-
9
-
10
-
11
-
12
-
13
-
14
-
15
-
16
-
17
-
 18
18 -
 19
19 -
 20
20 -
 21
21 -
 22
22 -
 23
23 -
 24
24 -
 25
25 -
 26
26 -
 27
27 -
 28
28 -
29
-
30
-
31
-
32
-
33
-
34
-
35
-
36
-
37
-
38
-
39
-
40
-
41
-
42
-
43
-
44
-
45
-
46
-
47
-
48
-
49
-
50
-
51
-
52
-
53
-
54
-
55
-
56
-
57
-
58
-
59
-
60
-
61
-
62
-
63
-
64
-
65
-
66
-
67
-
68
-
69
-
70
-
71
-
72
-
73
-
74
-
75
-
76
-
77
-
78
-
79
-
80
-
81
-
82
-
83
-
84
-
85
-
86
-
87
-
88
-
89
-
90
-
91
-
92
-
93
-
94
-
95
-
96
-
97
-
98
-
99
-
100
-
101
-
102
 |
 |
