Singer Heavy Duty 4452 Instruction Manual - Page 55
Clearance Plate
 |
View all Singer Heavy Duty 4452 manuals
Add to My Manuals
Save this manual to your list of manuals |
Page 55 highlights
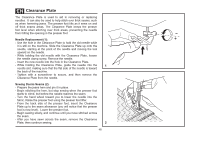
EN Clearance Plate The Clearance Plate is used to aid in removing or replacing needles. It can also be used to help stitch over thick seams, such as when hemming jeans. The presser foot tilts as it sews on and off thick seams areas. The Clearance Plate keeps the presser foot level when stitching over thick areas, preventing the needle from hitting the opening in the presser foot. Needle Replacement (1): - Use the hole in the Clearance Plate to hold the old needle while it is still on the machine. Slide the Clearance Plate up onto the needle, starting at the point of the needle and moving the tool upward on the needle. - While holding the old needle with the Clearance Plate, loosen the needle clamp screw. Remove the needle. - Insert the new needle into the hole in the Clearance Plate. - While holding the Clearance Plate, guide the needle into the 1 needle slot, making sure that the flat side of the needle is toward the back of the machine. - Tighten with a screwdriver to secure, and then remove the Clearance Plate from the needle. Sewing Denim Seams (2): - Prepare the jeans hem and pin it in place. - Begin stitching the hem, but stop sewing when the presser foot starts to climb, but before the needle reaches the seam. - Turn the hand wheel toward you to lower the needle into the fabric. Raise the presser foot using the presser foot lifter. - From the back side of the presser foot, insert the Clearance Plate up to the seam allowance (you will notice that the presser foot is now level). Lower the presser foot. - Begin sewing slowly, and continue until you have stitched across the seam. - After you have sewn across the seam, remove the Clearance Plate, then continue sewing. 2 48
-
 1
1 -
2
-
3
-
4
-
5
-
6
-
7
-
8
-
9
-
10
-
11
-
12
-
13
-
14
-
15
-
16
-
17
-
18
-
19
-
20
-
21
-
22
-
23
-
24
-
25
-
26
-
27
-
28
-
29
-
30
-
31
-
32
-
33
-
34
-
35
-
36
-
37
-
38
-
39
-
40
-
41
-
42
-
43
-
44
-
45
-
46
-
47
-
48
-
49
-
 50
50 -
 51
51 -
 52
52 -
 53
53 -
 54
54 -
 55
55 -
 56
56 -
 57
57 -
 58
58 -
 59
59 -
 60
60 -
61
-
62
-
63
-
64
-
65
-
66
-
67
-
68
-
69
-
70
-
71
-
72
 |
 |
