Singer Heavy Duty 6800C and Roller Bag Bundle User Manual - Page 25
Select a Stitch, Needle stop position
 |
View all Singer Heavy Duty 6800C and Roller Bag Bundle manuals
Add to My Manuals
Save this manual to your list of manuals |
Page 25 highlights
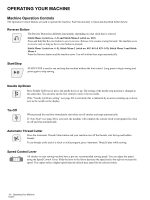
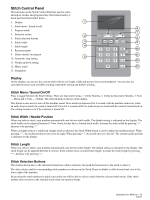
1. Needle position - if the default needle position is adjusted (or if straight stitch is selected), the active one is shown here 2. Recommended presser foot - indicates what presser foot is recommended to use for the selected stitch to obtain the best stitch result 3. Active stitch menu - what stitch menu is active 4. Stitch number - the currently selected stitch with number and graphic 5. Needle stop position - indicates if needle "UP" or "DOWN" is active 6. Auto-Stop is activated 7. Mirror image - if activated, the stitch image will also be mirrored 8. Elongation - the number indicate how much the stitch is elongated (x1 is default setting) 9. Buttonhole lever indicator- indicate that a buttonhole is selected 10. Bobbin winding indicator - indicates that the bobbin winding motor is activated 11. Stitch length - the current length for the selected stitch 12. Stitch width - the current width for the selected stitch (when straight stitch is selected, no width is shown, instead the needle position icon is shown) Select a Stitch Your machine has four stitch menus. Menu 1 includes the most frequently used utility stitches, and are printed on the machine next to the stitch selection buttons, Menu 2 has both utility and decorative stitches. Menu 3-4 are a Font menus. Here, you will find two sets of font styles, letters and numbers you can use to create sequences. When you turn on your machine, stitch menu 1 is activated and straight stitch (stitch no. 1) is selected (A). Press "Stitch Menu" (B) to toggle between the stitch menus. The currently selected menu is shown on the display (A). The stitches on Menu 1 have a direct selection. Once Menu 1 is selected, just press the button next to the stitch to select it (C). The stitches on Menus 2-4 are pictured on the Stitch Reference Charts that can be pulled out at the bottom of the machine. The Stitch Menu number is listed within a folder above the stitches (D). The Stitch Number is printed above the picture of respective stitch (E). By pressing the digits in quick succession you will be able to select a stitch from 10 and up from the selected stitch menu (F). If the stitch number does not exist in the selected menu you will hear a beep and the latest selection will remain. To select another stitch in the same menu just press the number of the stitch. To select a stitch in another menu you will first need to change stitch menu and then select the stitch. 3 2 1 A B C D E F = 4 567 8 9 10 12 11 ++ Operating Your Machine - 21 English
-
 1
1 -
2
-
3
-
4
-
5
-
6
-
7
-
8
-
9
-
10
-
11
-
12
-
13
-
14
-
15
-
16
-
17
-
18
-
19
-
 20
20 -
 21
21 -
 22
22 -
 23
23 -
 24
24 -
 25
25 -
 26
26 -
 27
27 -
 28
28 -
 29
29 -
 30
30 -
31
-
32
-
33
-
34
-
35
-
36
-
37
-
38
-
39
-
40
-
41
-
42
-
43
-
44
 |
 |
