Singer Industrial Serger Instruction Manual - Page 14
Replacing, Upper and, Lower Knife - instructions
 |
View all Singer Industrial Serger manuals
Add to My Manuals
Save this manual to your list of manuals |
Page 14 highlights
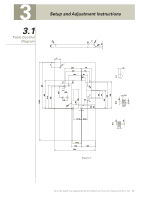
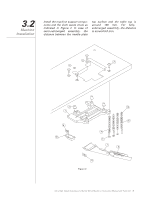
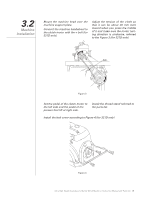
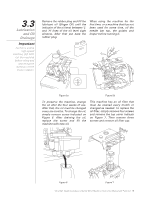
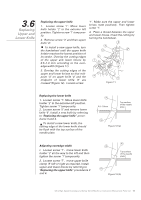
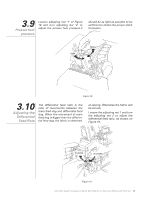
3.6 Replacing Upper and Lower Knife Replacing the upper knife 1. Loosen screw '1'. Move lower knife holder '2' to the extreme left position. Tighten screw '1' temporarily. 2. Remove screw '3' and then upper knife '4'. To install a new upper knife, turn the handwheel until the upper knife holder reaches the lowest position of its stroke. Overlap the cutting edges of the upper anb lower knives by 0.5~1.0 mm according to the overedge width (Figure 11). 3. Overlap the cutting edges of the upper and lower knives so that midpoint 'A' on upper knife '4' and the midpoint of lower knife '6' are crossed (Figure 12). Loosen screw '1'. Make sure the upper and lower knives mate positively. Then tighten screw '1'. 4. Place a thread between the upper and lower knives. Check the cutting by turning the handwheel. 8 3 4 7 2 1 5 4 6 Figure 11 Replacing the lower knife 1. Loosen screw '1'. Move lower knife holder '2' to the extreme left position. Tighten screw '1' temporarily. 2. Loosen screw '5' and remove lower knife '6'. Install a new knife by referring to "Replacing the upper knife" procedures 3 and 4. To install a new lower knife, the cutting edge of the lower knife should be flush with the top surface of the needle plate. 4 0.5~1.0mm Top surface of the needle plate 6 Figure 12 (a) Adjusting overedge width I. Loosen screw '1'ˈmove lower knife holder '2' all the way to the left and then tighten the screw '1' temporarily. 2. Loosen screw '7'ˈmove upper knife clamp '8' left or right as required. Install upper and lower knives by referring to "Replacing the upper knife" procedures 3 and 4. A 4 Top surface of the needle plate 6 Figure 12 (b) Ultra High Speed Overedge and Safety Stitch Machine | Instruction Manual and Parts List 11
-
 1
1 -
2
-
3
-
4
-
5
-
6
-
7
-
8
-
 9
9 -
 10
10 -
 11
11 -
 12
12 -
 13
13 -
 14
14 -
 15
15 -
 16
16 -
 17
17 -
 18
18 -
 19
19 -
20
-
21
-
22
-
23
-
24
-
25
-
26
-
27
-
28
-
29
-
30
-
31
-
32
-
33
-
34
-
35
-
36
-
37
-
38
-
39
-
40
-
41
-
42
-
43
-
44
-
45
-
46
-
47
-
48
-
49
-
50
-
51
-
52
-
53
-
54
-
55
-
56
-
57
-
58
-
59
-
60
-
61
-
62
-
63
-
64
-
65
-
66
-
67
-
68
-
69
-
70
-
71
-
72
-
73
-
74
-
75
-
76
-
77
-
78
-
79
-
80
-
81
-
82
-
83
-
84
 |
 |
