Singer One Instruction Manual 8 - Page 22
Singer One Manual
 |
View all Singer One manuals
Add to My Manuals
Save this manual to your list of manuals |
Page 22 highlights
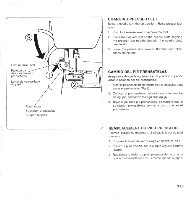
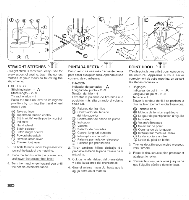
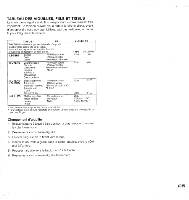
A O c) c:= STRAIGHT STITCHES A Straight stitch is most frequently used for every aspect of sewing. Learn the correct method of your machine following the steps below. 1. SETTINGS Stitch indicator - A Stitch length - 2 - 3 Thread tension - 4 Raise the take-up lever to its highest position by turning the hand wheel toward you. Take-up lever co Top thread tension control Stitch width/needle position control Indicator Hand wheel Stitch selector Stitch length control Power/light switch Reverse stitch lever J Presser foot lever 2. Pull both threads under the presser foot toward the back of the machine. 3. Place the fabric under the presser foot and lower the presser foot lever. 4. Turn the hand wheel toward you until the needle enters the fabric. 0 CD PUNTADA RECTA A 11 Punto recto se usa mas frecuentemente para coser cualquier cosa. Aprenda el use correcto de su maquina. 1. FIJACION Indicador de puntadas Longitud del punto - 2 - 3 Tension del hilo - 4 Levantar la palanca de tira-hilos a la posicion mas alta girando el volante hacia Ud. Palanca de tira-hilos B Controlador de tension del hilo superior Controlador de ancho de punto Indicador Volante Selector de puntadas Control longitud puntada Interruptor corriente/luz Palanca puntada de retroceso Palanca pie prensatelas 2. Tirar ambos hi los debajo del prensatelas hacia la parte trasera de la maquina. 3. Colocar la tele debajo del prensatelas y bajar la palanca del prensatelas. 4. Girar el volante hacia Ud. haste que la aguja entre en el material. POINT DROIT A 1 C'est le point le plus utilise pour touts genre de couture. Apprenez a vous servir correctement de votre machine, en suivant les stapes ci-dessous : 1. Reglages lndicateur de point - A Longueur de point - 2 - 3 Tension - 4 Elever le tendeur de fil a sa position la plus haute en tournant le volant vers vous. Tendeur de fil Molette de tension superieure Largeur de point/position d'aiguille Indicateur Volant/debrayage Selecteur de point Commands de longueur Interrupteur moteur/lumiere 8 Levier couture arriere Levier du pied de biche 2. Tirer les deux fils sous le pied presseur, vers l'arriere. 3. Placer le tissu sous le pied presseur et abaisser le levier. 4. Tourner le volant vers vous jusqu'a ce que l'aiguille penetre dans le tissu. 20
-
 1
1 -
2
-
3
-
4
-
5
-
6
-
7
-
8
-
9
-
10
-
11
-
12
-
13
-
14
-
15
-
16
-
 17
17 -
 18
18 -
 19
19 -
 20
20 -
 21
21 -
 22
22 -
 23
23 -
 24
24 -
 25
25 -
 26
26 -
 27
27 -
28
-
29
-
30
-
31
-
32
-
33
-
34
-
35
-
36
-
37
-
38
-
39
-
40
-
41
-
42
-
43
-
44
 |
 |
