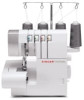
Singer ProFinish 14CG754 Serger Instruction Manual 15 - Page 35
number.
 |
View all Singer ProFinish 14CG754 Serger manuals
Add to My Manuals
Save this manual to your list of manuals |
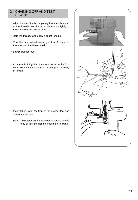
Page 35 highlights
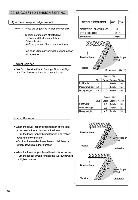
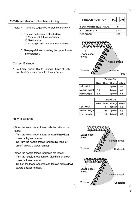
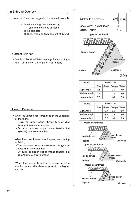
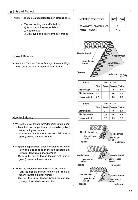
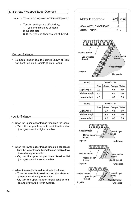
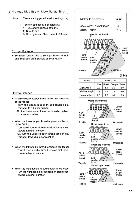
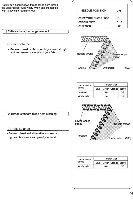
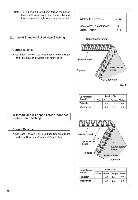
5) 3-thread Wrapped Edge Overlock Note: These are suggested tension settings only. Tension settings are effected by: 1) Type and thickness of fabric 2) Needle size 3) Size, type and fiber content of thread. NEEDLE POSITION eO ow SEAM WIDTH FINGER KNOB STITCH LENGTH S 2 - 4 Correct Balance • Set Each Tension Dial to Settings Shown at Right and Test Sew on a Sample of Your Fabric Needle thread Upper looper thread Topside Lower I per thread Needle thread Underside How to Balance • When the upper looper thread tension is too loose; - Turn the upper looper thread tension dial (orange) toward a higher number • When the lower looper thread tension is too loose; - Turn the lower looper thread tension dial (yellow) toward a higher number. - Or, turn the upper looper thread tension dial (orange) toward a lower number. • When the needle thread tension is too loose; - Turn the needle thread tension dial (blue or green) toward a higher number. - Or, turn the upper looper thread tension dial (orange) toward a lower number. Fabric Tension Dial Blue Green Orange Yellow Light weight 2.0 0.5 6.0 Medium weight 3.0 0.5 7.0 Heavy weight 4.0 0.5 8.0 Fabric Tension Dial Blue Green Orange Yellow Light weight 2.0 0.5 6.0 Medium weight 3.0 0.5 7.0 Heavy weight 4.0 0.5 8.0 Needle thread Upper looper thread Topside Cower looper th ad Underside Needle thread Upper looper thread Topside \L wer looper i thri\ad Needle thread Underside Needle thread Upper looper thread A. Topside ower looper ead Need thread Underside 34
-
 1
1 -
2
-
3
-
4
-
5
-
6
-
7
-
8
-
9
-
10
-
11
-
12
-
13
-
14
-
15
-
16
-
17
-
18
-
19
-
20
-
21
-
22
-
23
-
24
-
25
-
26
-
27
-
28
-
29
-
 30
30 -
 31
31 -
 32
32 -
 33
33 -
 34
34 -
 35
35 -
 36
36 -
 37
37 -
 38
38 -
 39
39 -
 40
40 -
41
-
42
-
43
-
44
-
45
-
46
-
47
-
48
-
49
-
50
-
51
-
52
-
53
 |
 |
