Singer XL-400 FUTURA Instruction Manual - Page 66
Securing Fabric In Embroidery
 |
View all Singer XL-400 FUTURA manuals
Add to My Manuals
Save this manual to your list of manuals |
Page 66 highlights
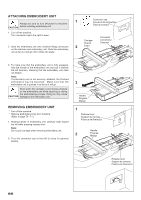
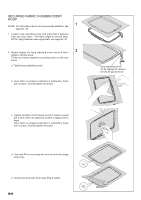
SECURING FABRIC IN EMBROIDERY HOOP 1 NOTE: For information about using appropriate stabilizer, see page 66 - 67. 1. Loosen hoop adjusting screw and place fabric between inner and outer frame. Pull fabric edges to remove slack. NOTE: Apply stabilizer when appropriate, see page 66 - 67. 2. Slightly tighten the hoop adjusting screw and pull fabric 2 edges to remove slack. Fit the two frames together by pressing down on the inner frame. a. Tighten hoop adjusting screw. b. Once fabric is properly positioned in embroidery frame with no slack, securely tighten the screw. Hoop adjusting screw Vis de réglage de cerceau Tornillo de ajuste de aro c. Tighten the fabric in the frames so that it makes a sound like a drum when the tightened surface is tapped with a finger. Once fabric is properly positioned in embroidery frame with no slack, securely tighten the screw. d. This mark ▼ on inner hoop will come to front side (Large hoop only). e. Check inner and outer hoop mark ▼▲ to match. 64
-
 1
1 -
2
-
3
-
4
-
5
-
6
-
7
-
8
-
9
-
10
-
11
-
12
-
13
-
14
-
15
-
16
-
17
-
18
-
19
-
20
-
21
-
22
-
23
-
24
-
25
-
26
-
27
-
28
-
29
-
30
-
31
-
32
-
33
-
34
-
35
-
36
-
37
-
38
-
39
-
40
-
41
-
42
-
43
-
44
-
45
-
46
-
47
-
48
-
49
-
50
-
51
-
52
-
53
-
54
-
55
-
56
-
57
-
58
-
59
-
60
-
 61
61 -
 62
62 -
 63
63 -
 64
64 -
 65
65 -
 66
66 -
 67
67 -
 68
68 -
 69
69 -
 70
70 -
 71
71 -
72
-
73
-
74
-
75
-
76
-
77
-
78
-
79
-
80
-
81
-
82
-
83
-
84
-
85
-
86
-
87
-
88
-
89
-
90
-
91
-
92
-
93
-
94
-
95
-
96
-
97
-
98
-
99
-
100
-
101
-
102
-
103
-
104
-
105
-
106
-
107
-
108
-
109
-
110
-
111
-
112
 |
 |
