Sony Ericsson W595a User Guide - Page 33
Contacts, New contact, Options, Advanced, Delete all, Memory status, Myself, My contact info
 |
View all Sony Ericsson W595a manuals
Add to My Manuals
Save this manual to your list of manuals |
Page 33 highlights
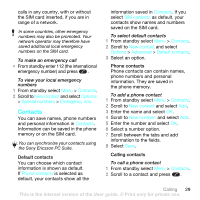
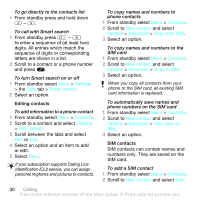
3 Enter the name and select OK. 4 Enter the number and select OK. 5 Select a number option and add more information, if available. 6 Select Save. To call a SIM contact 1 From standby select Menu > Contacts. 2 Scroll to a contact and press . Deleting contacts To delete all contacts 1 From standby select Menu > Contacts. 2 Scroll to New contact and select Options > Advanced > Delete all contacts. 3 Select an option. Contact memory status The number of contacts you can save in your phone or on the SIM card depends on available memory. To view contact memory status 1 From standby select Menu > Contacts. 2 Scroll to New contact and select Options > Advanced > Memory status. Myself You can enter information about yourself and, for example, send your business card. To enter Myself information 1 From standby select Menu > Contacts. 2 Scroll to Myself and select Open. 3 Scroll to an option and edit the information. 4 Select Save. To add your own business card 1 From standby select Menu > Contacts. 2 Scroll to Myself and select Open. 3 Scroll to My contact info and select Add > Create new. 4 Scroll between the tabs and add information to the fields. 5 Enter the information and select Save. Groups You can create a group of phone numbers and email addresses from Phone contacts to send messages to. See Messaging on page 37. You can also use groups (with phone numbers) when you create accepted callers lists. See Accept calls on page 35. To create a group of numbers and email addresses 1 From standby select Menu > Contacts. 2 Scroll to New contact and select Options > Groups. 3 Scroll to New group and select Add. Calling 31 This is the Internet version of the User guide. © Print only for private use.
-
 1
1 -
2
-
3
-
4
-
5
-
6
-
7
-
8
-
9
-
10
-
11
-
12
-
13
-
14
-
15
-
16
-
17
-
18
-
19
-
20
-
21
-
22
-
23
-
24
-
25
-
26
-
27
-
 28
28 -
 29
29 -
 30
30 -
 31
31 -
 32
32 -
 33
33 -
 34
34 -
 35
35 -
 36
36 -
 37
37 -
 38
38 -
39
-
40
-
41
-
42
-
43
-
44
-
45
-
46
-
47
-
48
-
49
-
50
-
51
-
52
-
53
-
54
-
55
-
56
-
57
-
58
-
59
-
60
-
61
-
62
-
63
-
64
-
65
-
66
-
67
-
68
-
69
-
70
-
71
-
72
-
73
-
74
-
75
-
76
-
77
-
78
-
79
-
80
-
81
-
82
-
83
 |
 |
