Sony BDV-E385 Operating Instructions - Page 17
Getting Started, Step 1: Installing the System, How to position the system, Connecting the speakers - speaker stands
 |
View all Sony BDV-E385 manuals
Add to My Manuals
Save this manual to your list of manuals |
Page 17 highlights
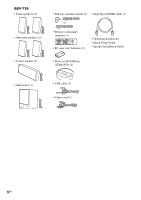
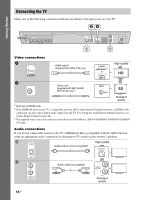
Getting Started Getting Started Step 1: Installing the System How to position the system Install the system by referring to the illustration below. A B F C G D E A Front speaker (L (left)) B Front speaker (R (right)) C Center speaker D Surround speaker (L (left)) E Surround speaker (R (right)) F Subwoofer G Unit Step 2: Connecting the System Do not connect the AC power cord (mains lead) of the unit to a wall outlet (mains) until all the other connections are made. To assemble the speakers, refer to the supplied "Speaker Installation Guide." (BDV-E490 only) • When you connect another component with a volume control, turn down the volume of the other components to a level where sound is not distorted. Connecting the speakers Connect the speaker cords to match the color of the SPEAKERS jacks of the unit. When connecting to the unit, insert the connector until it clicks. White (Front left speaker (L)) Red (Front right speaker (R)) Purple (Subwoofer) Green (Center speaker) • Use caution when placing the speakers and/or speaker stands attached to the speakers on a specially treated (waxed, oiled, polished, etc.) floor, as staining or discoloration may result. • Do not lean or hang on a speaker, as it may fall down. • You can install the speakers on a wall. For details, refer to the supplied "Speaker Installation Guide." FRONT R FRONT L SUBWOOFER CENTER SPEAKERS SUR R SUR L Gray (Surround right speaker (R)) Blue (Surround left speaker (L)) 17US
-
 1
1 -
2
-
3
-
4
-
5
-
6
-
7
-
8
-
9
-
10
-
11
-
 12
12 -
 13
13 -
 14
14 -
 15
15 -
 16
16 -
 17
17 -
 18
18 -
 19
19 -
 20
20 -
 21
21 -
 22
22 -
23
-
24
-
25
-
26
-
27
-
28
-
29
-
30
-
31
-
32
-
33
-
34
-
35
-
36
-
37
-
38
-
39
-
40
-
41
-
42
-
43
-
44
-
45
-
46
-
47
-
48
-
49
-
50
-
51
-
52
-
53
-
54
-
55
-
56
-
57
-
58
-
59
-
60
 |
 |