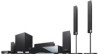
Sony BDV-HZ970W Quick Setup Guide - Page 2
Enable wireless transmission, Perform Easy Setup, Play a disc - network setting
 |
UPC - 027242780712
View all Sony BDV-HZ970W manuals
Add to My Manuals
Save this manual to your list of manuals |
Page 2 highlights
3 Enable wireless transmission 1. Insert the wireless transceivers into both the main unit and surround amplifier. EZW-RT10 S-AIR AB ID C R L ASB-ACIRPAIIDRING SURROUND SELECTOR SURROUND SURROUND BACK EZW-RT10 IMPEDANCE3-U16SE Insert securely until they click. 2. Set the S-AIR ID switches to "A." S-AIR ID ABC EZW-RT10 S-AIR ID ABC R L ASB-ACIRPAIIDRING SURROUND SELECTOR SURROUND SURROUND BACK EZW-RT10 IMPEDANCE3-U16SE A B C PAIRING S-AIR ID The S-AIR IDs on the main unit and surround amplifier are set to "A" at the factory. 3. Connect the AC power cords (), and turn on the power (). S-AIR/STANDBY S-AIR/STANDBY 4 Perform "Easy Setup" Do not insert a disc before performing the "Easy Setup". 5 Play a disc 1. Insert batteries into the remote. 123 456 789 0 1. Press , and place a disc on the tray. 2. Switch the input selector on your TV so that system screens like the ones below appear on the TV screen. Starting up "Easy Setup" screen 3. Perform basic settings by following the on-screen instructions in "Easy Setup" using and . 2. Press to close the disc tray. Playback starts. If playback does not start automatically, select in the [Video], [Music], or [Photo] category, and press . Updating to the latest software version By connecting the system to the Internet, you can update your system's software to the latest version. For details on how to connect the system to the Internet, refer to "Step 3: Connecting to the Network" in the Operating Instructions. Note During a software update, "UPDATING" is displayed in the front panel display and video signals via HDMI may not be displayed. After the update completes, the main unit automatically shuts off. Please wait for the software update to complete; do not turn the main unit on or off, or operate the main unit or TV. [Easy Setup is now complete.] appears when "Easy Setup" is complete.
-
 1
1 -
 2
2
 |
 |
