Sony CDX-1200 Operating Instructions (primary manual) - Page 2
Automatic Music Sensor AMS, Manual Search, Repeat Play, Shuffle Play, Best Tuning Memory BTM, - rear fader
 |
View all Sony CDX-1200 manuals
Add to My Manuals
Save this manual to your list of manuals |
Page 2 highlights
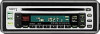
Location of controls SOURCE MODE D-BASS BTM SENS SEEK AMS ATT REPEAT SHUF SOUND 1 2 3 4 5 6 DSPL OFF CDX-1200 1 MODE (band select) button 2 SOURCE (source select) button 3 Reset button 4 (+) (-) (volume/bass/treble/left-right/ front-rear control) button 5 Display window 6 SEEK/AMS (seek/Automatic Music Sensor/ manual search) button 7 Z (eject) button 8 SENS/BTM (sensitivity adjust/Best Tuning Memory) button 9 D-BASS button 0 SOUND button qa During radio reception: Number buttons During CD playback: (1) REPEAT button (2) SHUF button qs DSPL (display mode change/time set) button qd OFF button* qf ATT (attenuate) button * Warning when installing in a car without ACC (accessory) position on the ignition key switch Be sure to press (OFF) on the unit for two seconds to turn off the clock display after turning off the engine. When you press (OFF) momentarily, the clock display does not turn off and this causes battery wear. CD Player Listening to a CD Insert a CD. Playback starts automatically. Label side up Locating a specific track - Automatic Music Sensor (AMS) During CD playback, press either side of (SEEK/AMS) for each track you want to skip. SEEK To locate succeeding tracks AMS To locate preceding tracks If a CD is already inserted, press (SOURCE) repeatedly until "CD" appears to start playback. CD MIN SEC Elapsed playing time Note To play back an 8 cm (3 in.) CD, use the optional Sony compact disc single adapter (CSA-8). To Stop playback Eject the CD Press Z or (OFF) Z Changing the display item Each time you press (DSPL) during CD playback, the item changes as follows: B Elapsed playing time B Track number Clock b Locating a specific point in a track - Manual Search During playback, press and hold either side of (SEEK/AMS) for about two seconds. Release when you have found the desired point. SEEK To search forward AMS To search backward Note If " " or " " appears in the display, you have reached the beginning or the end of the disc and you cannot go any further. Playing a CD in various modes Playing tracks repeatedly - Repeat Play Press (1) during playback. "REPEAT" appears in the display. When the current track is over, it will play again from the beginning. To return to normal playback mode, press again. Playing tracks in random order - Shuffle Play Press (2) during playback. "SHUF" appears in the display. To return to normal playback mode, press again. Setting the clock The clock has a 12-hour digital indication. Example: To set the clock to 10:08 1 Press (DSPL) during operation. 2 Press (DSPL) for two seconds. The hour indication flashes. 1 Set the hour. To go forward To go backward 2 Press (SOUND). The minute indication flashes. 3 Set the minute. To go forward To go backward 3 Press (DSPL). The clock starts. Note If the car has no accessory position on the ignition key switch, the clock cannot be set unless the power is turned on. Set the clock after you have turned on the radio, or started CD playback. Radio Memorizing stations automatically - Best Tuning Memory (BTM) This unit selects the stations with the strongest signals and memorizes them in the order of their frequencies. You can store up to 6 stations on each band (FM I, FM II, FM III, and AM). Caution When tuning in stations while driving, use Best Tuning Memory to prevent accidents. 1 Press (SOURCE) repeatedly to select the tuner. Each time you press (SOURCE), the mode changes as follows: CD y TUNER 2 Press (MODE) repeatedly to select the band. Each time you press (MODE), the band changes as follows: B FM I B FM II B FM III B AM 3 Press (SENS/BTM) for two seconds. The unit stores stations in the order of their frequencies on the number buttons. A beep sounds when the setting is stored. Notes • The unit does not store stations with weak signals. If only a few stations can be received, some number buttons will retain their former setting. • When a number is indicated in the display, the unit starts storing stations from the one currently displayed. • If a CD is not in the unit, only the tuner band appears even if you press (SOURCE). Other Functions Adjusting the sound characteristics You can adjust the bass, treble, balance, and fader. You can store the bass and treble levels. Each source can store the bass and treble level independently. 1 Select the item you want to adjust by pressing (SOUND) repeatedly. BAS (bass) t TRE (treble) t BALANCE (left-right) t FADER (front-rear) t VOL (volume) 2 Adjust the selected item by pressing (+) or (-). Adjust within three seconds after selecting the item. (After three seconds, the buttons function reverts to volume control buttons.) Cancel the beep sound Press (6) while pressing (SOUND). To obtain the beep sound again, press these buttons again. Note If you connect an optional power amplifier and do not use the built-in amplifier, the beep sound will be deactivated. Boosting the bass sound - D-bass You can enjoy a clear and powerful bass sound. The D-bass function boosts the low frequency and high frequency signal with a sharper curve than conventional bass boost. You can hear the bass line more clearly even while the vocal volume remains the same. You can emphasize and adjust the bass sound easily with the D-BASS control. Level D-BASS 3 D-BASS 2 D-BASS 1 D-BASS 3 D-BASS 2 D-BASS 1 0dB Frequency (Hz) Adjusting the bass curve Press (D-BASS) repeatedly to select the desired bass curve. "D-BASS" appear in the display. As the D-BASS number increases so does the effect. D-BASS 1 t D-BASS 2 t D-BASS 3 t D-BASS OFF Note The bass sound may distort at same volume. If the bass sound distorts, select less effective bass curve. Attenuating the sound Press (ATT). "ATT" flashes. To restore the previous volume level, press (ATT) again. Memorizing only the desired stations You can store up to 6 stations on each band (a total of 18 for FM I, FM II, and FM III, and 6 for AM) in the order of your choice. 1 Press (SOURCE) repeatedly to select the tuner. 2 Press (MODE) repeatedly to select the band. 3 press and hold either side of (SEEK/AMS) to tune in the station that you want to store on the number button. 4 Press and hold the desired number button ((1) to (6)) until "MEM" appears. The number button indication appears in the display. Note If you try to store another station on the same number button, the previously stored station will be erased. Receiving the memorized stations 1 Press (SOURCE) repeatedly to select the tuner. 2 Press (MODE) repeatedly to select the band. 3 Press the number button ((1) to (6)) on which the desired station is stored. If you cannot tune in a preset station Press either side of (SEEK/AMS) to search for the station (automatic tuning). Scanning stops when the unit receives a station. Press either side of (SEEK/AMS) repeatedly until the desired station is received. Note If the automatic tuning stops too frequently, press (SENS/BTM) repeatedly until "LOCAL" (local seek mode) is displayed. Only the stations with relatively strong signals will be tuned in. Tip If you know the frequency of the station you want to listen to, press and hold either side of (SEEK/AMS) until the desired frequency appears (manual tuning). If FM stereo reception is poor - Monaural Mode Press (SENS/BTM) repeatedly until "MONO" appears. The sound improves, but becomes monaural ("STEREO" disappears). To return to normal mode, press again until "MONO" disappears. Changing the display item Each time you press (DSPL), the item changes as follows: Frequency y Clock Troubleshooting guide The following checklist will help you remedy the problems you may encounter with your unit. Before going through the checklist below, check the connection and operating procedures. General Problem Cause/Solution No sound. •Adjust the volume with (+). •Set the fader control to the center position for two-speaker systems. The contents of the memory have been erased. No beep sound. •The power cord or battery has been disconnected. •The reset button has been pressed. t Store the settings again into the memory. •An optional power amplifier is connected and you are not using the built-in amplifier. •The beep sound is cancelled. CD playback Problem CD cannot be loaded. Play does not begin. CD is automatically ejected. CD will not eject. The operation buttons do not function. The sound skips due to vibration. Cause/Solution •Another CD is already loaded. •The CD was forcibly inserted upside down. Dirty disc. The ambient temperature exceeds 50°C (122°F). Press the reset button. •The unit is installed at an angle of more than 60°. •The unit is not installed in a sturdy part of the car. Radio reception Problem Cause/Solution Preset tuning is not possible. •Memorize the correct frequency. •The broadcast signal is too weak. Automatic tuning is not possible. The broadcast signal is too weak. t Use manual tuning. The stations cannot be received. The sound is hampered by noises. Connect an power aerial control lead (blue) or accessory power supply lead (red) to the power supply lead of a car's aerial booster. (When your car has built-in FM/AM aerial in the rear/ side glass only.) The "STEREO" indication flashes. •Tune in the frequency accurately. •The broadcast signal is too weak. t Set to the MONO mode. Error displays The following indications will flash for a while. Display Cause Solution A CD is dirty or inserted upside down. The CD player cannot be operated because of some problem. Clean or insert the CD correctly. Press the reset button. If the above-mentioned solutions do not help improve the situation, consult your nearest Sony dealer.
-
 1
1 -
 2
2
 |
 |
