Sony CDX-530RF Operating Instructions (primary manual) - Page 4
Affichages d'erreur
 |
View all Sony CDX-530RF manuals
Add to My Manuals
Save this manual to your list of manuals |
Page 4 highlights
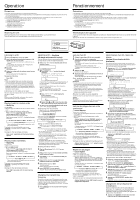
2 Press or frequency. Each time you press change as follows: repeatedly to select the or , the frequency : 88.3 MHz t 89.9 MHz t 89.7 MHz t 89.5 MHz t 89.3 MHz t 89.1 MHz t 88.9 MHz t 88.7 MHz t 88.5 MHz t : 88.3 MHz t 88.5 MHz t 88.7 MHz t 88.9 MHz t 89.1 MHz t 89.3 MHz t 89.5 MHz t 89.7 MHz t 89.9 MHz t 3 Press (SHUF/REP) for two seconds. Using on the wireless remote 1 Press (SHUF) for two seconds until frequency appears. 2 Press or repeatedly to select the frequency. 3 Press (SHUF) for two seconds. Notes • When you change the transmitting frequency on the unit, be sure to tune your FM tuner to the newly selected one. • Press u on the wired remote before changing the frequency if the power to the unit is turned off. Changing the output level You can select the output level from the unit. Normally the unit is used at the initial output level; change the level if necessary. 1 Press (SHUF/REP) for two seconds. 2 Press (SHUF/REP) momentarily. Initial setting 3 Press or output level. repeatedly to select the To decrease the output level : To increase the output level : 4 Press (SHUF/REP) for two seconds. Using on the wireless remote 1 Press (SHUF) for two seconds. 2 Press (SHUF) again momentarily. 3 Press or to select the output level. 4 Press (SHUF) for two seconds. Note When you select level 4 or 5, the CD playback sound may be distorted or you may hear some noise. In such a case, select a lower output level on the unit and turn down the overall volume on your car audio. 2 Appuyez plusieurs fois sur ou sélectionner la fréquence. Chaque fois que vous appuyez sur ou , les fréquences changent comme suit: pour : 88.3 MHz t 89.9 MHz t 89.7 MHz t 89.5 MHz t 89.3 MHz t 89.1 MHz t 88.9 MHz t 88.7 MHz t 88.5 MHz t : 88.3 MHz t 88.5 MHz t 88.7 MHz t 88.9 MHz t 89.1 MHz t 89.3 MHz t 89.5 MHz t 89.7 MHz t 89.9 MHz t 3 Appuyez sur (SHUF/REP) pendant deux secondes. Utilisation de la télécommande sans fil 1 Appuyez sur (SHUF) pendant deux secondes jusqu'à ce que la fréquence apparaisse. 2 Appuyez sur ou pour sélectionner la fréquence. 3 Appuyez sur (SHUF) pendant deux secondes. Remarques • Si vous changez la fréquence de transmission de l'appareil, n'oubliez pas de syntoniser votre syntoniseur FM sur la nouvelle fréquence sélectionnée. • Appuyez sur la touche u de la télécommande filaire avant de changer la fréquence si l'appareil n'est pas sous tension. Changement du niveau de sortie Vous pouvez sélectionner le niveau de sortie de l'appareil. En principe, l'appareil est utilisé au niveau de sortie initial ; changez le niveau si nécessaire. 1 Appuyez sur (SHUF/REP) pendant deux secondes. 2 Appuyez brièvement sur (SHUF/REP). Réglage initial 3 Appuyez plusieurs fois sur ou sélectionner le niveau de sortie. Pour diminuer le niveau de sortie pour : Pour augmenter le niveau de sortie : 4 Appuyez sur (SHUF/REP) pendant deux secondes. Utilisation de la télécommande sans fil 1 Appuyez sur (SHUF) pendant deux secondes. 2 Appuyez de nouveau brièvement sur (SHUF). 3 Appuyez sur ou pour sélectionner le niveau de sortie. 4 Appuyez sur (SHUF) pendant deux secondes. Remarque Si vous sélectionnez le niveau 4 ou 5, le son de lecture CD peut comporter des distorsions ou des parasites. En pareil cas, sélectionnez un niveau de sortie inférieure et baissez le volume de votre autoradio. Location and function of controls Nomenclature Wired remote (RM-X87) Télécommande à fil (RM-X87) Wireless remote (RM-X89) Télécommande sans fil (RM-X89) 1 AMS (Automatic Music Sensor/manual search) control Depending on which side of the control you push down, you can select from the following functions. 2 REP (repeat play) indication 3 SHUF (shuffle play) indication 4 DISC NAME (disc number/disc name) indication The indicated disc number matches the disc number in the disc magazine. 5 TRACK NAME (track number/track name) indication 6 MIN (minute) indication 7 SEC (second) indication 8 DISC buttons Depending on which side of the button you press, you can select from the following functions. 9 u (play/pause) button If pressed during CD playback, the CD will pause. If pressed again, CD playback will continue. 0 Infrared receptor for the wireless remote qz OFF button qx Play/pause indication Turns around during CD playback and flashes when the pause button is pressed. qc DSPL-SCRL (indication change/name scroll) button qv SHUF/REP (shuffle play/repeat play/control mode set) button qg NAME (character select) buttons qh DSPL/-EDIT (display/name edit) button qj AMS/MANU (Automatic Music Sensor/manual search) buttons qk REP (repeat play) button ql ENTER/-DELETE button w; SCRL (scroll) button wz SHUF (shuffle play) button (Wired remote) (Wired remote) (Wireless remote) AMS function To locate the beginning of a track, push down > to locate the beginning of the next track. . to locate the beginning of the track currently played. If you push down the control repeatedly, the beginnings of all following or previous tracks will be located until the end of the disc is reached. Manual search function To quickly locate a desired point of a track, push down and hold M to fast-forward. m to fast-reverse. The elapsed playing time of the track will be shown in the display window during manual search. (Wireless remote) Disc select function To select a desired disc, press momentarily to select the next disc. to select the previous disc. 1 Commande AMS (détecteur automatique de musique/recherche manuelle) En fonction du côté de la commande sur lequel vous appuyez, vous pouvez sélectionner les fonctions suivantes. 2 Indication REP (répétition de la lecture) 3 Indication SHUF (lecture aléatoire) 4 Indication DISC NAME (numéro du disque/nom du disque) Le numéro de disque indiqué correspond au numéro de disque dans le chargeur de disques. 5 Indication TRACK NAME (numéro de plage/ nom de plage) 6 Indication MIN (minute) 7 Indication SEC (seconde) 8 Touches DISC En fonction du côté de la touche sur lequel vous appuyez, vous pouvez sélectionner les fonctions suivantes. 9 Touche u (lecture/pause) Si vous appuyez sur cette touche en cours de lecture CD, le CD passe en mode de pause. Si vous appuyez de nouveau sur cette touche, la lecture CD reprend. 0 Récepteur de télécommande sans fil IR qz Touche OFF qx Indication de lecture/pause Tourne pendant la lecture du CD et clignote lorsque la touche de pause est enfoncée. qc Touche DSPL-SCRL (changement d'indication/ défilement des noms) qv Touche SHUF/REP (lecture aléatoire/lecture répétée/réglage du mode de contrôle) qg Touches NAME (sélection des caractères) qh Touche DSPL/ -EDIT (affichage/affichage du nom) qj Touches AMS/MANU (détecteur automatique de musique/recherche manuelle) qk Touche REP (lecture répétée) ql Touche ENTER/-DELETE w; Touche SCRL (défilement) wz Touche SHUF (lecture aléatoire) (Télécommande à fil) (Télécommande sans fil) Fonction AMS Pour localiser le début d'une plage, appuyez sur > pour localiser le début de la plage suivante. . pour localiser le début de la plage actuellement reproduite. Si vous appuyez plusieurs fois sur la commande, les débuts de toutes les plages suivantes et précédentes seront localisés jusqu'à ce que la fin du disque soit atteint. Fonction de recherche manuelle Pour localiser rapidement un point désiré d'une plage, maintenez enfoncée M pour avancer rapidement. m pour reculer rapidement. La durée écoulée de la plage apparaît sur l'afficheur pendant la recherche manuelle. (Télécommande à fil) (Télécommande sans fil) Fonction de sélection de disque Quand vous voulez sélectionner un disque, appuyez momentanément sur pour choisir le disque suivant. pour choisir le disque précédent. Troubleshooting guide The following checklist will assist in the correction of most problems which you may encounter with your unit. Before going through the checklist below, refer to the connection and operating procedures. General Problem The unit does not function. Cause/Solution • The built-in micro computer has malfunctioned. t Press the reset button the CD changer. • The connecting cords are not connected properly. The sound skips. The disc magazine is not locked in the CD changer. • The CD changer is installed in an unstable location. t Re-install it in a stable location. • The CD is dirty or defective. t Clean or replace it. Take out the disc magazine, press Z, and re-insert the disc magazine until it is locked securely. Guide de dépannage La liste de contrôle suivante vous assistera dans la correction de la plupart des problèmes que vous pourriez rencontrer avec votre appareil. Avant de passer en revue la liste de vérification ci-dessous, reportez-vous aux procédures de connexion et d'utilisation. Problèmes généraux Problème L'appareil ne fonctionne pas. Le son saute. Le chargeur de disques est mal encastré. Cause/solution • Le micro-ordinateur intégré est défaillant. t Appuyez sur la touche de réinitialisation du changeur de CD. • Les cordons de raccordement sont mal branchés. • Le changeur de CD est installé dans un endroit instable. t Réinstallez-le dans un endroit stable. • Le CD est souillé ou défectueux. t Nettoyez ou remplacez-le. Retirez le chargeur, appuyez sur Z et réintroduisez le chargeur jusqu'à ce qu'il s'encliquette correctement en position. Error displays The following indications will flash for about five seconds. Display Cause The disc magazine is not inserted in the CD changer. No CD is inserted in the CD changer. Solution Insert the disc magazine with CDs into the CD changer. Take out the disc magazine and insert CDs. The CD is dirty. The CD is inserted upside down. The CD changer cannot be operated because of some problem. One or more CDs from the CD changer will not play because of some problem. Clean the CD. Insert the CD correctly. Press the reset button of the CD changer. Insert another CD. If the solutions mentioned above do not improve the situation, consult your nearest Sony dealer. Affichages d'erreur Les indications suivantes clignotent pendant environ cinq secondes. Affichage Cause Solution Le chargeur de disques n'est pas introduit Introduisez le chargeur de disques avec des dans le changeur CD. disques dans le changeur CD. Aucun CD n'est introduit dans le changeur Sortez le chargeur CD et introduisez les CD. CD. Le disque est sale. Nettoyez le CD. Le disque est placé à l'envers. Introduisez le CD dans le bon sens. Le changeur de CD ne fonctionne pas en raison d'un problème. Un ou plusieurs disques du changeur CD ne sont pas lus en raison d'un problème. Appuyez sur la touche de réinitialisation du changeur de CD. Introduisez un autre disque. Si les solutions mentionnées ci-dessus ne peuvent pas résoudre le problème, consultez le revendeur Sony le plus proche.
-
 1
1 -
 2
2 -
 3
3 -
 4
4
 |
 |
