Sony CDX-L350 Primary User Manual - Page 1
Sony CDX-L350 - Fm/am Compact Disc Player Manual
 |
View all Sony CDX-L350 manuals
Add to My Manuals
Save this manual to your list of manuals |
Page 1 highlights
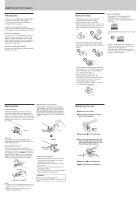
Specifications AUDIO POWER SPECIFICATIONS POWER OUTPUT AND TOTAL HARMONIC DISTORTION 23 watts per channel minimum continuous average power into 4 ohms, 4 channels driven from 20 Hz to 20 kHz with no more than 5 % total harmonic distortion. CD player section Signal-to-noise ratio Frequency response Wow and flutter Laser Diode Properties Material Wavelength Emission Duration Laser output power 90 dB 10 - 20,000 Hz Below measurable limit GaAlAs 780 nm Continuous Less than 44.6 µW* * This output is the value measured at a distance of 200 mm from the objective lens surface on the Optical Pick-up Block. Tuner section FM Tuning range 87.5 - 107.9 MHz Antenna terminal External antenna connector Intermediate frequency 10.7 MHz Usable sensitivity 11 dBf Selectivity 75 dB at 400 kHz Signal-to-noise ratio 65 dB (stereo), 68 dB (mono) Harmonic distortion at 1 kHz 0.7 % (stereo), 0.5 % (mono) Separation 33 dB at 1 kHz Frequency response 30 - 15,000 Hz AM Tuning range Antenna terminal Intermediate frequency Sensitivity 530 - 1,710 kHz External antenna connector 10.7 MHz/450 kHz 30 µV Power amplifier section Outputs Speaker outputs (sure seal connectors) Speaker impedance 4 - 8 ohms Maximum power output 50 W × 4 (at 4 ohms) General Outputs Tone controls Power requirements Dimensions Mounting dimensions Mass Supplied accessory Audio output Power amplifier control Power antenna relay control Bass ±10 dB at 20 Hz Treble ±10 dB at 20 kHz 12 V DC car battery (negative earth) Approx. 178 × 50 × 176 mm (7 1/8 × 2 × 7 in.) (w/h/d) Approx. 182 × 53 × 161 mm (7 1/4 × 2 1/8 × 6 3/8 in.) (w/h/d) Approx. 1.2 kg (2 lb. 10 oz.) Parts for installation and connections (1 set) Front panel case (1) Card remote commander RM-X115 Design and specifications are subject to change without notice. 3-227-643-11 (1) FM/AM Compact Disc Player Operating Instructions Owner's Record The model and serial numbers are located on the bottom of the unit. Record the serial number in the space provided below. Refer to these numbers whenever you call upon your Sony dealer regarding this product. Model No. CDX-L350 Serial No. For installation and connections, see the supplied installation/connections manual. Getting Started Resetting the unit Before operating the unit for the first time or after replacing the car battery, you must reset the unit. Press the RESET button with a pointed object, such as a ball-point pen. Attaching the front panel Attach part A of the front panel to part B of the unit as illustrated and push the left side into position until it clicks. RESET button Note Pressing the RESET button will erase the clock setting and some stored contents. Detaching the front panel You can detach the front panel of this unit to protect the unit from being stolen. Caution alarm If you turn the ignition switch to the OFF position without removing the front panel, the caution alarm will beep for a few seconds. 1 Press (OFF)*. CD playback or radio reception stops (the key illumination and display remain on). * If your car has no ACC position on the ignition switch, be sure to turn the unit off by pressing (OFF) for 2 seconds to avoid car battery drain. 2 Press (RELEASE), then pull it off towards you. (OFF) A B Note Do not put anything on the inner surface of the front panel. Setting the clock The clock uses a 12-hour digital indication. Example: To set the clock to 10:08 1 Press (DSPL) for 2 seconds. The hour indication flashes. 1 Press either side of the volume +/- button to set the hour. 2 Press (SEL). The minute indication flashes. 3 Press either side of the volume +/- button to set the minute. 2 Press (DSPL). (RELEASE) Notes • If you detach the panel while the unit is still turned on, the power will turn off automatically to prevent the speakers from being damaged. • Do not drop or put excessive pressure on the front panel and its display window. • Do not subject the front panel to heat/high temperature or moisture. Avoid leaving it in parked cars or on dashboards/rear trays. Tip When carrying the front panel with you, use the supplied front panel case. The clock starts. After the clock setting is completed, the display returns to normal play mode. CDX-L350 Sony Corporation 2001 Printed in Korea Warning This equipment has been tested and found to comply with the limits for a Class B digital device, pursuant to Part 15 of the FCC Rules. These limits are designed to provide reasonable protection against harmful interference in a residential installation. This equipment generates, uses, and can radiate radio frequency energy and, if not installed and used in accordance with the instructions, may cause harmful interference to radio communications. However, there is no guarantee that interference will not occur in a particular installation. If this equipment does cause harmful interference to radio or television reception, which can be determined by turning the equipment off and on, the user is encouraged to try to correct the interference by one or more of the following measures: - Reorient or relocate the receiving antenna. - Increase the separation between the equipment and receiver. - Connect the equipment into an outlet on a circuit different from that to which the receiver is connected. - Consult the dealer or an experienced radio/ TV technician for help. You are cautioned that any changes or modifications not expressly approved in this manual could void your authority to operate this equipment. Welcome ! Thank you for purchasing this Sony Compact Disc Player. You can enjoy its various features even more with: •Supplied controller accessory Card remote commander RM-X115 CAUTION The use of optical instruments with this product will increase eye hazard.
-
 1
1 -
 2
2 -
 3
3 -
 4
4
 |
 |