Sony CDX-MP450X Operating Instructions - Page 6
Location of controls - install
 |
View all Sony CDX-MP450X manuals
Add to My Manuals
Save this manual to your list of manuals |
Page 6 highlights
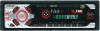
Location of controls CDX-MP450X Refer to the pages listed for details. 1 D (D-BASS) button 23 2 Z (eject) button (located on the front side of the unit, behind the front panel) 10, 14 3 MENU button 9, 11, 12, 13, 15, 16, 17, 18, 19, 20, 23 4 Volume control dial 5 MODE button 18, 19 6 Receptor for the card remote commander 7 Display window 8 OPEN button 8, 10, 14, 24 9 ATT button 22 0 RESET button (located on the front side of the unit, behind the front panel) 8 qa OFF button* 7, 8, 9, 10, 14 qs SOUND button 22 qd SOURCE (Tuner/CD/MP3) button 7, 9, 10, 11, 14, 18, 19 qf ENTER button 9, 11, 12, 13, 15, 16, 17, 18, 19, 20, 23 qg SCRL (auto scroll) button 11 qh DSPL (display mode change) button 10, 11, 14 qj Number buttons 19 (1) REP 12, 16 (2) SHUF 12, 16 (3) PGM 13, 17 qk FLDR/PRESET +/- (cursor up/down) buttons 9, 11, 12, 13, 15, 16, 17, 18, 19, 20, 23 ql SEEK -/+ (cursor left/right) buttons 9, 11, 12, 13, 15, 16, 17, 19, 20, 22, 23 * Warning when installing in a car without ACC (accessory) position on the ignition key switch Be sure to press (OFF) on the unit for two seconds to turn off the clock display after turning off the engine. When you press (OFF) only momentarily, the clock display does not turn off and this causes battery wear. 6
-
 1
1 -
 2
2 -
 3
3 -
 4
4 -
 5
5 -
 6
6 -
 7
7 -
 8
8 -
 9
9 -
 10
10 -
 11
11 -
 12
12 -
13
-
14
-
15
-
16
-
17
-
18
-
19
-
20
-
21
-
22
-
23
-
24
-
25
-
26
-
27
-
28
-
29
-
30
-
31
-
32
-
33
-
34
-
35
-
36
-
37
-
38
-
39
-
40
-
41
-
42
-
43
-
44
-
45
-
46
-
47
-
48
-
49
-
50
-
51
-
52
-
53
-
54
-
55
-
56
-
57
-
58
-
59
-
60
-
61
-
62
-
63
-
64
-
65
-
66
-
67
-
68
-
69
-
70
-
71
-
72
-
73
-
74
-
75
-
76
-
77
-
78
-
79
-
80
-
81
-
82
-
83
-
84
 |
 |
