Sony CDX-R3300 Operating Instructions - Page 16
Adjusting the sound characteristics, Quickly attenuating the sound - audio out switch to rear
 |
View all Sony CDX-R3300 manuals
Add to My Manuals
Save this manual to your list of manuals |
Page 16 highlights
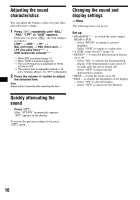
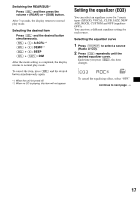
Adjusting the sound characteristics You can adjust the balance, fader, low pass filter and subwoofer volume. 1 Press (SEL) repeatedly until "BAL," "FAD," "LPF" or "SUB" appears. Each time you press (SEL), the item changes as follows: LOW*1 t MID*1 t HI*1 t BAL (left-right) t FAD (front-rear) t LPF (low pass filter)*2*3 t SUB (subwoofer volume)*2*4 *1 When EQ3 is activated (page 17). *2 When "SUB" is selected (page 16). *3 The cut off frequency is adjustable to 78 Hz, 125 Hz or OFF. *4 The volume level is adjustable between -10 and +10 steps. (Below -10, "ATT" is displayed.) 2 Press the volume +/- button to adjust the selected item. Note Adjust within 3 seconds after selecting the item. Changing the sound and display settings - Menu The following items can be set: Set up • REAR/SUB*1 - to switch the audio output REAR or SUB. - Select "REAR" to output to a power amplifier. - Select "SUB" to output to a subwoofer. • A.SCRL (Auto Scroll)*2 (page 12) • DEMO*1 - to turn the demonstration display on or off. - Select "ON" to activate the demonstration display (The demonstration starts about 10 seconds after the unit is turned off). - Select "OFF" to deactivate the demonstration display. • BEEP - to turn the beeps on or off. • DIM - to change the brightness of the display. - Select "ON" to dim the display. - Select "OFF" to deactivate the Dimmer. Quickly attenuating the sound Press (ATT). After "ATT-ON" momentarily appears, "ATT" appears in the display. To restore the previous volume level, press (ATT) again. 16
-
 1
1 -
2
-
3
-
4
-
5
-
6
-
7
-
8
-
9
-
10
-
 11
11 -
 12
12 -
 13
13 -
 14
14 -
 15
15 -
 16
16 -
 17
17 -
 18
18 -
 19
19 -
 20
20 -
 21
21 -
22
-
23
-
24
-
25
-
26
-
27
-
28
-
29
-
30
-
31
-
32
-
33
-
34
-
35
-
36
-
37
-
38
-
39
-
40
-
41
-
42
-
43
-
44
-
45
-
46
-
47
-
48
-
49
-
50
-
51
-
52
-
53
-
54
-
55
-
56
-
57
-
58
-
59
-
60
-
61
-
62
-
63
-
64
-
65
-
66
-
67
-
68
 |
 |