Sony CDXGT640UI Operating Instructions - Page 9
CD/USB, Radio - ipod
 |
UPC - 027242774155
View all Sony CDXGT640UI manuals
Add to My Manuals
Save this manual to your list of manuals |
Page 9 highlights
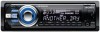
J SEEK +/- buttons CD/USB: To skip tracks (press); skip tracks continuously (press, then press again within about 1 second and hold); reverse/fastforward a track (press and hold). Radio: To tune in stations automatically (press); find a station manually (press and hold). K MODE button*1 page 12, 16, 17 Press to select the radio band (FM/AM)/ select the play mode of iPod. Press and hold to enter/cancel the passenger control. L (BROWSE) button page 11 To enter the Quick-BrowZer mode. M PTY/CAT*2 button page 13 To select PTY in RDS. N Number buttons CD/USB: (1)/(2): ALBUM -/+ (during MP3/WMA/ AAC playback) To skip albums (press); skip albums continuously (press and hold). (3): REP*3 page 14, 15, 17 (4): SHUF page 14, 15, 17 (5): DM+ Improves digitally compressed sound, such as MP3. To activate the DM+ function, set "ON." To cancel, set "OFF." (6): PAUSE To pause playback. To cancel, press again. Radio: To receive stored stations (press); store stations (press and hold). O DSPL (display)/SCRL (scroll) button page 13, 14, 15, 17 To change display items (press); scroll the display item (press and hold). P AUX input jack page 19 To connect a portable audio device. Q RESET button page 6 R Z (eject) button To eject the disc. S Disc slot Insert the disc (label side up), playback starts. *1 If an HD Radio tuner or SAT tuner is connected: when (SOURCE) is pressed, the connected device ("HD," "XM" or "SR") will appear in the display. Furthermore, if (MODE) is pressed, you can switch the HD Radio tuner band or SAT tuner band. *2 When the SAT tuner is connected. *3 This button has a tactile dot. Note When ejecting/inserting a disc, keep any USB devices disconnected to avoid damage to the disc. 9
-
 1
1 -
2
-
3
-
 4
4 -
 5
5 -
 6
6 -
 7
7 -
 8
8 -
 9
9 -
 10
10 -
 11
11 -
 12
12 -
 13
13 -
 14
14 -
15
-
16
-
17
-
18
-
19
-
20
-
21
-
22
-
23
-
24
-
25
-
26
-
27
-
28
-
29
-
30
-
31
-
32
-
33
-
34
-
35
-
36
-
37
-
38
-
39
-
40
-
41
-
42
-
43
-
44
-
45
-
46
-
47
-
48
-
49
-
50
-
51
-
52
-
53
-
54
-
55
-
56
 |
 |
