Sony CFD-F10 Operating Instructions - Page 2
Listening to the radio, Playing a tape, Recording, Playing a CD - manual
 |
View all Sony CFD-F10 manuals
Add to My Manuals
Save this manual to your list of manuals |
Page 2 highlights
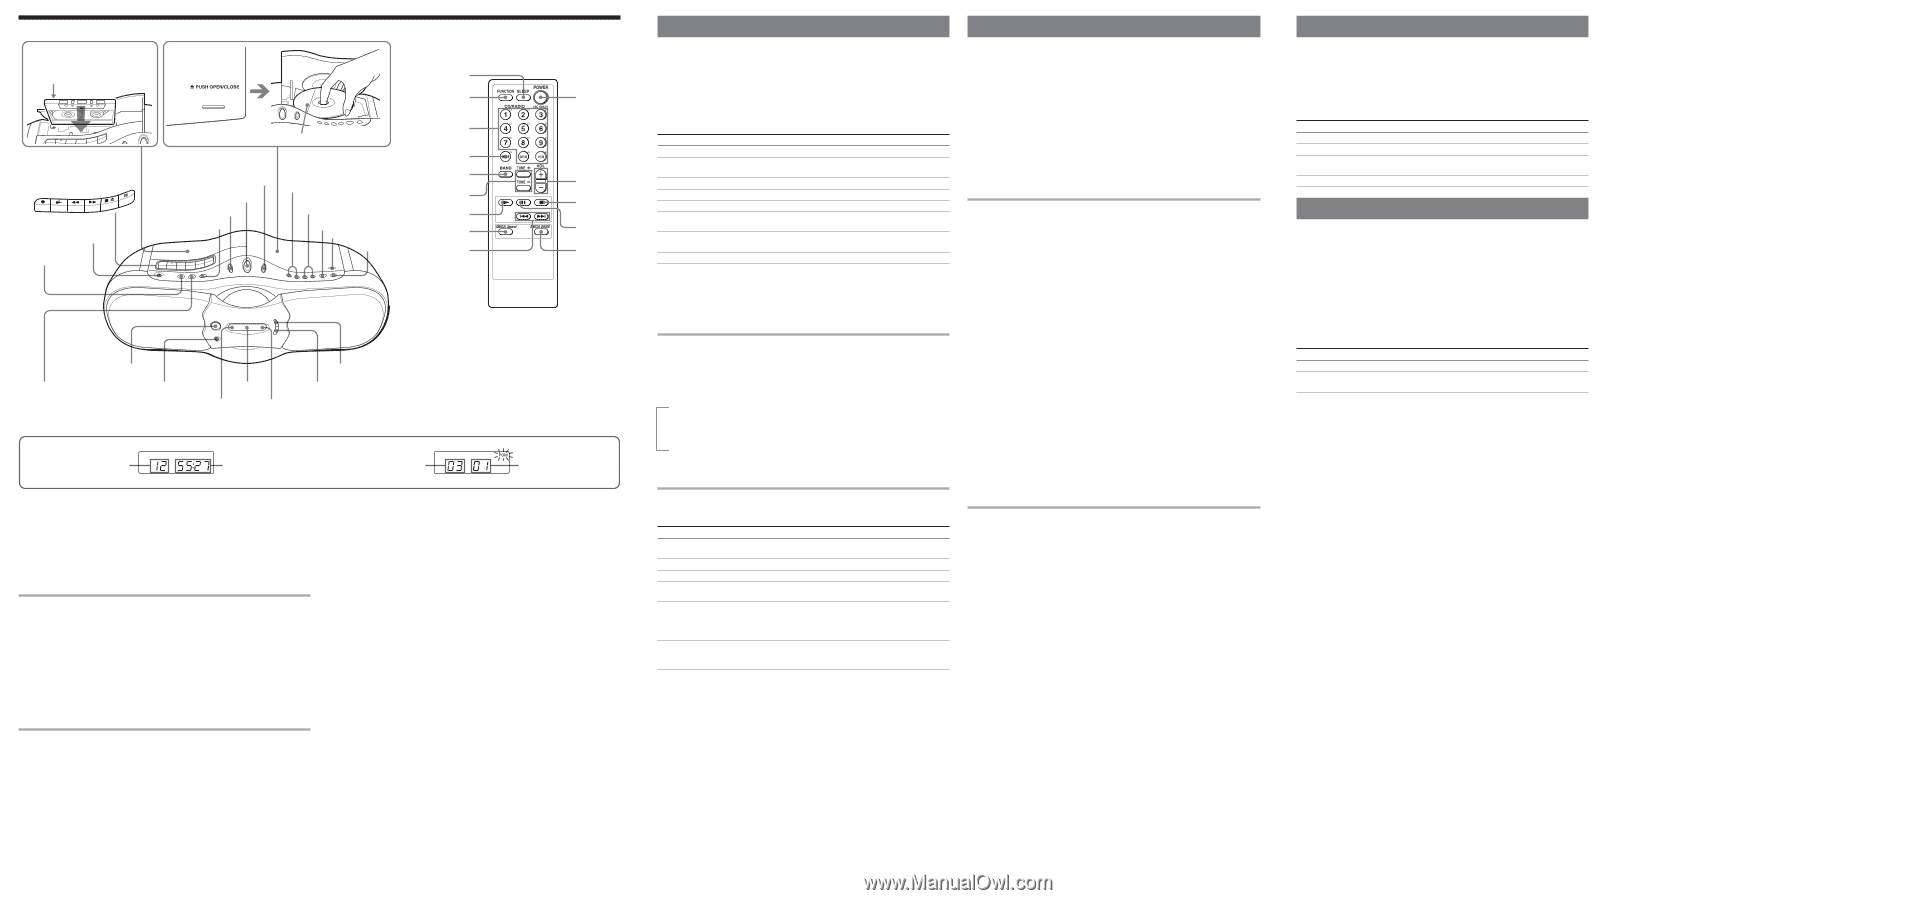
Location of controls Inserting a cassette With the side you want to play facing upward * i TAPE Loading a CD Remote Control SLEEP FUNCTION With the labeled side up Number buttons MODE MEGA BASS VOLUME +*, - MEGA Xpand CD TUNE -, + m,M PRESET -, + .,> u* Z PUSH OPEN/CLOSE x BAND TUNE +,- N MEGA Xpand .,> POWER VOL +*, - x X MEGA BASS POWER RADIO BAND•AUTO PRESET SLEEP Display MODE DSPL/ENT/MEM OPR/BATT Remote sensor *The button has a tactile dot. Display D Total track number Total playing time E Programmed track Playing order To turn on/off the power Press POWER. To adjust the volume Press VOLUME +, - (VOL +, - on the remote). To listen through headphones Connect the headphones to the i (headphones) jack. Adjusting the sound emphasis To reinforce the bass sound Press MEGA BASS. "MEGA BASS" appears in the display. To return to normal sound, press the button again. To get the MEGA Xpand effect Press MEGA Xpand. "MEGA Xpand" appears in the display. You can get the effect of expansion of the sound field. To return to normal sound, press the button again. Falling asleep to music 1 Play the music source you want. 2 Press SLEEP to display "SLEEP." 3 Press SLEEP to select the minutes until the player goes off automatically. Each time you press the button, the indication changes as follows: "60" t "90" t "120" t "OFF" t "10" t "20" t "30". To cancel the sleep function Press POWER to turn off the power. Note When you are playing a tape using this function: If the tape length of one side is longer than the set time, the player will not go off until the tape reaches the end. Playing a CD 1 Press CD (direct power-on). (On the remote, press POWER and then press FUNCTION repeatedly until "Cd" appears in the display.) 2 Load a CD in the CD compartment. 3 Press Z PUSH OPEN/CLOSE to close the CD compartment. 4 Press u (N on the remote). The player plays all the tracks once. To stop playback pause playback go to the next track go back to the previous track remove the CD locate a point while listening to the sound locate a point while observing the display locate a specific track directly* Press x u (X on the remote) Press the button again to resume play after pause. > . Z PUSH OPEN/CLOSE M (forward) or m (backward) while playing until you find the point (> or . on the remote) M (forward) or m (backward) in pause until you find the point (> or . on the remote) a number button of the track on the remote * You cannot locate a specific track if "SHUF" or "PGM" is lit in the display. Turn off the indication by pressing x. Tip To locate a track numbered over 10, press >10 first, then the corresponding number buttons on the remote. Example:To play track number 23, press >10 first, then 2 and 3. Using the display To check the total track number and playing time Press DSPL/ENT/MEM in stop mode (see fig. D). To check the remaining time Press DSPL/ENT/MEM repeatedly while playing a CD. The display changes as follows: t the current track number and playing time r the current track number and the remaining time on the current track* r the number of tracks left and remaining time on the CD * For a track whose number is more than 20, the remaining time appears as "- -:- -" in the display. Selecting the play mode Press MODE until "REP 1" "REP ALL" "SHUF" "SHUF REP" "PGM" "PGM REP" appears in the display. Then proceed as follows: To repeat a single track repeat all the track shuffle play repeat tracks in random order program play repeat programmed tracks Select "REP 1" "REP ALL" "SHUF" "SHUF REP" Then do this Press . or > to select the track that you want to repeat, then press u. Press u. Press u. Press u. "PGM" "PGM REP" Press . or > then press DSPL/ENT/MEM for the tracks you want to program in the order you want up to 20 tracks (see fig. E). Then press u. Press . or > then press DSPL/ENT/MEM for the tracks you want to program in the order you want up to 20 tracks. Then Press u. On the remote When you've selected "PGM" or "PGM REP", press the number buttons for the track you want up to 20 tracks, then press N. To cancel selected play mode Press MODE repeatedly until the selected mode disappears from the display. To check the programmed track and playing order in the display To check the order of tracks before play, press DSPL/ENT/MEM. Every time you press the button, the track number appears in the programmed order. To change the current program Press x once if the CD is stopped and twice if the CD is playing. The current program will be erased. Then create a new program following the programming procedure. Tips • You can play the same program again, since the program is saved until you open the CD compartment. • You can record your own program. After you've created the program, insert a blank tape and press z to start recording. Listening to the radio 1 Press RADIO BAND•AUTO PRESET until the band you want appears in the display (direct power-on). Each time you press the button, the indication changes as follows: "FM" t "AM". 2 Hold down TUNE + or - until the frequency digits begin to change in the display. The player automatically scans the radio frequencies and stops when it finds a clear station. If you can't tune in a station, press the button repeatedly to change the frequency step by step. Tip If the FM broadcast is noisy, press MODE repeatedly until "Mono" appears in the display and the radio will play in monaural. Presetting radio stations You can store radio stations into the player's memory. You can preset up to 30 radio stations , 20 for FM and 10 for AM in any order. 1 Press RADIO BAND•AUTO PRESET to select the band. 2 Hold down RADIO BAND•AUTO PRESET for 2 seconds until "AUTO" flashes in the display. 3 Press DSPL/ENT/MEM. The stations are stored in memory from the lower frequencies to the higher ones. If a station cannot be preset automatically You need to preset a station with a weak signal manually. 1 Press RADIO BAND•AUTO PRESET to select the band. 2 Tune in a station you want. 3 Hold down DSPL/ENT/MEM for 2 seconds until the preset number flashes in the display. 4 Press PRESET + or - until the preset number you want for the station flashes in the display. 5 Press DSPL/ENT/MEM. The new station replaces the old one. On the remote 1 Press BAND until the band you want appears in the display. 2 Tune in a station you want. 3 Hold down the number buttons that you want to preset the new station on for about 2 seconds. To select the preset number over 10, press >10 first, then the corresponding number buttons. You need to hold down the last number button to enter for about 2 seconds. (Example: To select 12, press >10 and 1 first, then hold down 2 for about 2 seconds.) Tip The preset radio stations remain in memory even if you unplug the AC power cord or remove the batteries. Playing preset radio stations 1 Press RADIO BAND•AUTO PRESET to select the band. 2 Press PRESET + or - to tune in the stored station. On the remote 1 Press BAND. 2 Press the number buttons to tune in the stored station. To tune in a preset station over 10, press >10 first, then corresponding number buttons. (Example: To tune in a preset station 12, press >10 and 1 first, and then press 2.) Playing a tape 1 Press TAPE (direct power-on). (On the remote, press POWER and then press FUNCTION repeatedly until "TAPE" appears in the display.) 2 Press xZ to open the tape compartment and insert a recorded tape. Close the compartment. Use TYPE I (normal) tape only. 3 Press N. To stop playback fast-forward or rewind the tape pause playback eject the cassette Press xZ M or m X Press the button again to resume play after pause. xZ Recording 1 Press xZ to open the tape compartment and insert a blank tape. Use TYPE I (normal) tape only. 2 Select the program source you want to record. To record from the CD player Press CD and insert a CD (See "Playing a CD"). To record from the radio Press RADIO BAND•AUTO PRESET and tune in the station you want (See "Listening to the radio"). 3 Press z to start recording. (N is depressed automatically.) To stop recording pause recording Press xZ X Press the button again to resume recording. Tips • Adjusting the volume or the audio emphasis will not affect the recording level. • For the best results, use the AC power as a power source for recording. • To erase a recording, proceed as follows: 1 Insert a tape with the recording you want to erase. 2 Press TAPE. 3 Press z.
-
 1
1 -
 2
2
 |
 |