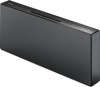
Sony CMT-X5CD Operating Instructions - Page 1
Sony CMT-X5CD Manual
 |
View all Sony CMT-X5CD manuals
Add to My Manuals
Save this manual to your list of manuals |
Page 1 highlights
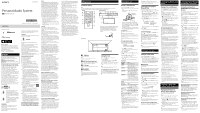
4-528-303-12(1) Personal Audio System GB Operating Instructions CMT-X5CD ©2014 Sony Corporation Printed in China The unit is not disconnected from the mains as long as it is connected to the AC outlet, even if the unit itself has been turned off. CAUTION The use of optical instruments with this product will increase eye hazard. WARNING Owner's Record The model and serial numbers are located on the bottom exterior of the unit. Record these numbers in the space provided below. Refer to them whenever you call upon your Sony dealer regarding this product. Model No. Serial No. WARNING For the State of California, USA only Perchlorate Material-special handling may apply, See www.dtsc.ca.gov/hazardouswaste/ perchlorate Perchlorate Material : Lithium battery contains perchlorate To reduce the risk of fire or electric shock, do not expose this apparatus to rain or moisture. To reduce the risk of fire, do not cover the ventilation opening of the appliance with newspapers, tablecloths, curtains, etc. Do not expose the appliance to naked flame sources (for example, lighted candles). To reduce the risk of fire or electric shock, do not expose this appliance to dripping or splashing, and do not place objects filled with liquids, such as vases, on the appliance. Do not install the appliance in a confined space, such as a bookcase or built-in cabinet. As the main plug is used to disconnect the unit from the mains, connect the unit to an easily accessible AC outlet. Should you notice an abnormality in the unit, disconnect the main plug from the AC outlet immediately. The nameplate is located on the bottom exterior. These following indications are located on the bottom exterior. This symbol is intended to alert the user to the presence of uninsulated"dangerous voltage" within the product's enclosure that may be of sufficient magnitude to constitute a risk of electric shock to persons. This symbol is intended to alert the user to the presence of important operating and maintenance (servicing) instructions in the literature accompanying the appliance. CAUTION Danger of explosion if battery is incorrectly replaced. Replace only with the same or equivalent type. Do not expose batteries or appliances with battery-installed to excessive heat, such as sunshine and fire. DO NOT INGEST BATTERY, CHEMICAL BURN HAZARD The remote control supplied with this product contains a coin/button cell battery. If the coin/button cell battery is swallowed, it can cause severe internal burns in just 2 hours and can lead to death. Keep new and used batteries away from children. If the battery compartment does not close securely, stop using the product and keep it away from children. If you think batteries might have been swallowed or placed inside any part of the body, seek immediate medical attention. Important Safety Instructions 1) Read these instructions. 2) Keep these instructions. 3) Heed all warnings. 4) Follow all instructions. 5) Do not use this apparatus near water. 6) Clean only with dry cloth. 7) Do not block any ventilation openings. Install in accordance with the manufacturer's instructions. 8) Do not install near any heat sources such as radiators, heat registers, stoves, or other apparatus (including amplifiers) that produce heat. 9) Do not defeat the safety purpose of the polarized or grounding-type plug. A polarized plug has two blades with one wider than the other. A grounding type plug has two blades and a third grounding prong. The wide blade or the third prong are provided for your safety. If the provided plug does not fit into your outlet, consult an electrician for replacement of the obsolete outlet. 10) Protect the power cord from being walked on or pinched particularly at plugs, convenience receptacles, and the point where they exit from the apparatus. 11) Only use attachments/accessories specified by the manufacturer. 12) Use only with the cart, stand, tripod, bracket, or table specified by the manufacturer, or sold with the apparatus. When a cart is used, use caution when moving the cart/apparatus combination to avoid injury from tip-over. 13) Unplug this apparatus during lightning storms or when unused for long periods of time. 14) Refer all servicing to qualified service personnel. Servicing is required when the apparatus has been damaged in any way, such as power-supply cord or plug is damaged, liquid has been spilled or objects have fallen into the apparatus, the apparatus has been exposed to rain or moisture, does not operate normally, or has been dropped. The following FCC statement applies only to the version of this model manufactured for sale in the U.S.A. Other versions may not comply with FCC technical regulations. NOTE: This equipment has been tested and found to comply with the limits for a Class B digital device, pursuant to Part 15 of the FCC Rules. These limits are designed to provide reasonable protection against harmful interference in a residential installation. This equipment generates, uses and can radiate radio frequency energy and, if not installed and used in accordance with the instructions, may cause harmful interference to radio communications. However, there is no guarantee that interference will not occur in a particular installation. If this equipment does cause harmful interference to radio or television reception, which can be determined by turning the equipment off and on, the user is encouraged to try to correct the interference by one or more of the following measures: Reorient or relocate the receiving antenna. Increase the separation between the equipment and receiver. Connect the equipment into an outlet on a circuit different from that to which the receiver is connected. Consult the dealer or an experienced radio/TV technician for help. CAUTION You are cautioned that any changes or modifications not expressly approved in this manual could void your authority to operate this equipment. Properly shielded and grounded cables and connectors must be used for connection to host computers and / or peripherals in order to meet FCC emission limits. This device complies with Part 15 of the FCC Rules. Operation is subject to the following two conditions: (1) this device may not cause harmful interference, and (2) this device must accept any interference received, including interference that may cause undesired operation. This equipment must not be co-located or operated in conjunction with any other antenna or transmitter. This equipment complies with FCC radiation exposure limits set forth for an uncontrolled environment and meets the FCC radio frequency (RF) Exposure Guidelines. This equipment has very low levels of RF energy that it deemed to comply without maximum permissive exposure evaluation (MPE). But it is desirable that it should be installed and operated keeping the radiator at least 20 cm or more away from person's body (excluding extremities: hands, wrists, feet and ankles). This device complies with industry Canada licence-exempt RSS standard(S). Operation is subject to the following two conditions: (1) this device may not cause interference, and (2) this device must accept any interference, including interference that may cause undesired operation of the device. This equipment complies with IC radiation exposure limits set forth for an uncontrolled environment and meets RSS-102 of the IC radio frequency (RF) Exposure rules. This equipment has very low levels of RF energy that it deemed to comply without maximum permissive exposure evaluation (MPE). But it is desirable that it should be installed and operated keeping the radiator at least 20 cm or more away from person's body (excluding extremities:hands, wrists, feet and ankles). Before operating this system Malfunctions that occur during the normal use of the system will be repaired by Sony in accordance with the conditions defined in the limited warranty for this system. However, Sony will not be liable for any consequences arising from a failure to play caused by a damaged or malfunctioning system. Music discs encoded with copyright protection technologies This product is designed to playback discs that conform to the Compact Disc (CD) standard. Recently, various music discs encoded with copyright protection technologies are marketed by some record companies. Please be aware that among those discs, there are some that do not conform to the CD standard and may not be playable by this product. Note on DualDiscs A DualDisc is a two sided disc product which mates DVD recorded material on one side with digital audio material on the other side. However, since the audio material side does not conform to the Compact Disc (CD) standard, playback on this product is not guaranteed. License and Trademark Notice ˎˎWindows Media is either a registered trademark or trademark of Microsoft Corporation in the United States and/or other countries. ˎˎThis product is protected by certain intellectual property rights of Microsoft Corporation. Use or distribution of such technology outside of this product is prohibited without a license from Microsoft or an authorized Microsoft subsidiary. ˎˎMPEG Layer-3 audio coding technology and patents licensed from Fraunhofer IIS and Thomson. ˎˎThe BLUETOOTH® word mark and logos are registered trademarks owned by BLUETOOTH SIG, Inc. and any use of such marks by Sony Corporation is under license. ˎˎThe N Mark is a trademark or registered trademark of NFC Forum, Inc. in the United States and in other countries. ˎˎAndroid and Google Play are trademarks of Google Inc. ˎˎThe system names and product names indicated in this manual are generally the trademarks or registered trademarks of the manufacturer. ™ and ® marks are omitted in this manual. ˎˎ"WALKMAN" and "WALKMAN" logo are registered trademarks of Sony Corporation. ˎˎ© 2013 CSR plc and its group companies. The aptX® mark and the aptX logo are trade marks of CSR plc or one of its group companies and may be registered in one or more jurisdictions. ˎˎApple, the Apple logo, iPad, iPhone, iPod, iPod classic, iPod nano and iPod touch are trademarks of Apple Inc., registered in the U.S. and other countries. App Store is a service mark of Apple Inc. ˎˎ"Made for iPod" and "Made for iPhone" mean that an electronic accessory has been designed to connect specifically to iPod and iPhone, respectively, and has been certified by the developer to meet Apple performance standards. Apple is not responsible for the operation of this device or its compliance with safety and regulatory standards. Please note that the use of this accessory with iPod, iPhone or iPad may affect wireless performance. ˎˎ"Xperia" and "Xperia Tablet" are trademarks of Sony Mobile Communications AB. Getting Started Location of Controls Note This manual mainly explains operations using the remote, but the same operations can also be performed using the buttons on the unit having the same or similar names. Remote Unit (front/top) Top Front Unit (back) When you use the remote for the first time The battery is factory-installed in the remote. Before using the remote for the first time, remove the insulation sheet attached to the battery holder. For details, see "Changing the battery". (USB) port Connect a USB device. Note ˎˎYou can use your iPhone/iPod with this system via Bluetooth or connection only. AUDIO IN (external input) jack Connect optional external equipment with an audio connecting cable (not supplied). ~ AC IN input Connect the power cord (supplied) to the wall outlet. FM ANTENNA Connect the FM antenna. Note ˎˎFind a location and an orientation that provide good reception, and then fix the antennas to a stable surface (window, wall, etc.). ˎˎSecure the end of the FM lead antenna with adhesive tape. Setting the clock 1 Press to turn on the system. 2 Press TIMER . If "PLAY SET" is displayed, press to select "CLOCK," then press . 3 Press to set the hour, then press . 4 Press to set the minutes, then press . Note ˎˎThe clock settings are reset when you disconnect the power cord or if a power failure occurs. To display the clock when the system is off Press DISPLAY repeatedly to display the clock. The clock is displayed for about 8 seconds. If the system is in BLUETOOTH Standby mode, the clock does not appear by pressing DISPLAY . Listening to a CD Playing a CD-DA/MP3 disc 1 Press FUNCTION to select "CD." 2 Insert a CD to the disc slot at the top of the unit. Load a CD with the label side (printed side) toward you. Label side (printed side) (eject) Plays back automatically. If you switch the function to "CD" from another function when a CD is already inserted in the slot, press after "READING" has disappeared from the display window . The button of the remote or the unit enables you to fast-rewind/fast forward, select a track, file or folder (for MP3 disc), etc. To eject the CD Press (eject) on the unit. Note ˎˎ8 cm CD cannot be used with this system. ˎˎDo not load a CD with non-standard shapes (e.g., heart, square, star). Doing this may cause irreparable damage to the system. ˎˎDo not use a CD with tape, stickers or paste on it as this may cause malfunction. ˎˎWhen you remove a CD, do not touch the surface of the disc. To change the play mode Play mode enables you to playback the same music repeatedly or shuffle-play. Play mode 1 Press to stop playback. If you select "REPEAT" in step 4, you do not have to stop playback. 2 Press MENU . 3 Press to select "CD MENU", then press . 4 Press to select "PLAYMODE" or "REPEAT," then press . 5 Press to select the play mode, then press . You can select the following play modes. PLAYMODE Play mode NORMAL FOLDER* SHUFFLE FLDR.SHUF* PROGRAM Effect Plays a track or file. Plays all tracks in the selected folder. "FLDR" lights up in the display window . Plays all tracks or files in random order. "SHUF" lights up in the display window . Plays all tracks or files in the selected folder in random order. "FLDR. SHUF" lights up in the display window . Plays the programmed tracks or files. "PGM" lights up in the display window . For details, see "Creating your own program (Program Play)". * This play mode is applicable only for playing an MP3 disc. REPEAT Play mode ALL (Repeat plays all tracks) ONE (Repeat plays one track) OFF Effect The system plays all tracks in a disc or folder repeatedly. " " lights up in the display window . The system plays the selected track repeatedly. " 1" lights up in the display window . Cancels repeat playback. Note on playing MP3 discs ˎˎDo not save unnecessary folders or files on a disc that has MP3 files. ˎˎFolders that have no MP3 files are not recognized on the system. ˎˎThe system can only play MP3 files that have a file extension of ".mp3." Even when file name has the ".mp3" file extension, if it is not an audio MP3 file, playing this file may generate a loud noise, which could cause damage of the system. ˎˎThe maximum number of MP3 folders and files compatible with this system is: 999* folders (including the root folder) 999 files 250 files in a single folder 8 folder levels (in the tree structure of files) * This include folders that have no MP3 or other files. The number of folders that the system can recognize may be less than actual number of folders, depending on the folder structure. ˎˎCompatibility with all MP3 encoding/writing software, CD-R/RW drive and recording media cannot be guaranteed. Incompatible MP3 discs may produce noise or interrupted audio or may not play at all. Creating your own program (Program Play) Plays the programmed track or file in a CD. 1 Select "PROGRAM" in step 5 of "To change the play mode" , then press . 2 When using an MP3 disc, press +/- to select the folder containing the tracks or files that you want to program. If you want to play all tracks or files in the folder, press . 3 Press to select a desired track or file, then select . Selected track Total playing time or file number of the selected track or file Repeat the steps above to program additional tracks or files. 4 Press . Your program of tracks or files starts playback. To cancel program play In step 1, select "NORMAL" for "PROGRAM," then press . To delete a programmed track or file Press CLEAR while the play is stopped. Each time you press the button, the last programmed track or file will be deleted. When all the programmed tracks or files are deleted, "NO STEP" appears. Tip ˎˎUp to 25 tracks or files can be programmed. If you attempt to program more than 25 tracks or files, "FULL" will be displayed. In this case, delete unnecessary tracks. ˎˎTo play the same program again, press . Note ˎˎWhen the disc is ejected or the power cord is disconnected after programming, all the programmed tracks and files are deleted. Listening to the radio Tuning in a radio station 1 Press FUNCTION to select "FM". 2 Press and hold PRESET +/- until the frequency indication in the display window starts changing, then release the button. Tuning stops automatically when a FM stereo broadcast is received (Automatic Scanning). "ST" lights up in the display window . Manual tuning Press PRESET +/- repeatedly to tune-in the desired station. Tip ˎˎIf reception of an FM stereo broadcast is noisy, press MENU and select "TUNE:MENU," "FM MODE" and "MONO" in turn, to select monaural reception. This reduces noise. Presetting radio stations You can preset your desired radio stations. 1 Tune in the desired station, then press MENU . 2 Press to select "TUNE:MENU," then press . 3 Press to select "MEMORY," then press . 4 Press to select "OK," then press . 5 Press to select the preset number, then press . Preset number "COMPLETE" appears in the display window and the radio station is registered with the preset number. Repeat the steps above to register further radio stations. 6 Press to turn off the power, then press / again to turn on the power. Tip ˎˎYou can preset up to 20 FM stations. ˎˎIf you select an already-registered preset number in step 5, the preset radio station is replaced by the currently tuned-in radio station. To tune in to a preset radio station Press PRESET +/- to select the preset number to which the desired station is registered. Listening to a file on a USB device Playing a file on a USB device You can play audio files stored on a USB device such as WALKMAN® or digital media player, on this system by connecting a USB device to the system. For details on compatible USB devices, see "Compatible devices and versions." 1 Press FUNCTION to select "USB." 2 Connect the USB device to the (USB) port on the rear of the unit. Connect the USB device directly, or via the USB cable supplied with the USB device, to the (USB) port . Wait until "READING" disappears. 3 Press . Starts playback. You can operate fast-rewind/fast-forward, selecting a track or file or selecting folder with the remote or the button of the unit. To change the play mode When playing the USB device, the play mode can be selected. Press MENU , then select "USB MENU." Select "PLAYMODE" or "REPEAT." For details, see "To change the play mode" of "Listening to a CD." When a file on a USB device is playing, programmed playback cannot be played. Tip ˎˎIf a USB device is connected to the unit, battery charging starts automatically. Even when the system is off, the USB device can be charged. ˎˎIf the USB device cannot be charged, disconnect and reconnect it. For details on the charging status of the USB device, see the operating manual of the USB device. Note ˎˎThe playback order for the system may differ from the playback order of the connected digital music player. ˎˎBe sure to turn off the system before removing the USB device. Removing the USB device while the system is turned on may corrupt the data on the USB device. ˎˎWhen USB cable connection is necessary, connect the USB cable supplied with the USB device to be connected. For details on connection, refer to the operation manual supplied with the USB device to be connected. ˎˎIt may take time before "READING" appears after connecting, depending on the type of USB device connected. ˎˎDo not connect the USB device through a USB hub. ˎˎWhen the USB device is connected, the system reads all the files on the USB device. If there are many folders or files on the USB device, it may take a long time to finish reading the USB device. ˎˎWith some connected USB devices, it may take a long time to transmit signals from the system or to finish reading the USB device. ˎˎCompatibility with all encoding/writing software cannot be guaranteed. If audio files on the USB device were originally encoded with incompatible software, those files may produce noise or, may malfunction. ˎˎThe maximum number of folders and files on the USB device compatible with this system is: 1,000* folders (including the root folder) 3,000 files 250 files in a single folder 8 folder levels (in the tree structure of files) * This includes folders that have no playable audio file and empty folders. The number of folders that the system can recognize may be less than actual number of folders, depending on the folder structure. ˎˎThe system does not necessarily support all the functions provided in a connected USB device. ˎˎFolders that have no audio files are not recognized. ˎˎThe audio formats that you can listen to with this system are as follows: MP3: file extension ".mp3" WMA*: file extension ".wma" AAC*: file extension ".m4a," "mp4" or ".3gp" Note that even when file name has the correct file extension, if the actual file differs, the system may produce noise or may malfunction. * Files with DRM (Digital Rights Management) copyright protection or files downloaded from an online music store cannot be played on this system. If you try to play one of these files, the system plays the next unprotected audio file. Listening to music with optional audio components Playing back the music of optional audio components You can play a track of optional audio components connected to the unit. Note ˎˎBeforehand, press the VOL - to turn down the volume. 1 Press FUNCTION to select "AUDIO IN." 2 Connect its audio connecting cord to the AUDIO IN jack on the rear of the unit and the output terminal of the optional external equipment. 3 Start playback of the connected component. Adjust the volume on the connected component during playback. 4 Press VOL +/ on the remote to adjust the volume. Note ˎˎThe system may enter Standby mode automatically if the volume level of the connected component is too low. For details, see "Setting the Automatic Standby function." Listening to music through a BLUETOOTH connection Pairing the system with a BLUETOOTH device and listening to music You can listen to music from BLUETOOTH device over a wireless connection. Before using the BLUETOOTH function, perform pairing to register your BLUETOOTH device. Note ˎˎPlace the BLUETOOTH device to be connected within one meter of the system. ˎˎIf your BLUETOOTH device is compliant with touch (NFC), skip the next procedure. See "Listening to music by onetouch action (NFC)." 1 Press FUNCTION to select "BT AUDIO." 2 Press MENU . 3 Press to select "BT MENU," then press . 4 Press to select "PAIRING," then press . 5 Press to select "OK" then press . When "PAIRING" starts flashing in the display window , the system changes to pairing mode. 6 Search for this system with the BLUETOOTH device. A list of the devices found may appear on the BLUETOOTH device display. 7 Select [SONY:CMT-X5CD] (this system). If prompted to enter a passkey on the BLUETOOTH device, enter "0000." If this system is not shown in the display of the device, proceed from step 1 again. When pairing is completed, the display changes to the connected BLUETOOTH device name from "PAIRING" and the BLUETOOTH indicator lights up. 8 Press . Starts playback. Depending on the BLUETOOTH device, press again. Also, you may have to start up a music player on the BLUETOOTH device. 9 Press VOL +/- to adjust the volume. If the volume cannot be changed on the system, adjust it on your BLUETOOTH device. Operation such as fast-rewind/fast-forward, selecting music and selecting a folder can be operated with the remote or buttons of the unit. Tip ˎˎYou can perform a pairing operation or attempt to make a BLUETOOTH connection with another BLUETOOTH device while the BLUETOOTH connection is established with one BLUETOOTH device. The currently established BLUETOOTH connection is canceled when BLUETOOTH connection with another device is successfully established. Note ˎˎThe operations described above may not be available for certain BLUETOOTH devices. In addition, the actual operations may differ depending on the connected BLUETOOTH device. ˎˎOnce a pairing operation is performed, it does not have to be performed again. In the following cases, however, a pairing operation must be performed again: Pairing information was erased when the BLUETOOTH device was repaired. You attempt to pair the system with more than 10 BLUETOOTH devices. This system can pair with up to 9 BLUETOOTH devices. If you pair another BLUETOOTH device after pairing with 9 devices was performed, pairing information of the device that was connected with the system first is overwritten with that of the new device. Pairing registration information of this system is erased from the connected device. If you initialize the system or erase the pairing history with the system, all the pairing information will be erased. ˎˎThe sound of this system cannot be sent to a BLUETOOTH speaker. ˎˎ"Passkey" may be called "Passcode," "PIN code," "PIN number" or "Password," etc. To check the address of a connected BLUETOOTH device Press DISPLAY , while the name set on the connected BLUETOOTH device is shown in the display window . The BLUETOOTH device address appears in two lines on the system display window for 8 seconds. To cancel the connection with a BLUETOOTH device Disconnect the BLUETOOTH connection on the BLUETOOTH device. "BT AUDIO" appears in the display window . To erase the pairing registration information 1 Select "DEL LINK" after step 3 on "Pairing the system with a BLUETOOTH device and listening to music," then press . 2 Press to select "OK," then press . "COMPLETE" appears in the display window and all the pairing information is erased. Note ˎˎIf you have erased the pairing information, you cannot make a BLUETOOTH connection unless pairing is performed again.
-
 1
1 -
 2
2
 |
 |
